What is a Skeleton?
If you are new to creating 3D products for IMVU then you will quickly come in contact with the idea of Skeletons. A Skeleton is made up of the various elements that are needed in any 3D product to tell IMVU how all of its many parts relate to each other and how the Avatar interacts with them. We call this relationship of parts a Skeleton because like the bones in your body they string together to make a cohesive whole, that although invisible to your customer, ensure they everything works together whether as a furniture item, a room, an avatar accessory, or parts of the Avatar itself. There is a learning curve to get accustomed to how these parts fit together, and why they need to be connected in a specific order, but understanding these rules will help make creating your 3D products more enjoyable. Also, this knowledge will help you troubleshoot your products if anything were to go wrong during the exporting or importing process.
Below we will describe the functions of a Skeleton in each of the product types, and show you how to link each part in its appropriate order. We will also include links to other tutorials that will support many of the concepts we will be discussing here.
Building a Skeleton Hierarchy
All Skeletons start with a Root Node. This is the foundation of any collection of parts, with all of these parts Linking to that main Root. In the case of an Avatar, the Root will be the main connection for all the Bones in an Avatar’s body, while the Root for a Furniture product will connect all the parts that tell an Avatar where they can sit, interact, and animate. The Root also connects how the lights and camera relates to a virtual 3D Room.
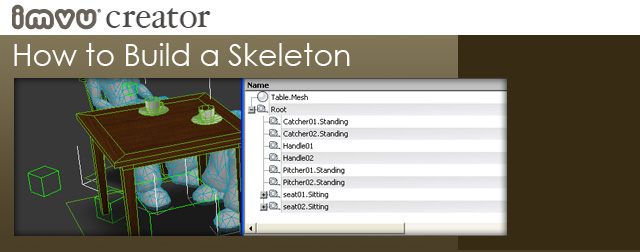
3D applications, like 3D Studio Max, represent Nodes as simple geometric boxes (invisible when exported) that can be placed and named to represent their specific function. Creating a Node and naming it Root is all it takes to create a Root Node, with the same being true of all other Nodes in your 3D product. Once in place these Nodes can be Linked together to create the Skeleton for your product. The only exception to Linking Nodes together is when you need a specific Mesh to connect to your Skeleton. When a Mesh is connected to a specific Node it uses a technique called Weighting, which is just another way of attaching parts to the larger Root. 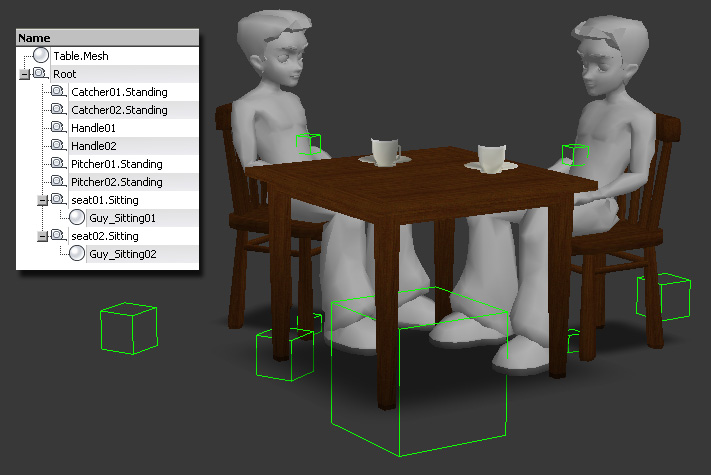 For example… here is a simple two avatar Cafe Table with all the necessary Nodes in place. Next to the model you can see the Root Hierarchy list. In that list you can see that Parented (shown indented) to the Root are a variety of other Nodes (represented by a measuring tape icons), while Skinned to the Root and Seat Nodes are Meshes representing the Table & Chairs as well as the two placeholder Avatars (represented by sphere icons). The act of Linking/Parenting one Node to another, as well as Skinning a Mesh to a Node creates the list automatically. While building your 3D product you will refer back to this list often to check that everything is connected properly in your product’s Skeleton.
Creating a Node
To create a Node in 3D Max, go to the Create Tab in the Modifiers menu, and select the Helpers icon (measuring tape icon). Under Object Type you will find a button labeled Dummy, select that. 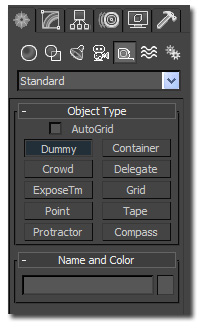
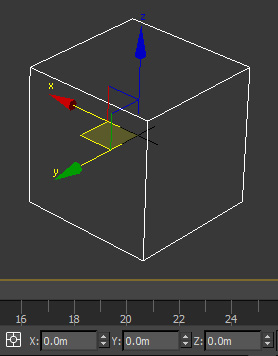
Then making sure you have selected the Node, change the X, Y, and Z coordinate to 0.0. This makes sure that your Node is placed at the absolute center of your display.The Root Node acts as the foundation for all the Nodes that will be added to it, so as a rule it is wise to make sure that it lives at the very bottom and center of your Skeleton product. The Root Node is also where the Furniture Tool icon will appear when you are editing and placing your products in a 3D environment, so it is good to have it live close to the ground.
Lastly, while the Dummy Node is selected you can change its name… in this case to the name Root. 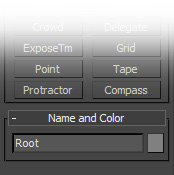
Linking to a Node
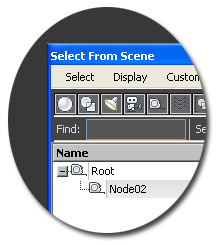
Next we are going to create another Node and Link it to the Root Node.
Going through the same steps as before, create a second Node, a little smaller then the first so that it is easy to tell the two apart. Next, name that Node “Node02”. With the Link Tool selected (chain icon), click on Node02 and while still holding down drag a “linking line” down to the Root node until the Linking icon appears, then let go. 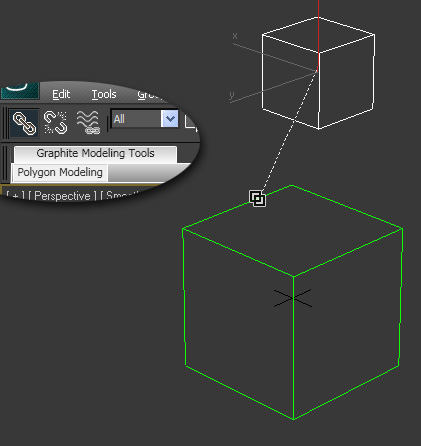
You Did It!
You have now learned the basics in building a Skeleton. All product Skeletons will use this very same technique, getting only a little more cumbersome depending on just how many Nodes you will need to Link to the Root Node (in the case of Rooms that could be hundreds of Nodes). The most important thing to remember is how these parts relate to each other. A simple rule to remember is:
- Nodes Link to Nodes
- Meshes are Weighted* to Nodes
Where to Go From Here
Each IMVU product category has its own unique Skeleton requirements, which luckily are described in other Tutorials. Below you will find a short introduction to each product type and get pointed to further information on how to arrange and Export these Skeletons to the IMVU Create Mode Editor.
 Super Furniture Product
 Nodes
Nodes
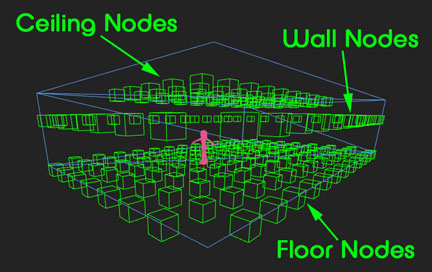
Room Nodes
Unique to Room products are Room Nodes, these tell IMVU here Furniture, wall pictures, and ceiling products can be placed in a Room.
See-Through Nodes
Another Node type you will only find when you are creating Room products are See-Through Nodes. These are Nodes that allow the geometry of just a part of your room to disappear when camera moves behind the Node. This is very useful when you want to avoid your 3D camera view being block by a wall or large architectural element.
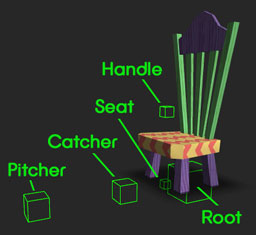
 Seat Node Naming Conventions
One other thing you will run into when creating Nodes for Rooms is the shear number of avatar seats you will be adding to your product. Unlike Furniture items, Rooms customarily have lots of places for Avatars to stand and sit, so lots of seat, catcher & pitcher, and handle nodes will be mixed in with those hundred plus Room Nodes.
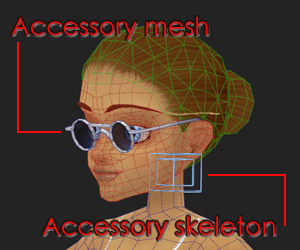
Accessories
Creating a Skeleton for an Accessory Product
Accessories are unique in that much of the Skeleton needed to build your product is already provided for you in the Avatar model. Your job will be to link your Mesh and Node(s) so they relate to the correct Attachment Node in the Avatar Skeleton.
Pets
Pets are considered another form of Avatar Accessory. Like Accessories, the Nodes needed to create a Pet that attaches to the Avatar, or merely stands near it are the same.
Avatar Products
Creating a Skeleton for an Avatar Product
In the case of creating an Avatar, if Furniture is a good introduction to Mesh building, then Avatar creation is rocket science. Still, it is important to say that although complex the Nodes, Bones, and Meshes that make up an Avatar follow all the rules we have discussed throughout this tutorial. 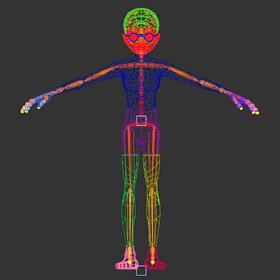
Avatar Bone Hierarchy
Luckily, there have been some brave souls that have trail blazed the frontiers of Avatar building and have risked their very lives to return with information on the necessary Hierarchy for the bones of an Avatar.
There is some good news in this complexity, and that is that there is no reason to reinvent an Avatar when your product can build on what has come before. Whether creating a unique Avatar Head, or a complete Avatar Body, working with the existing Bones and Hierarchy provided by IMVU will help insure that your Avatar with work with most Avatar products and animations in the Catalog.
Becoming familiar with all of these rules and principles will make you a better and more knowledgeable Creator of IMVU products. We wish you much success and encourage you to haunt the Education Center for more information about how to build all types of IMVU products. The more you know the more enjoyable the process of creation will be.