Skeletons & Bone Relationships

Skeletons & Bone Relationships

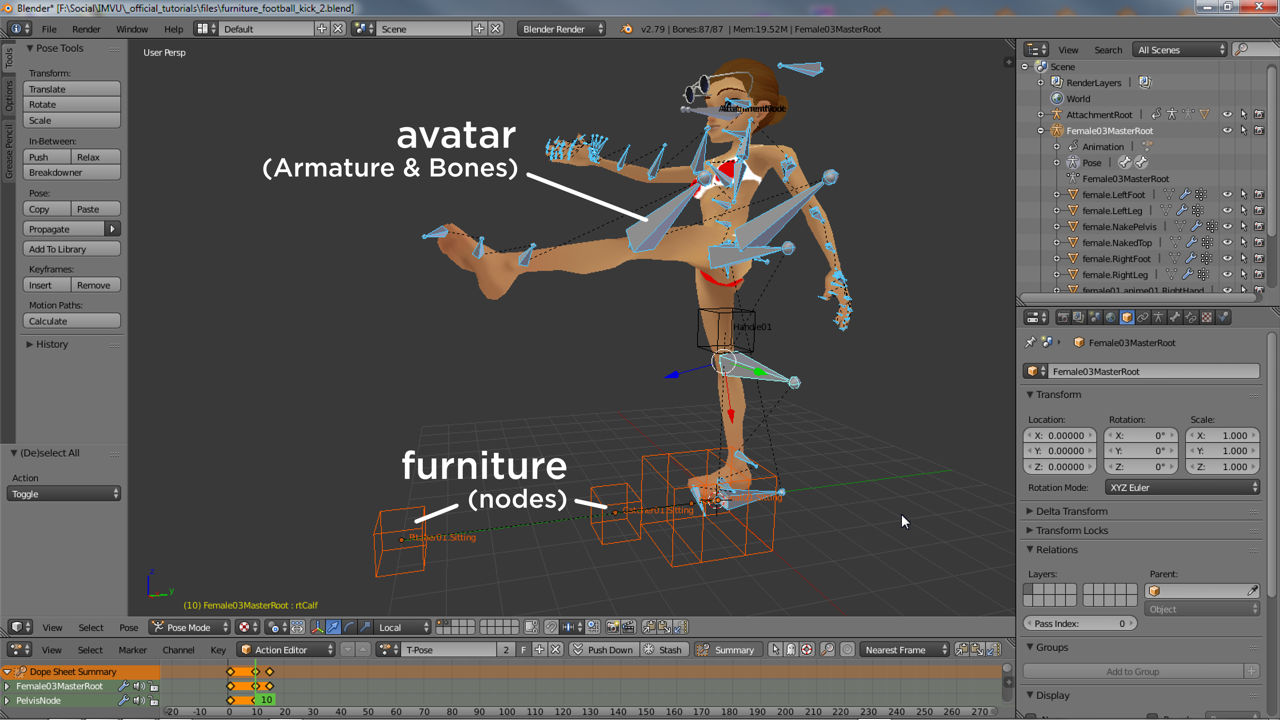
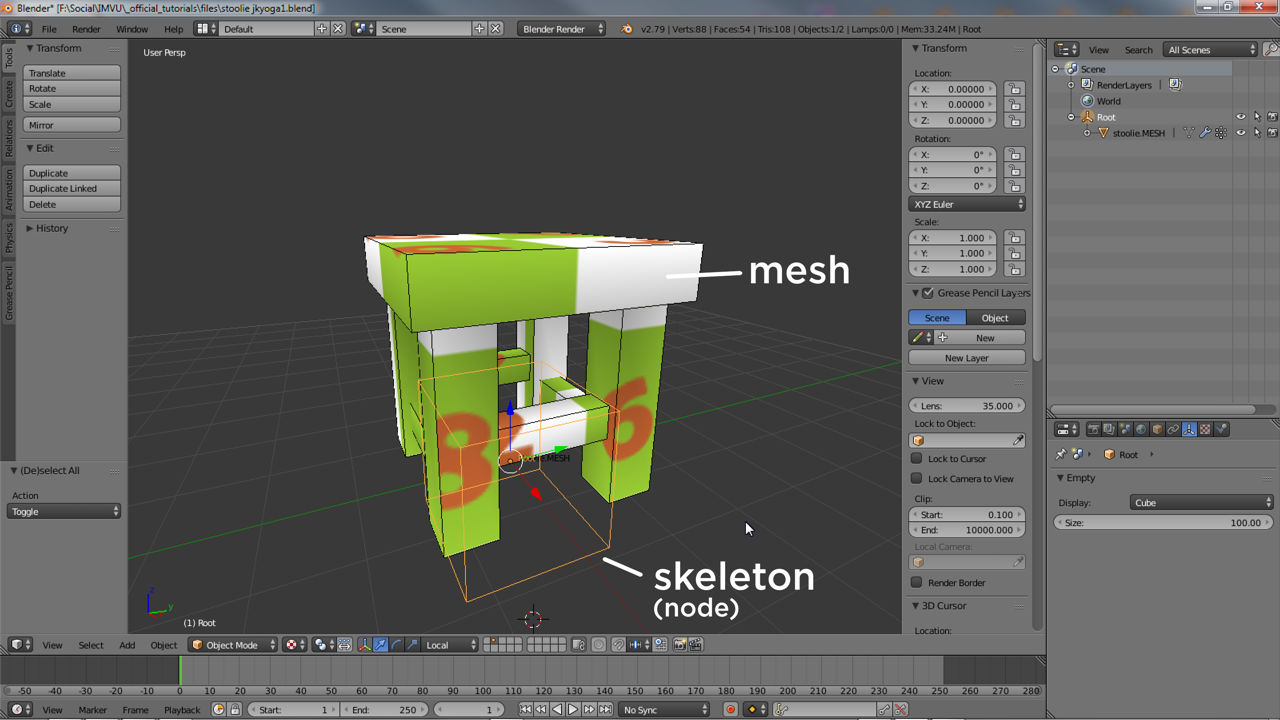
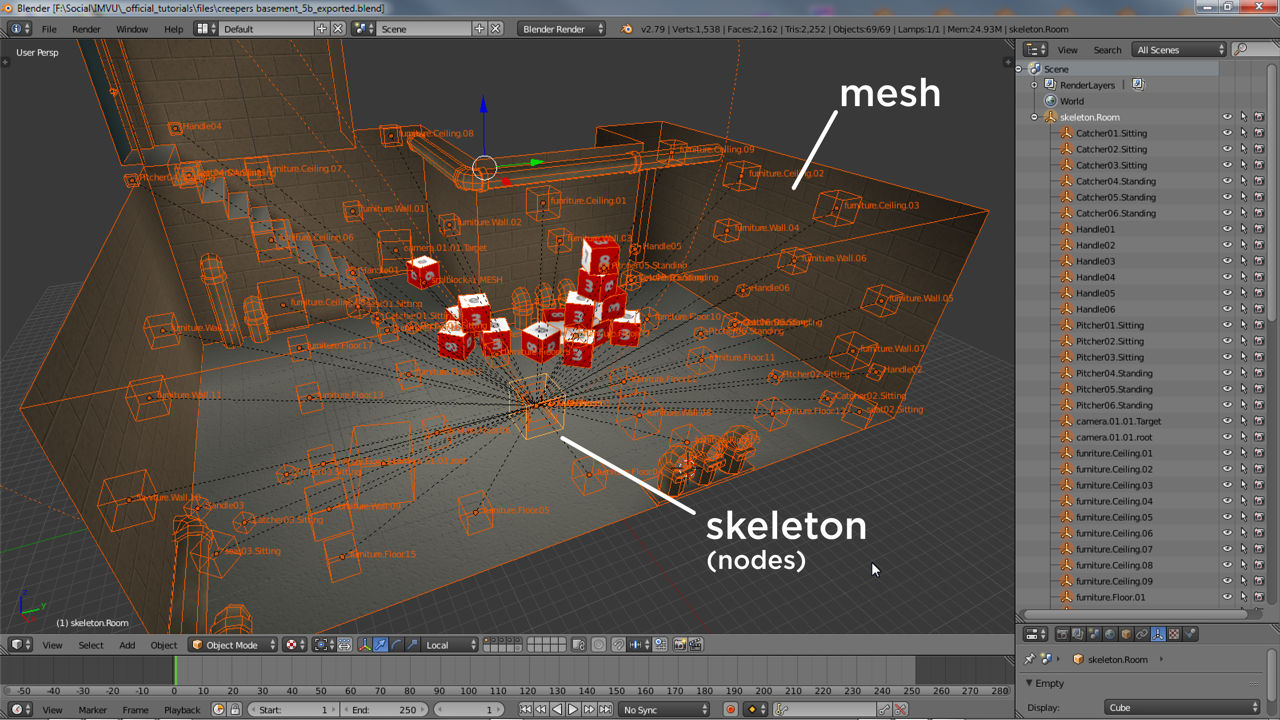
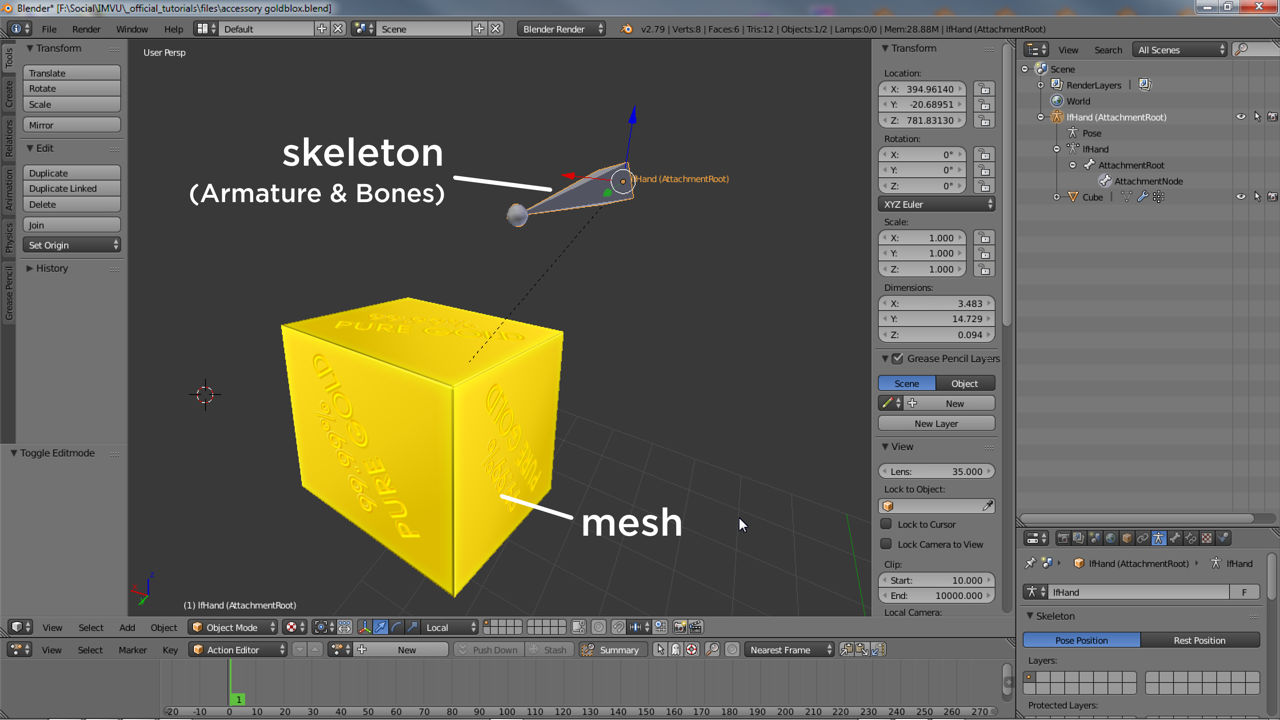
All 3D products in IMVU are comprised of two main parts, a visible mesh and an invisible skeleton. The visible bit, the mesh, is what Users see and interact with. The invisible, the skeleton, essentially controls what happens when items are used. In other words, a furniture items skeleton allows a couch to be placed on a furniture node, part of a rooms skeleton , or an ear-ring accessory being positioned at the avatars ear and not their wrist. Skeletons then are necessary for IMVU to function properly, ensuring items appear and behave as the should.

What Is A Skeleton

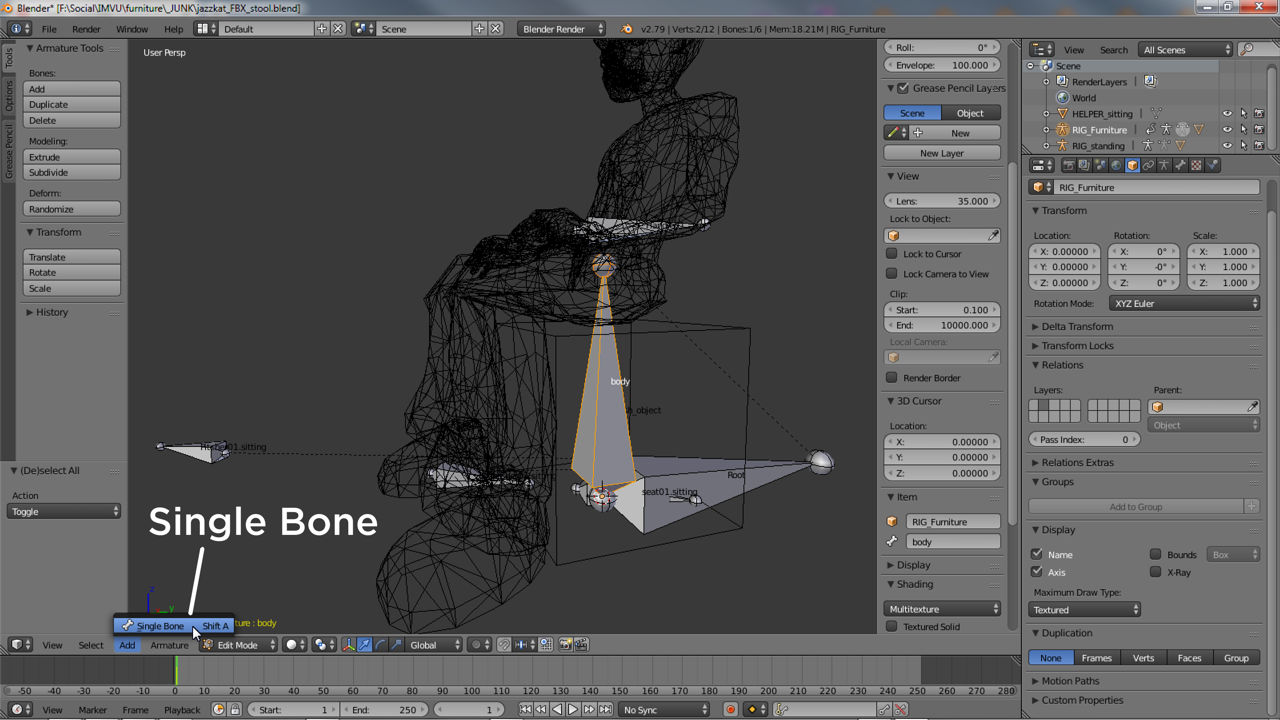
For IMVU skeletons are not objects or structures but relationships. So whilst there are actual skeletons, an Armature in Blender, a skeletal structure can be used that’s determined solely by the relationships between objects the skeleton might contain. The aforementioned Armature for example, is a type of skeletal object within which a sub-element, Bones, can be strung together to form what can be considered a traditional skeletal structure;

A skeleton can be an Armauter and bones, or nodes

In IMVU a skeleton is simply a hierarchical structure, a set of objects that have a relationship, which generally means they can be constructed from anything (within limits), in Blender and Armature and Bones, Nodes, or a combination of the two.

In contrast, the same skeletal structure, that is the hierarchy represented by the traditional skeleton, can be replicated using any type of object, Nodes as is the case of IMVU, that when linked together create something that approximates the structure of an Armature based skeleton.

It’s important to understand the above discusses structure, the relationships between elements, not behaviour, how those elements might articulate.

A typical node-based skeleton for a furniture item

All skeletons are based on the relationship between the elements, not specifically the elements themselves or the object they are made from – using node a skeleton can be made simply by linking nodes together.

Skeletal Structure

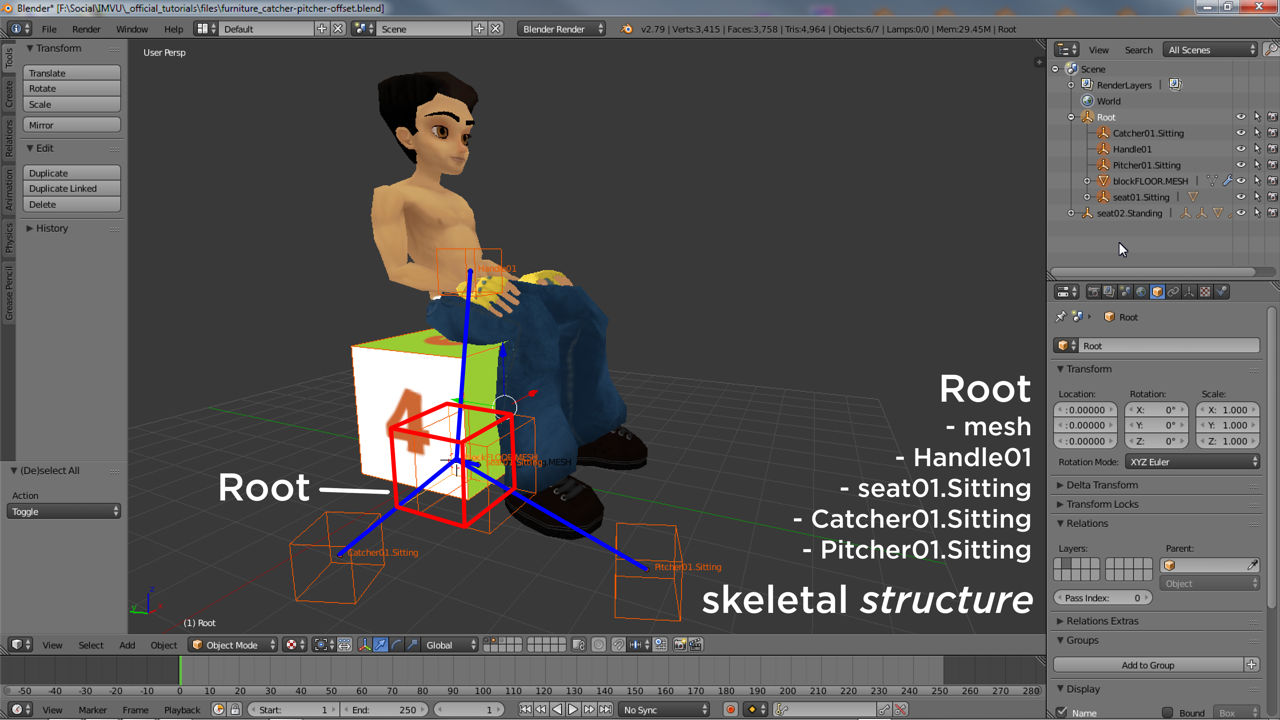
For most avatar-based products the skeleton is pre-built, bones cannot be added or removed without negatively affecting the appearance or behaviour of the avatar itself. For all other products and items skeletons can be constructed per the products intended purpose, which in turn determines the skeletons structure, the different types of bones or nodes that can be used (identified by name), how many can be used, their order, orientation, and the hierarchal structure that’s expected. For example, a simple furniture item might have the following skeleton;

Root
» seat[n].*
A very simple furniture item comprising a mehs and single node

The simplest item to make, a non-interactive furniture item, has a skeleton comprising a single node (to which the mesh is parented).

A room might have;

skeleton.Room
» node.Room
» » Omni01
» camera.*
» furniture.Floor.*
» furniture.Wall.*
» furniture.Ceiling.*
» seat[n].*
A more complex skeleton of nodes for a room

Rooms have skeletons constructed from nodes and although the hierarchical structure is simple, often nodes being linked directly to a master node (skeleton.Room), they can contain a lot of elements because each is a separate object in its own right in Blender.

An accessory (including pets);

AttachmentRoot
» AttachmentNode
An accessory skeleton is an Armature with two bones

Similar to furniture, accessories (and pets) typically have simple skeletons, the most basic being an Armature object, a self contained hierarchical object in Blender, with two bones.

Compared to the avatar;

zHead
Female03MasterRoot
 PelvisNode
  lfHip
   lfThigh
    lfCalf
     lfFoot
      lfToes
       xTipBone86
  rtHip
   rtThigh
    rtCalf
     rtFoot
      rtToes
       xTipBOne38
  Spine01
   Spine02
    Spine03
     Spine04
      Neck01
       Neck02
        Neck03
         Neck04
          Head
           xTipBone33
      lfClavicle
       lfShoulder
        lfBicep
         lfElbow
          lfWrist
           lfHand
            lfmetaCarpal03
             lfFingerMiddle01
              lfFingerMiddle02
               lfFingerMiddle03
                xTipBone87
            lfmetaCarpal01
             lfThumb01d
              lfThumb02
               lfThumb03
                xTipBone88
             lfmetaCarpal05
              lfFingerPinky01
               lfFingerPinky02
                lfFingerPinky03
                 xTiprtFingerne83
             lfmetaCarpal02
              lfFingerIndex01
               lfFingerIndex02
                lfFingerIndex03
                 xTipBone89
             lfmetaCarpal04
              lfFingerRing01
               lfFingerRing02
                lfFingerRing03
                 xTipBone90
      rtClavicle
       rtShoulder
        rtBicep
         rtElbow
          rtWrist
           rtHand
            rtmetaCarpal03
             rtFingerMiddle01
              rtFingerMiddle02
               rtFingerMiddle03
                xTipBone74
            rtmetaCarpal01
             rtThumb01d
              rtThumb02
               rtThumb03
                xTipBone66
            rtmetaCarpal05
             rtFingerPinky01
              rtFingerPinky02
               rtFingerPinky03
                xTiprtFingerne82
            rtmetaCarpal02
             rtFingerIndex01
              rtFingerIndex02
               rtFingerIndex03
                xTipBone70 
            rtmetaCarpal04
             rtFingerRing01
              rtFingerRing02
               rtFingerRing03
                xTipBone78
An avatar skeleton contains hundreds of bones all linked together

Avatars tend to have the most complex skeletons comprised as they are from an Armature object that contains all the necessary bones to allow for full articulation. Meshes are parented to the Armature and controlled using appropriately named vertex groups.To learn more about avatar skeletons click here.

Creating Skeletons

If a skeleton is represented by an Armature and Bones, additional elements need to be included accordingly, as Bones. Where Nodes have been used here too extra skeletal elements will need to match those already in use, i.e. more Nodes. In Blender creating new elements can be done by duplication, selecting an existing bone or node in Edit Mode and using Armature » Duplicate for bones or Object » Duplicate Object for nodes. In either case a new instance will appear than can be moved, renamed and re-parented based on requirements.

A number of starter files are available for Blender users that include skeletons;
– an avatar version is available for clothing and poses.
– for accessories and pets.
– also for rooms and furniture.


For clothing and poses skeletons should not be changed in terms of the number of bones they contain and/or their relationships to one another [link: clothing – avatar skeleton]. Accessory skeletons can be modified to a limited extent, perhaps to included extra bones to accommodate animation. Rooms and furniture items have the most customisable skeletons whilst also needing to have a number of core elements in place to function in IMVU (which are auto-inserted at run-time if missing).

Modifying a node based skeleton just means adding more nodes
Changing an Armature means being in Edit Mode and adding more Bones

When adding bones or nodes it’s better to duplicate and existing element (select a bone and duplicate from Armature » Duplicate or Armature » Extrude or select a node and click Object » Duplicate) to maintain their size and scale relative to the project – when adding bones or nodes Blender tends to revert to the applications default size and scaling of objects so they may appear extremely small in comparison to those needed for IMVU as provided in the Starter Files.

Updated on July 21, 2023

Was this article helpful?

Related Articles

Discuss this!
Ask questions and get answers in our Creator Discussions.
BROWSE DISCUSSIONS