Introduction
In IMVU, you can create Avatar Accessories. Accessories are products that can attach themselves to a bone in an avatar’s skeleton. This means that you have the power to make watches, halos, wings, PETS. Anything! The power is in your hands.
Just like Furniture products can be added to Room products, Accessories can be added to Avatars.
Building an Accessory from scratch is not easy. However, it can be much easier than building avatar clothing from scratch. This is because you need to know how to model and map in 3D as well as weight meshes. Should that deter you? No! Of course not. Thousands of people have built their own accessory products and so can you.
In addition, some things to note up front:
There is a run time Accessory limit per bone in IMVU. You may wear multiple Accessories at one time but may only wear three Accessories per attachment node at one time.
Also, while it is true that Accessories can move with the one bone in the avatar skeleton to which they are attached, Accessories can not be made to move with more than one bone in the avatar body.
Accessory Basics
An Accessory product is just like any other base 3D product in IMVU in that it contains its own skeleton, its own geometry, its own materials and its own textures.
Since Accessories contain their own skeleton, they can also contain their own animations. This comes in very handy when turning an accessory into….a pet!
Get the weighting files
The avatar weighting MAX filess that IMVU, inc. has created contain an example Accessory set up exactly the way it needs to be in order to be exported. So, the first thing you need to do is download the weighting MAX files.
For Position Only
You will NOT actually use or export any piece of the original base avatar mesh or embedded avatar skeleton.
You are building a separate Accessory product which means you are building a product that contains its own skeletons, meshes and materials. The reason you need the avatar mesh and embedded avatar skeleton is only for the placement/alignment of your Accessory product.
The Embedded Accessory Skeleton
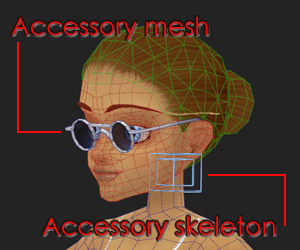
An Accessory skeleton can be very simple. The most simple Accessory skeleton must contain two bones/nodes. These bones/nodes can be called anything you like. One will be your master bone (or, the top of the hierarchy) and one will be the bone you actually weight the mesh to.
IMVU has called the master bone AttachmentRoot and called the second bone AttachmentNode. You will note that AttachmentRoot and AttachmentNode are both in the exact same location. You will also note that the AttachmentNode bone is parented to the AttachmentRoot bone. This is how these two bones should be set up regardless of how many other bones you may add in more complex products.
Skeleton Placement
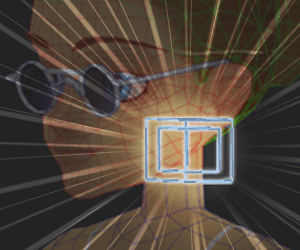
All you need do is align the AttachmentRoot bone to the avatar bone with which you want your attachment to move.
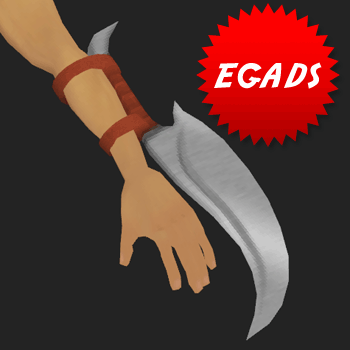
For example, if you want to build a bracelet, you would not align your AttachmentRoot bone/node to the avatar’s Head bone because then you would have a bracelet that moved when the head moved. Instead, you would align the AttachmentRoot to one of the wrist bones.
In the image example, the glasses accessory mesh found in the avatar weighting file has been scaled larger for legibility. The glasses mesh is weighted to the AccessoryNode bone.

The orientation of all of the bones in the avatar skeleton is not the same. This means that a pair of glasses moved to, say, the ltCalf bone will not point forward the way they do on the Head or rtWrist bones. This is why it is important to align your skeleton to the intended bone location *before* building your mesh. That way, you will guarantee that the mesh will actually show up in IMVU the way you see it in your 3D program.
Can I Make My Own Skeleton?
Of course you can. However, remember that you may always use the embedded AttachmentRoot/Node for your Accessory skeleton.
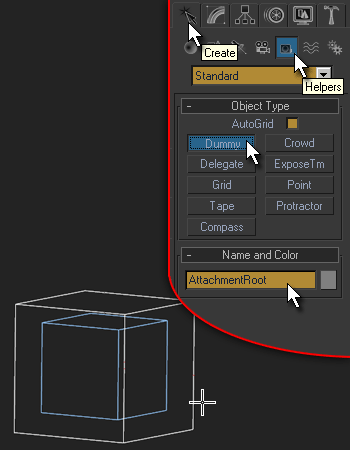
Building a skeleton for an Accessory product works just the same as building a skeleton for any other IMVU product. You need a root bone (AttachmentRoot) and a secondary bone (AttachmentNode) as your basis. So, with those two bones created, link the AttachmentNode bone to the AttachmentRoot bone using the link tool.
Now align AttachmentRoot to the avatar bone you wish your accessory to attach to. THEN, either align AttachmentNode to the same bone in the avatar skeleton OR align it to AttachmentRoot. Either way, AttachmentNode will end up in the same spot. Now you can weight the mesh to your heart’s content.
Or….if you have the need of more bones, you can add more bones as you see fit.
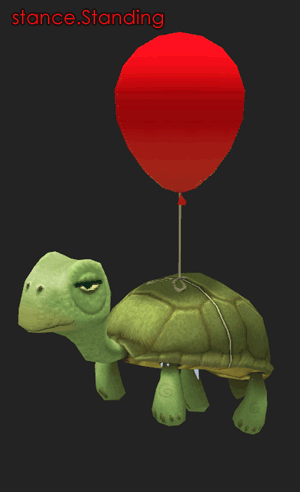
Pets
Since an Accessory can be attached to any bone in the avatar skeleton, that means it can be attached to the avatar root node. This bone is called Female03MasterRoot.
The benefit of attaching your Accessory to the avatar’s master root is that the Accessory will not move with the avatar’s idle animations. This has the wonderful side effect of allowing the Accessory to behave independantly of the avatar. In other words: you can make a Pet.
Making a Pet is harder to do than, say, a pair of glasses as the overall set up requires more planning and the execution time is longer. The skeleton and the weighting are just more complex on a pet than your average Accessory. That said, the basic set up is the same. A Pet Accessory needs a skeleton, a mesh, materials with textures and, if you like, animations.

However, your Pet Accessory product can be quite complex and utilize most of the behavioral animations IMVU has embedded in the avatars. For example, you can build Idle animations for stance.Standing and stance.Sitting or any other stance you would like to employ. You can also build triggered animations for any trigger that effects the avatar. LoL, cry, flip – your pet can do them all when your avatar does. This obviously makes the Pet a more important piece to any avatar’s outfit.
Build the mesh:
Accessory skeleton location
The first thing to realize about building an Accessory mesh is that the location of the Accessory skeleton master root matters *A LOT*. If you want your glasses to show up on the avatar’s head in IMVU, you need to have your Accessory skeleton master root bone aligned to the avatar’s head bone before you weight your glasses. So, to recap:
Build the Mesh:
Accessories for Avatar heads
If you are building an Accessory for an avatar head (glasses, earrings, unicorn horns, etc.), there are a few things to keep in mind.
The current IMVU head products are all built around the same basic head shape for Male or Female products. The only difference in all of the heads built by IMVU is only found in the shape of the face. Head size is dictated at run time in the IMVU messenger.
The cranium, the bridge of the nose and the position of the ears do not move position from head design to head design (built by IMVU). This allows each human head product IMVU has made to use all of the pre-existing Accessories without any glaring aesthetic bugs. However, this means that things like facial jewelry, beards, mustaches, fangs, etc. will not look right from head to head (because Accessory products do not animate when avatar facial animations are playing.)
Build the Mesh:
Z-fighting
The mesh for your Accessory can end up being very close to the mesh for the avatar asin the case of earrings, glasses and watches. However, if they are too close you may get Z fighting (or shimmering) in IMVU. It is worth testing in a Create Mode Editor. If you see Z fighting in an Editor, you will see it in IMVU.
To correct that shimmering effect, you ought to pull your Accessory goemetry away from the avatar mesh. I typically do this in edit geometry: vertex mode so that I only need to adjust the vertices that are actually causing the problem.
Build the Mesh:
Weight the Mesh
There are some tips specific to Accessories that could help you.
The first is that if you are building something that is meant to move with one bone only (Glasses, Earrings, etc.), weight all of your vertices to that bone in the ACCESSORY SKELETON. Remember, if you are weighting all of your verts to one bone, then you can use the Skin weighting modifier (which is much easier to use than the Physique weighting modifier.)
The second tip is that your Accessory mesh should never be weighted to any bones in the avatar skeleton. Your Accessory has its own skeleton (which you just created). If you weight your accessory to anything but the accessory skeleton, it will not work.
Map the mesh
Although an Accessory can use as many Materials as necessary, remember to keep your textures as small as possible.
Accessory Animations
Since Accessories contain their own skeletons, they can have animations. Even more, since they also contain meshes, they can also contain morph animations.
The second link has to do with animations. An accessory can utilize the same system that calls animations triggered by the IMVU avatar.
Avatar Animation System
An Accessory can “utilize the system that calls animations triggered by the IMVU avatar”?!! How does that work?
The IMVU avatar can play three classes of Actions:
- Idle Actions
- Stance Actions
- Triggered Actions
The first two are very close in definition but #1 has the addition of having a hard coded instruction for blinking.
A stance animation is dictated by a room or furniture seat node. For example, if a seat node is named seat01.FloatinInWater, then the IMVU code wants to play an animation called stance.FloatingInWater. If an Action with the same name exists in either the avatar product or within the Room or Furniture product, that animation will be applied to the avatar. The three main Idle/Stance Actions names are stance.Idle, stance.Standing and stance.Sitting. So, if your pet contains Actions with those names, the system will play those Actions whenever the avatar joins a Standing or Sitting seat. Even better, if the system can’t find, say, stance.FloatingInWater in your Accessory, it will try to default to stance.Idle or stance.Standing. In this way, your Accessory could always be playing an Idle animation. Cool.
A triggered action is an action that plays once (or loops infinitely until removed) and then goes away. When you type LOL in IMVU, you ‘trigger’ the LOL animation to play on your avatar. This means that your Accessory could have an animation that is triggered by the word ‘LOL’. This means that if you type LOL in a chat in IMVU, both the avatar animation and the Accessory animation will be triggered.
Budgets
Download and runtime file size is an issue that should be kept in mind whenever designing for IMVU. If your Accessory’s file size is too big, it is unlikely that your potential customer will purchase and download it and, if they do, there is a very high chance that they will review your product poorly and your sales will go down.
Therefore, it is good practice to try to keep the texture size, vertex/face count of your meshes and animation length down to the bare minimum.
Also, please know that IMVU automatically resizes assets that are too large or teched incorrectly. To learn more, please go to the Mapping Materials Tutorial.
Export Time
Now you must export all of the assets in the Accessory.
- Export the skeleton .XSF file. To learn more, please go to the Export the Skeleton – .xsf Tutorial.
- Then, export the mesh .xmf file. To learn more, check out the Export the Mesh – .xmf Tutorial.) Then, when prompted for the skeleton, browse to the .xsf skeleton file you just exported in step 1.
- Once you have the skeleton .xsf exported, you can export any animation .xaf files you may need. To learn more, please go to the Export Animations – .xaf Tutorial.
- You may export your material .xrf files any time you like. To learn more, please go to the Export Materials Tutorial.
On to Create Mode
With your Accessory assets built and exported, its time to put them all together in a Create Mode Editor.
There are some special parts of Create Mode, though, that are specific to Accessory products. Read on, oh Accessory maker…
Create Mode Editor: Derive
If you want to create a new accessory product, you must first derive from an existing accessory. To do this, open IMVU to Create Mode and click the Derive a new product button to open the derive dialog. NOTE: You can also type ctrl+d to open the derive dialog.
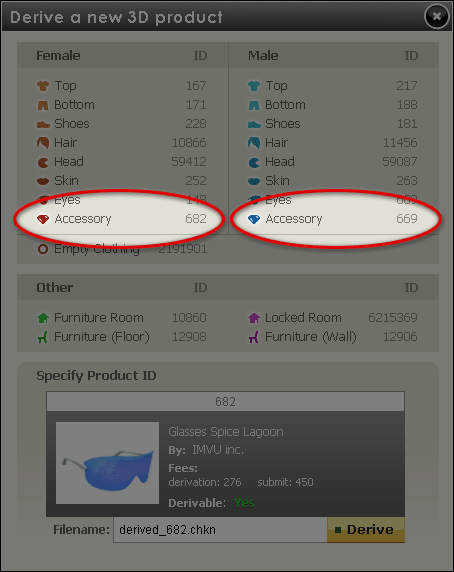
The derive dialog allows you to either type in the product ID you want or click on a beginning product ID. If a Creator has marked her accessory product as derivable, you can derive from it. If you don’t know which accessory product ID to derive from, please just choose a beginner accessory product. The beginner accessories are:
Female: product 682
Male: product 669
Create Mode Editor: Config tab
When the Editor Opens, click on the Config tab. The Config tab displays different panels depending on what type of product you are editing. In the case of Accessories, the only panel available is the Skeleton Variables panel. In this panel, you will see three main areas.
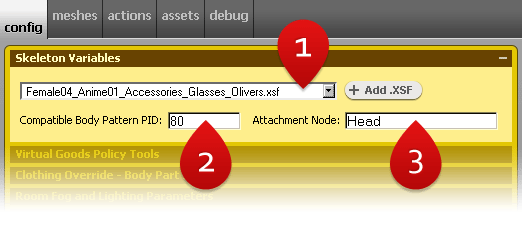
1. The skeleton drop down
The skeleton drop down is where you can see the currently loaded Skeleton. In the case of a derivation, the project you’re working on defaults to use the skeleton of its parent product. You can replace which skeleton your project uses by clicking the ‘Add .XSF’ button.
2. Compatible Body Pattern Product ID
Add the avatar product number that you wish your Accessory to work with and then apply changes. The IMVU Body Pattern Products are named as follows:
Female: product 80
Male: product 191
3. Attachment Node
The Attachment Node is the name of a bone in the avatar Skeleton. You can change where your accessory shows up just by changing the name in this field. NOTE: If the bone name is not present in the avatar skeleton, the accessory will not appear on screen…because it won’t know what to attach to. For example, in the case of Glasses, type in “Head” or, in the case of a pet, type in “Female04MasterRoot”.
More on Attachment Node