Introduction
One application you can use with IMVU to build 3D assets is called 3D Studio MAX. MAX is a great tool not only for building 3D meshes and skeletons but also for animation. This tutorial is going to run through the basics of animating in MAX and its information applies to both skeletal and morph animations.
FPS
Animation = change over time. This implies that you, as an animator, can control what happens to an object over a given number of frames. 3D animation is usually measured in frames per second. Most 3D games and softwar run at 30 frames per second (or 30 fps). IMVU tries to run at 30 fps also. This means that for every second that goes by in real time, 30 frames of IMVU are drawn on your screen.
Change Timeline
When you first open MAX, you will notice that the number of frames shown in your animation slider bar may not be 120. To change the number of frames, click on the ‘Time Configuration’ button in the lower right.
Time Configuration
TThis will open the ‘Time and Configuration’ dialog box. To change the time to 120 frames, type ‘120’ into the End Frame text field and then click OK.
You will see that the number of frames listed in your animation slidar bar has changed to ‘120’.
 Enter Animate Mode
At the bottom of the screen, toward the right, there is a button called ‘AutoKey‘. The AutoKey button allows you to enter and exit animate mode in MAX. While the AutoKey button is selected, both it and the frame around your active viewport will turn red. So, when you see red, that means you’re in animate mode.
When you’re in animate mode, you can adjust objects over time and those adjustments will be recorded within MAX.
Move an Object Over Time
Once in Animation mode, move the animation slider to 30 frames. Now, select the object in the scene you want to animate and move it to a new location. What you have just done is create a ‘key frame‘. When you adjust the object in any way at any point in the timeline other than zero, a new key frame will be created. You will also notice that when you made that first key frame, another key frame was automatically added to frame zero of your timeline. This will come in handy if you want to loop your animation. More on that in a bit.
Now, Make new keyframes at 60 and 90 frames – moving the object to new locations at each key frame.

Looping
When your animation begins and ends with the exact same adjustments, then that animation may be ‘looped’. This means that you can play the animation over and over and it will look like one continuous motion. If your animation begins at one place and ends at another, then it will pop when played over and over.
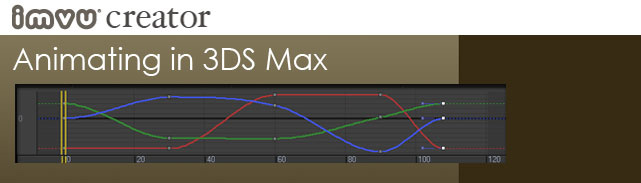
Curve Editor
Using the Curve Editor is optional. The Curve Editor is a really handy tool for when you want to adjust how long on object waits between keyframes. To open the Curve editor, Just click on the ‘Curve Editor’ button at the top right of MAX.
This will launch a new dialog window that should show all kinds of colored lines with dots on them. These are the XYZ curves of both the position and rotation of your object’s animation.
You can adjust the details of your animation using the tools provided in the Curve Editor. You can also make changes to individual channels of a key frame by moving the dots along the lines. This is one of MAX’s most powerful features as it lets you build an animation in keyframes and then adjust just when individual objects begin and end their animations. Also, you can use the Curve Editor whether you are in Animation mode or not.
Curve Editor Filters
If no colored lines appear in your Curve Editor, then you need to change the settings. To change the settings, you must click the ‘Filters’ button on the upper left of the Curve Editor.
This will launch the Filters window. We typically use the settings provided in the image below.
Filters
If no colored lines appear in your Curve Editor, then you need to change the settings. To change the settings, you must click the ‘Filters’ button on the upper left of the Curve Editor.
This will launch the Filters window.
Exit Animate Mode
When you are finished creating your animation, make sure to Click the Auto Key button again and get out of Animation mode.
One of the tricks of animating using MAX is remembering when you are in Animation mode. However, with some practice, you’ll get the hang of it.
Play Animation
Once you are out of animation mode, click the play button on the bottom right side of the screen. You will see that your object interpolates from spot to spot in a fluid motion. Press play on the example image below to see how simple interpolation looks.
Make Adjustments
Remember, you can iterate on your animation as much as you like to get it perfect. Have fun!