We get a lot of messages from developers who wish to branch out beyond 2D texture swapping and move into creating their own 3D models. Most of this correspondence centers around the frustration felt when first opening a 3D application and facing the daunting learning curve that is necessary to make the jump from 2D to 3D. Although it would be impossible to give you a full lesson in 3D modeling, I can attempt to demystify some of the basic principles involved and maybe dispel some of that initial fear.
An Introduction to 3D Modeling – Don’t Panic!
Okay, before we start I would like to get out into the open a dirty little secret about 3D modeling. It is my opinion that although 3D applications, like 3D Max and Maya are powerful tools, they have made no real attempt to make their applications intuitive or easy to use. These are complex tools that have been built on simpler, earlier incarnations and their evolution has added depth to appeal to a wide range of power users, from the gaming to the entertainment industries. These applications can do amazing things and even veteran users of these programs find themselves discovering new depths and shortcuts to getting their work done.
If you have experience using Photoshop you know what it is like to have used the program for years and be introduced to a new trick that would have probably saved you weeks of your life if you had just known it years ago. Although I know that the designers of these programs are doing their best to create these deep applications, I have to wonder if they actually use them on a daily basis.
As an example, to import a Bitmap image into 3D Max to use as a texture to apply to a mesh, I have to click a button that has no label or icon on it. The only conclusion I can come to is that whoever decided to design a button with no label on it (to do something as important as importing a texture) must secretly hate me.
Still, in their defense, all good things take work to understand, and one of the realities of modeling in 3D is that you have to learn the obscure language used by the software engineers responsible for creating these applications.
Viewports – The Windows into the 3D World
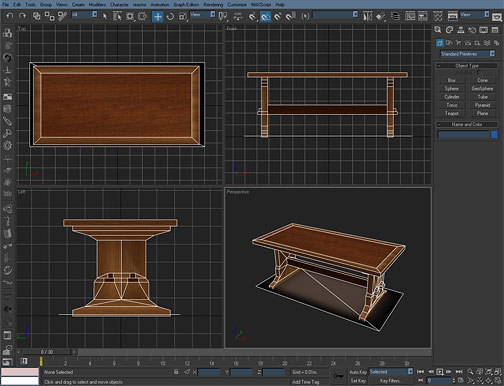
The Basics: Most 3D software gives you the default option of viewing your models from various viewpoints at the same time. In the case of 3D Studio Max, this means you will see the front, top, left, and perspective views of your modeling environment as soon as you open the application. In Max, these are called “Viewports”. 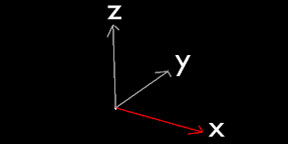 Axis In the 2D world of programs like Photoshop, we are dealing with the two dimensions of Up and Down (Z), and Side-to-Side (X)… but in 3D we have a third dimension to work with, the “Y” axis, Back-to-Front. This is frequently represented by a graphic like the one depicted here, indicating each of these directions, depending on the view you are currently working within.
“The Gizmo” To make the act of manipulating your mesh in this 3D space easier, both Max and Maya give you a device to help you grab your object and move it along any of these three axis’. In Max this is called a “Gizmo” (please don’t ask my why that call it that). This consists of three over sized “Handles” that always point along the three axis’… x, y & z. 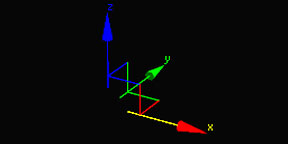
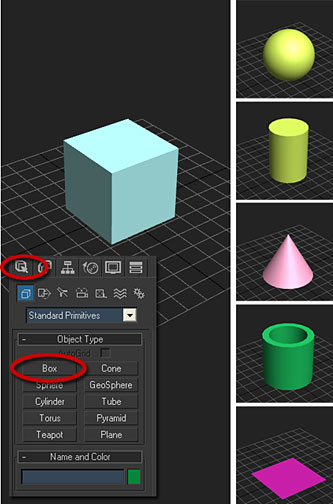 “The Create Tab” All new projects begin somewhere, and in the case of 3D applications like 3DS Max you start at the Create Tab. A sub Tab under the Create Tab is the Geometry Tab, which allows you to access primitive shapes that will become the foundation of your new model. These are the initial building blocks that you can distort, extrude, bend, and manipulate into whatever object you desire. Here you will be able to create a Box, Sphere, Cylinder, Cone, Tube, and Plane.
You can also create a variety of more complex shapes like a Torus, GeoSphere, Pyramid, and the Max signature… Teapot. As you create your initial shape, you will be able to adjust the Parameters of the shape. In the example below, the Box has been set to include multiple segments at its Length, Width, and Height. This adds complexity to your basic shape, but it also gives you more Verts to work with as you continue. The Parameters window is especially useful when determining the number of sides to a Cylinder, the amount of facets on a Sphere, and the number of sections in something like a vertical post. Be sure to play with these settings to see what you can come up with. 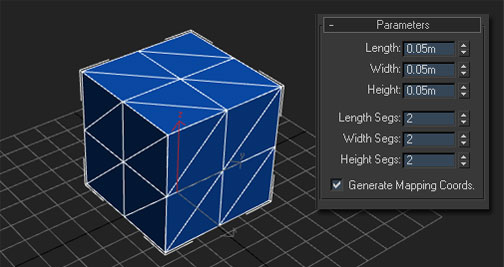
Vertex Versus Polygon
While there are many elements to the creation of a 3D mesh, for your work in IMVU you will work mostly with both vertices and polygons. You can think of your mesh like a wire cage. At each point where one “wire” interacts with another wire is a dot/handle that can be manipulated, this is called a Vertex.
The surface we customarily think of as the skin of our mesh is called a Polygon. Technically, when we are working with a mesh, the vertex points dictate the location, relationship, and properties of that surface, so when you move a vertex point, you move one edge of a poly.
Polygons are three sided and when limited in number they can make your model look faceted. Typically, the fewer polys in your model the more angular your model will appear, so, more ploys mean a smoother surface. This is why hardware developers are constantly pushing the power of their technology to render as many polygons as possible.
More polys = More Realistic.
 Modifiers
Modifiers are tools you can use to help you manipulate the verts and polys in your model. Like the Filters in Photoshop, Modifiers are applied to your model, and are too numerous and varied to fully list here, but it is highly recommended that you play and experiment.
You never know when you might get just the effect you are looking for by simply manipulating your mesh with an applied modifier. Modifiers include such tools as Taper, Squeeze, Lathe, Mesh Smooth, and many, many more, including Material Mapping tools, which we will talk about later.
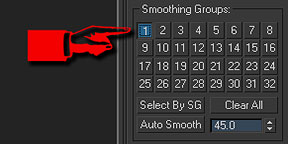
Smoothing Groups
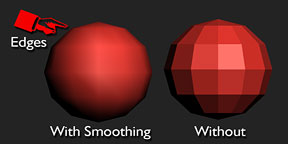
One handy tool that many 3D applications include is the ability to add a “Smoothing Group” to an object. This is usually applied to a model’s surface and gives the illusion that the surface is smoother then it actually is. This is handy when building low poly objects, since it can give the effect that there is more surface detail then there actually is.
In the case of IMVU, there can only be one smoothing group number applied to any one model. Smoothing applied to a faceted surface can be very effective, but because it does not actually smooth the geometry itself, your model will still retain a faceted edge.
 Materials
Putting Textures on the Surface of Your Mesh
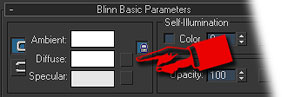
Once you have created your mesh, you are ready to apply textures to its surface. 3D Max calls these textures “Materials“, which suggests not merely textures, but a texture and all its additionally applied attributes. One way to think of applying materials to a model is to imagine you are applying wallpaper, or contact paper, to the surface of your mesh.
Materials are Bitmap or JPG images that are created in a 2D program then imported into your 3D application. Depending on the depth of detail in that 2D image, you can make up for a lot of limits in your mesh with a more complex, or higher resolution material applied to it. Materials can also contain additional information, such as alpha, bump or even reflective and illumination maps that give your texture even more detail and surface characteristics. At the moment IMVU only supports alpha maps, which we will discuss further in an upcoming section.
 Mapping Your Mesh The act of applying a material to a model is called Mapping. There are a variety of ways to Map a material to your model’s surface, and a wide array of additional tools to help you manipulate it once it is there. There are some mapping tools you will use more often then others. The short list includes:
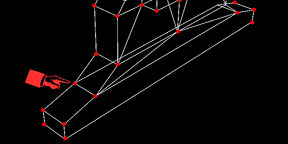
 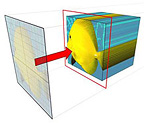 Planar Projects the map from a single plane flat against the object, somewhat like projecting a slide. Planar projection is useful when only one side of an object needs to be mapped. It is also useful for obliquely mapping multiple sides, and for mapping two sides of a symmetrical object.
 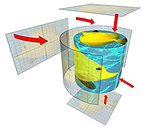 Cylindrical Projects the map from a cylinder, wrapping it around an object. Seams where the edges of the bitmap meet are visible unless a seamless map is used. Cylindrical projection is useful for objects that are roughly cylindrical in shape.
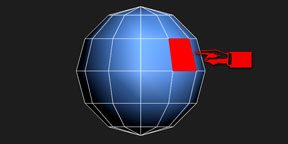
 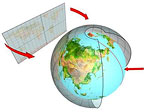 Spherical Surrounds the object by projecting the map from a sphere. You see a seam and mapping singularities at the top and bottom of the sphere where the bitmap edges meet at the sphere’s poles. Spherical mapping is useful for objects that are roughly spherical in shape.
 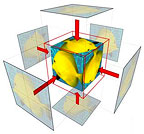 Box Projects the map from the six sides of a box. Each side projects as a planar map, and the effect on the surface depends on the surface normal. Each face is mapped from the closest box surface whose normal most closely parallels its own normal.
UVW Map & Unwrap UVW Modifiers For your work creating materials for your IMVU products in 3D Max, you will most likely be using two modifiers to help you apply textures to your meshes. These include UVW Map, and Unwrap UVW. UVW Map is the tool that allows you to decided which method you would like to use to apply materials to your mesh (see above list). 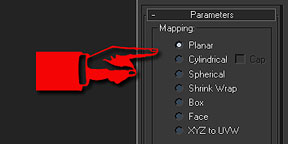
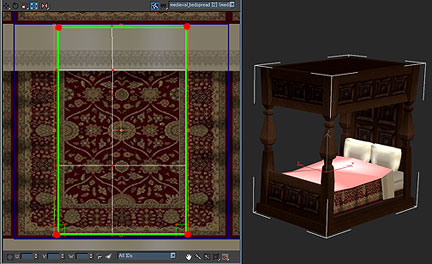 Unwrap UVW allows you to fine tune how your material is applied to any one, or group of polys within your mesh.
Multi-Sub Materials
Just when your brain was experiencing the dull ache of comprehension, we have one more abstract concept to throw at you, and that is Multi-Sub Materials. IMVU insists that if you are planning on applying multiple textures to a single Mesh, that you only apply them as a Multi-Sub Material. Simply put, a Multi-Sub Material is a single material that is made up of a collection of textures and their attributes. Each mesh you create can have many textures, but only one Sub-Material attributed to it. 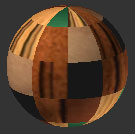
 To create a Sub-Material in Max, select a material preview sphere in the Materials Editor Window, then click the Standard button to change the material type. In the pop-up window choose Sub-Material.
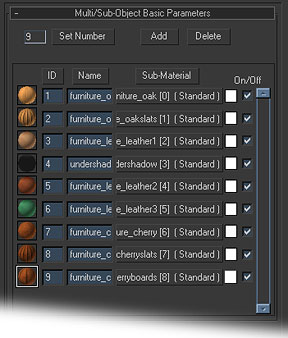
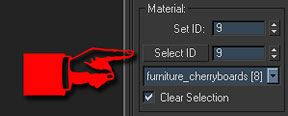
You should see your materials window transform into something like this: Now you can start adding textures to your Sub-Materials list by clicking on the Add button. Each new material will appear in your list, and will be given a unique Material ID Number. This ID number will be used later, under the UV Map Modifier, to help you apply that specific Sub-Material to your mesh.
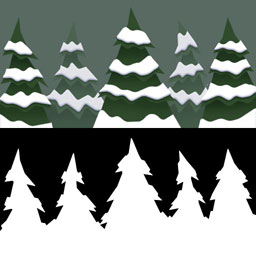
Alpha Maps
Another technique you have in your IMVU bag of tricks is the use of Alpha Maps, or Opacity Maps. These are additional black & white bitmaps that you apply to a texture to create a “cutout” effect. Opacity maps can also be used to create translucent materials. An Alpha or Opacity Map works like a frame, solid White becomes opaque, Black is transparent, and shades of Gray are various levels of translucency. 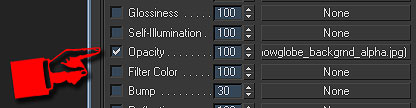
Skinning and Weighting Your Mesh
Although first-time meshers won’t necessarily run into the concept of “Skinning” or Weighting your models, it is one of the necessary steps to getting your completed mesh into the Create Mode Editor , and eventually into the catalog.
Thinking of your Mesh as an Avatar
In the creation of IMVU, its designers chose to apply the metaphors used in the building of avatars to the building of just about everything else. So… the surface of your mesh, whether it is an avatar asset, a room, or an article of clothing, is referred to as a “Skin” and many of the nodes as “Bones”.
The process of skinning a mesh is done once your model is completed, textured and ready to be exported to the Create Mode Editor. Any additional changes you make to your mesh will necessitate it to be re-Skinned and re-Exported for everything to work properly.  The exact steps for Skinning your mesh are covered in the Weighting a Mesh Tutorial, but in a nutshell, Skins are applied to a mesh as a Modifier, with several quick steps that will apply weighting information to that mesh, making it ready to be exported.
For static models weighting is a necessary step but does not greatly influence your models. Once you get into creating animated avatars (pretty advanced stuff) you will lean more heavily on how your meshes are weighted. Either way, it is all good stuff to know as you become more familiar with your 3D tool set.
Now Get Out There And Start Building Cool Stuff!
This may all seem like a head spinning jumble of things to figure out, and you would be right. With anything worth knowing you have to expect a little bit of a learning curve, but there is no reason you can’t start today with something small and work your way up to more complex models later. Anyone who has taken the leap to 3D would tell you that it really takes a year of use before you feel comfortable with using 3D tools, but the effort is worth it.
It has been our hope at IMVU that the tools we use to create our virtual products are the standard tools the computer game and film industry use every day. The knowledge you learn here will be applicable to any 3D project you might attempt in the future, in any situation. So, take the leap, and whether you are learning in 3D Max, Maya, or some other 3D application, you can feel more confident that you can build anything you can imagine, and share your creation with the world!