Introduction
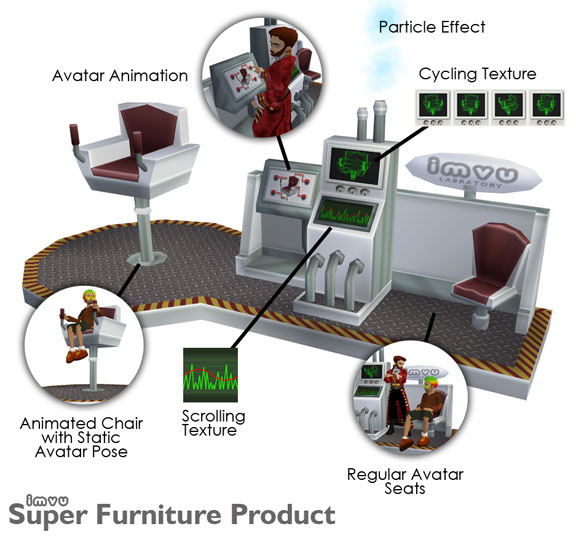
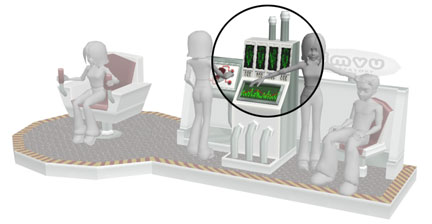
When I want to learn how something works I like to just take the dang thing apart and see how it ticks! This is the very reason we created the Super Furniture Product. Although fairly useless as Furniture items go, it does include one of every potential settings and effect you might want to use in your own Furniture product creation.
In this tutorial we will break down each of the features used and point you to other tutorials that will help you better understand how to do this yourself. It is worth noting that this only scratches the surface of what is possible and we look forward to you surprising us with your own unique combinations of these effects and techniques.
Nodes
Standing & Seated Nodes Starting from the far right and working ourselves to the left, we have included the standard Standing & Sitting avatar seat locations. These are as basic as it get, but worth mentioning. The standard Seat Nodes include an appropriately named Root node, a Catcher & Pitcher node, and in the case of the Seated avatar, a Handle node.
 All avatar animations that are displayed in these locations are the default seat and standing Idle Animations built into the IMVU Client. To create your own poses and animations you will need to do a little more work… which we will cover below.
Animated Textures
There are a lot of ways to create movement in your Furniture and Room models without necessarily having to build it into the geometry. These include both Scrolling and Cycling Texture Animations. Both are achieved through settings in the Create Mode Editor and need a little preparation in the textures that you use. 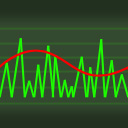 Scrolling Texture The lower meter effect is created using a single texture that “scrolls” from right to left. To achieve this I built a texture that could Tile horizontally. This means that as the texture scrolls you are unable to see a seam that would otherwise give away the effect of moving from one image to the next.
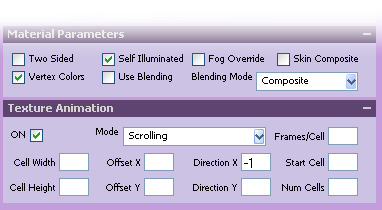
In the Create Mode Editor. I used the below settings to create the animated effect: Note that the Texture Animations Parameters is checked ON, the Mode is set to Scrolling, and the Direction is along the X Axis at “-1” (speed)
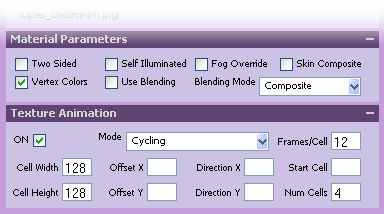
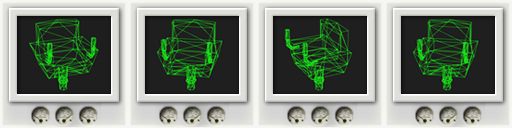 Cycling Animation For the monitor that includes thewire frame rotating chair, I used a simple Cycling Texture Animation consisting of for frames. All four frames live on the same texture and are applied to the Mesh so that all of the frames are visible.
Once in the Create Mode Editor you can set each part of the texture to be displayed separately, over an adjustable length of time. In the Create Mode Editor I used the below settings to create this animated effect:
Particle Effect
ALPHA
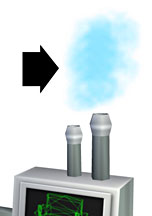
Another effect that can be added to a Furniture Product is Particle Effects. These can be as simple as a puff of smoke, or splash from a fountain, or engulf your entire product in flames. Particle Effects are still an ALPHA feature and will be going through an evolution of enhancements over time, but you can start playing with them now in the latest version of the Create Mode Editor.
The settings for this particular effect include a Source Rule and a KillOld Rule. The main Particles TAB allows you to influence the Gravity effect, load a .PNG texture file, and choose which Rules will influence how your particles will behave. 
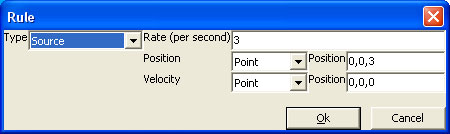 The Source Rule determines how many particles appear per second and how they are created. The KillOld Rule determines the life of a particle on screen. The smaller the number the shorter the life of the particle.
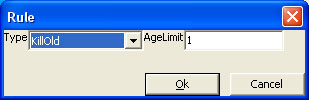
 Animated Avatar
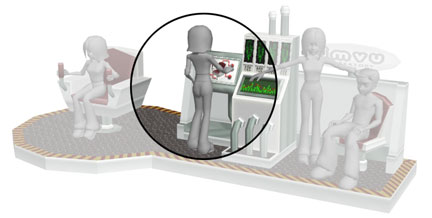
For the control panel, I did a simple avatar animation or “action”. Like the Seat Nodes, I created a unique avatar seat that loads an avatar action I created using the Rigged Avatar. The Rigged Avatar file allows you to load up all the tools you need to pose or animate your avatar. In the case of the avatar pressing buttons on my control panel, I have only animated those bones that control the arms, shoulders, and hips.
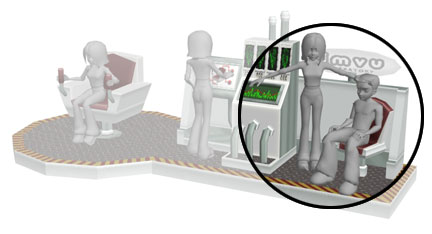
The rest of the avatar, including the hands, are in a static pose position that is all I need to create the action I want. The head is free to look around, and when another avatar sits in the animated chair the two avatars appear to be looking at each other as they go through their motions. ![]()
Avatar Statue For the animated chair I wanted an avatar pose that was different than what is offered with the standard Seat Nodes. To do this I created a static pose and an Avatar Statue to help me correctly place my new pose within my Mesh while I built it.
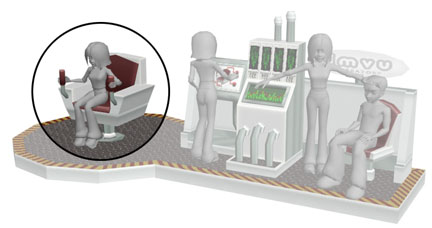
 To achieve this, I applied the same technique used to create my animated avatar at the control panel, but I did not include movement. I did however still need to export a animation file (.xaf) to tell the avatar to assume the pose when seated in my chair.

I left the head free to look around to add a sense of connectedness to the environment and periodic eye contact with the avatar at the controls, or anywhere nearby for that matter.
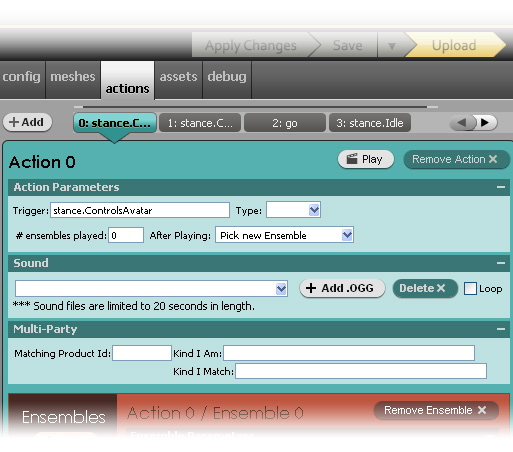
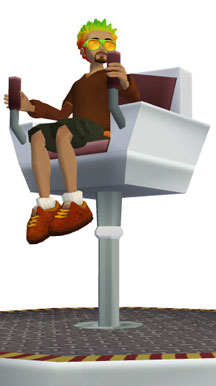
Chat Triggered Animated Chair
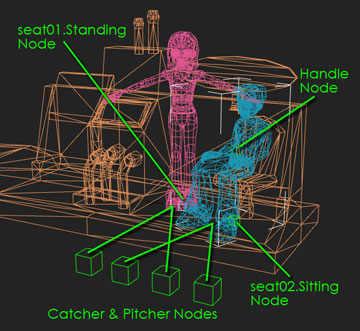
The final element is the animated chair whose animation is triggered by the avatar typing the word “Go” into a chat balloon. Note in the video to the right that the movement of the Mesh is dictated by an Animation Node (green cube) that the chair is Weighted to.
The secret behind animating any Furniture or Room element is the Animation Node and how the Mesh relates to it. It is also important to note that the Seat Node and Avatar Statue are Linked to the Animation Node.
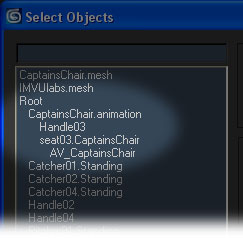 In the Hierarchy chart you will see the Root Node (.xsf), with the Animation Node (CaptainsChair.animation) Linked to it. The Handle Node and Seat Node are then Linked to the Animation Node, and finally, the Avatar Placeholder (Avatar Statue) is Linked to the Seat Node.
Finally, the Mesh (CaptainsChair.mesh) is Weighted to the Animation Node. This allows for the Mesh to animate with the Animation Node, and the Avatar to follow right along. To create a word trigger to start the animation I placed the word “go” into the Trigger field under the Actions TAB in the Create Mode Editor: