Introduction
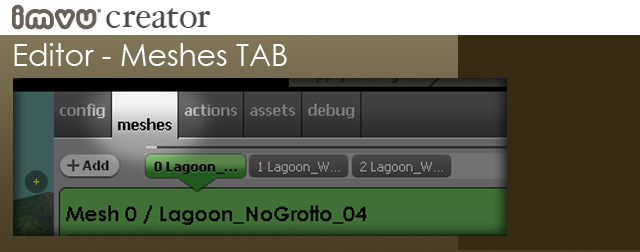
If you like making 3D products that can be seen on screen, then the Meshes TAB is for you. The Meshes tab allows you to import Mesh .xmf and Texture assets in order to build your IMVU product and then sell it in the IMVU Catalog.
While building and adding meshes is advanced, swapping textures out and making them animate is not. For beginners, all you will need to do is browse and import your textures and Opacity Maps. Then, you have the option of editing their parameters.
At first, the Meshes tab may look complicated. However, once you’ve used it once or twice, you’ll figure out what bells and whistles allow you to build the types of products you want. The main thing to remember is that you can do it. So, have fun and play around with the tools offered in the Meshes tab. Knowing how to use them can speak to your soul AND to your wallet. Have fun!
The Tab Itself
The tools found in the Meshes TAB allows you to smash people’s minds with your incredible imagination!
While most of the time, the Meshes tab will be chock full whenever you derive from a product, this tutorial will walk you through what each piece does if you were to start from scratch.
Derivation Example
Click the Add button…
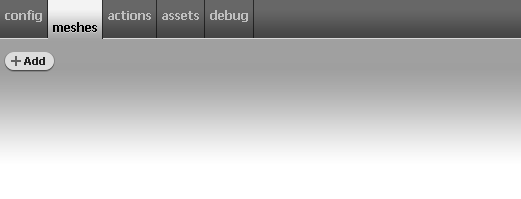
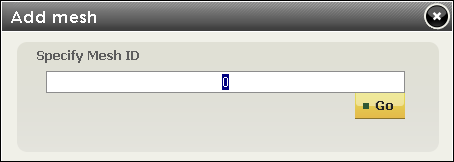
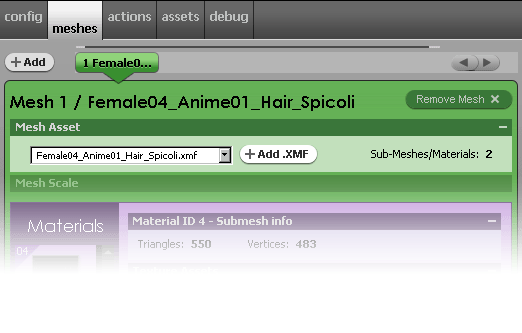
When you first arrive to an empty Meshes tab, it looks like this. The tab wants you to add a new mesh and then add an asset to it. To add a new mesh, just click the Add button. When you do, the Add Mesh dialog will appear. Give your new mesh an ID number and click G0 to add your new mesh.
For this tutorial, we will start with mesh ID 1.
Empty Mesh
When you click Go, you will see a lovely green mesh panel appear. Note that since you typed in the number 1, the mesh is entitled 1. This means that the mesh is now built for Body Part 1 – which is the avatar hair. Although body parts are for avatars, the overall process you just went through works for every 3D product type including Rooms, Furniture, and accessories.
If you ever mistakenly add the wrong ID for a mesh, just click the Remove Mesh button and start over.
One Avatar Body Part behaves a little differently than the rest. If you had typed a 0 when you added your mesh, the Mesh Scale panel would be enabled when the Mesh is created (see image below). This is because Mesh Scale only works for avatar heads…and the avatar head is Body Part 0.
Add .XMF
A mesh asset in IMVU is an asset that has been exported from a 3D software package that supports Cal3D exporters. IMVU has written Exporters for 3DS MAX but there are other exporters available on the internet for other software packages.
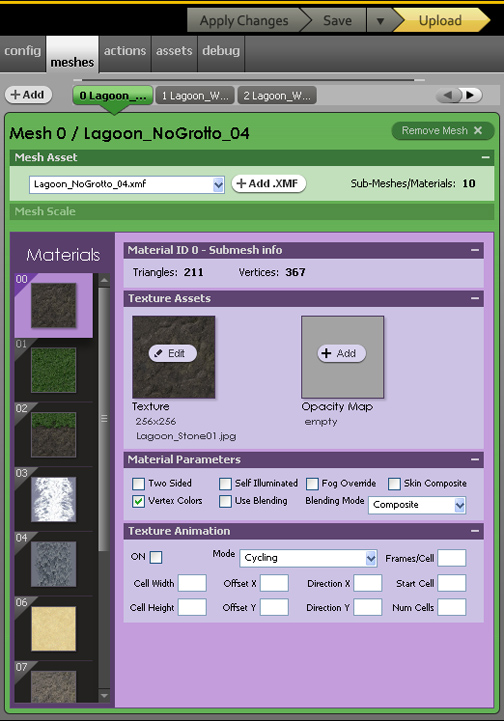
When I added that file, a few things happened. The most noticeable is that the Materials panel appeared. However, two other things also happened. The first was that the name of the mesh .XMF asset was applied to the title of the Mesh and the button for the mesh in the navigation. Although some mesh names are meaningless, these names can help you find the mesh you’re looking for when you have lots and lots of them.
The second thing that happened was that the number of sub-meshes became listed. This is helpful for seeing whether your mesh .XMF asset has the correct number of sub-meshes. Correct = what you intended.
Materials
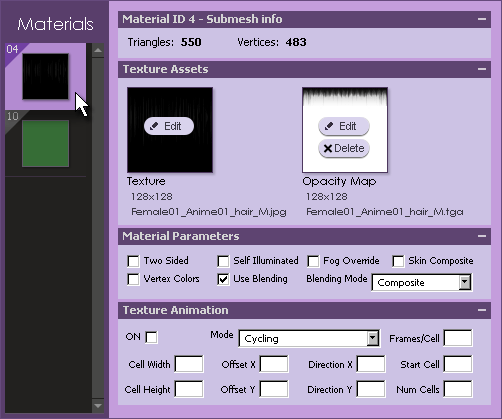
When you add a mesh .XMF asset, materials for that asset are automatically created. The number of materials is defined by the .XMF asset itself. A material is a combination of asset and parameters. Another thing defined by the .XMF mesh asset is the material ID number. This number does not have to be sequential. ie – a mesh does not have to define material ID 1, 2, 3. Rather, as is the case in the above image, a mesh can refer to materials 4 and 10. You can see the ID number in the upper right corner of the material preview.
To switch between materials, just click on their preview in the right hand nav. When there are lots of materials, you can use the scroll bar or up/down arrow keys to browse through and select them.
Supported file types – The assets that a material can accept are .jpg, .png, .gif, .bmp and .tga image file types.
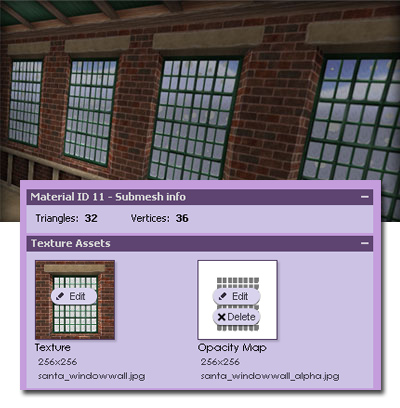
Submesh info – The top panel in any material is the submesh info panel. The information in this panel describes how many polygons and vertices in the mesh are associated with this particular material ID. If you don’t use this information, you can minimize this panel.
Inherited Assets
A new product contains all its parent product’s assets, such as meshes, textures, body part IDs, etc. Create Mode will show you all of these assets葉he “inherited truth” of a product.
When creating your new product, you may not need to change each of these areas遥ou may only want to change a texture of a product, or the mesh and texture but leave the body part ID. Whichever assets you do not change will show up in your new product , and will be visible in the Editor. This can be very helpful but sometimes confusing:
For example: if your new product has a mesh that only defines two material IDs but the parent product’s mesh has defined three material IDs, that third material ID will always be shown in the Mesh tab, but not on your actual product. Making any change to this extra, unused texture will have no effect on your product. You also cannot delete this ‘extra’ texture. You can tell that there is an unused material ID in a product if the Triangles and Vertices say “undefined”.
Texture Assets
The Texture Assets panel contains two slots for image assets. The texture slot is for the color texture associated with the material. If the material added was referenced by the product you’re deriving from, then the asset previews that appear here will be from the parent product.
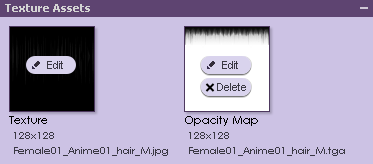
If the parent product does not define the material ID you have added, you will see an empty material slot.
Texture Do’s and Don’t’s
To cut to the chase: your textures need to be 256×512 pixels smaller or they will be reduced in image size by the code. This can have a negative impact on the way your product looks so make sure you’re in control: keep your textures small and use them wisely.
For fun, try browsing your computer for images to place in the Texture slot. Just hit the Apply Changes button to see what they look like.
Texture Assets – Opacity
You can add and delete Opacity Maps at your leisure. An Opacity Map is a grayscale image that determines what areas of your texture are opaque, transparent, or translucent. To load an Opacity Map you will need to click on the Edit button in the Opacity Map slot. Opacity Maps are loaded seperately from the Texture Map, and can be added to or removed from any Material. You can remove an Opacity Map by clicking on the Delete button.
Material Parameters

The Materials Parameters panel is where you can toggle on or off various settings for each individual material. Any parameter change made in this panel affects only its material. If you want all Materials to share the same parameter settings, then you need to manually set them for each Material.
Two Sided: Normally, a texture is displayed only on one side of a piece of geometry. This is because the user rarely sees the inside of a piecce of geometry. For example, there is no need to render a texture on both the outside and inside of a ball because only the outside of the ball is visible. However, when you have a glass window or some draping hair, you might want to the texture to render on both sides of the geometry. This first check box tells the Material to render on both sides.
Self Illuminated: Checking this box makes the material unaffected by the Scene’s lighting. This is handy for things like fire or anything that you want to stay bright.
Fog Override: Checking this box makes the material unaffected by fog. This is VERY handy for sky textures.
Vertex Colors: If you have exported a mesh that contains vertex colors, you can view them on a per-material basis by checking this box in each material.
Use Blending: When you add an Opacity Map, you can choose whether the Material uses smooth blending or harsh blending. Leaving this check box unchecked leaves the blending ragged and harsh. Checking this box leaves the blending smooth.
Blending Mode: If you checked the Use Blending checkbox, the Mode drop down tells the Opacity Map whether it can be an Additive blend or a Composite blend. Additive blending literally takes the texture and “adds” light values to it based on values in your opacity map. The more additive textures you have in front of one another, the brighter and brighter they get. This is handy for things like shafts of light.
Composite blending shows you a smooth blend of your Opacity Map and Texture assets. Unlike Additive blending, Composite has no additional effects applied to it.
Texture Animation Parameters
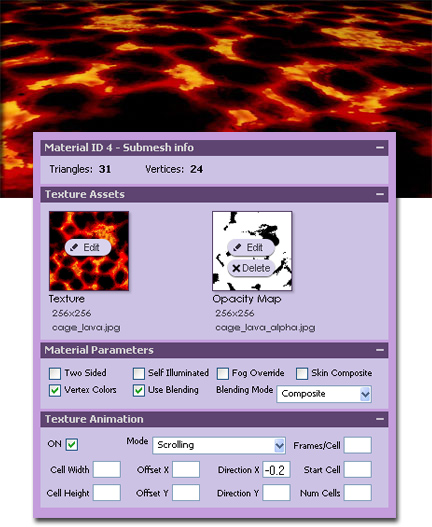
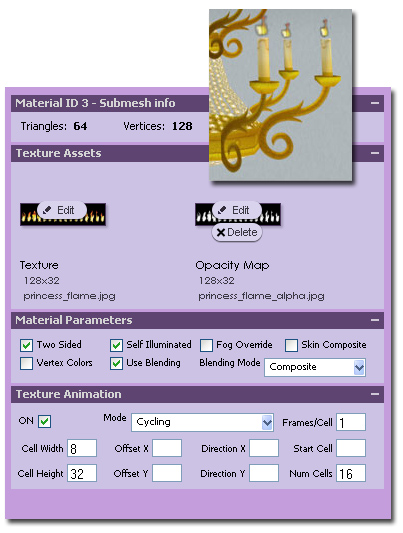
Just below the Material Parameters are the Texture Animation controls. A texture can Scroll over a surface at various speeds and directions (like the lava texture above), or Cycle through frames of animation that exist on a single texture (as seen in the flame texture below).
Cycling allows you to sample frames within a given texture.
Cell width and Cell height are used for Cycling animations. The number here is in pixels and tells the Material what size you want your animation cell size to be. For example, if I had a texture that was 128×64 and I happened to have four separate frames drawn across it from left to right, my Cell width would be (128/4=) 32 and my Cell height would be 64.
Offset X and Y are used for Cycling animations. They allow you to offset where your first frame of a Cycling animation begins. This is very handy if you have one large texture that contains several Cycling animations on it. Set your X and Y to 0, 0 to use the full texture, or different values to use a subset of the texture. The cell rectangle does not have to divide the dimensions of the texture evenly, and it doesn’t have to have the same proportions as the texture.
Start Cell is used for Cycling animations and tells the animator which frame to start on. This is handy for things like flickering candles where you may want to use the same texture on a bunch of candles but don’t want them to animate the exact same way (meaning looking EXACTLY the same in IMVU). With this feature, you could use the same texture on multiple candles but have them all appear different in IMVU. Of course, you COULD just make new textures per each flickering candle but that would needlessly increase the file size of your product.
Direction X and Y are used for Scrolling animations. These deltas specify the amount (direction and speed) to scroll, positive numbers going down and right. The delta is in Fixels (fractional pixels). Try typing in numbers like 1, 2 or 3 and then try -1, -2, -3 to see what happens.
Num Cells allows you to define how many Cells the animator should include in a given Cycling animation. By setting Offset X/Y or Start Cell, and then setting the number of cells with this function, you can use a single texture sheet for multiple sets of cells.
Frames/Cell allows you to slow down the animation. You can specify that it takes multiples of 1/30 sec to advance a frame of animation.
Play around!
We know this tab looks spooky the first few times you go through it but please play around with the tools and see what they do. The worst that can happen is that you learn to be a great Creator!