Introduction
We define an Animation in IMVU is anything that moves or distorts a Mesh. Although you can also animate textures along the surface of a Mesh, Exporting Animations are specific to models where parts of the Mesh physically move through space.
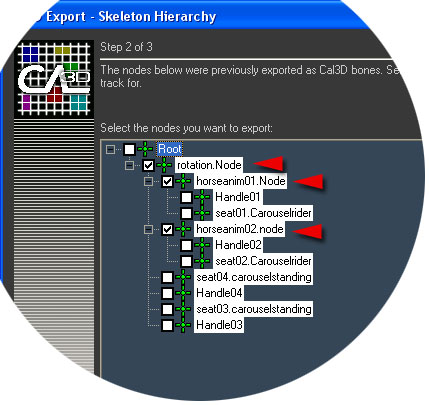
Example shows the animation export window displaying the Root hierarchy, here you see that only those Nodes needed to animate the Mesh are checked. All others are unchecked. The animation file needs to be exported AFTER the skeleton file as the skeleton is referenced in the Animation export process.
Exporting a Furniture or Room Animation
In order to export your Animation file, select Root and choose Export in the file menu. Scroll to the .xaf file format, name your file (remembering to manually type in the .xaf at the end of the name) and click Save. In the Cal3D window that appears, you will be prompted to supply a skeleton/.xsf file. If this file is not automatically placed, browse to the skeleton file you just created and then click next. The Cal3D window will then show you a list of all of the Nodes in the scene with check boxes next to them. You only need to export the Nodes that actually animate so uncheck those that are unnecessary. For example, you will never need to include the avatar meshes in your animations as they actually don’t animate based on the Scene (the seat nodes may) so uncheck the boxes next to the avatars.
The third window in the Cal3D animation export process is where you verify the actual time values of the animation. Check that the start and end frame numbers match what you intended to export, and make sure the frames per second is set to 30. Click finish. You just exported an animation file!
Exporting an Avatar Accessory Animation
In order to export your Animation file, select AttachmentRoot and choose Export in the file menu. Scroll to the .xaf file format, name your file (remembering to manually type in the .xaf at the end of the name) and click Save. In the Cal3D window that appears, you will be prompted to supply a skeleton/.xsf file. Browse to the skeleton file you just created and then click next. The Cal3D window will then show you a list of all of the Nodes in the scene with check boxes next to them. You only need to export the Nodes that actually animate so uncheck those that are unnecessary.
The third window in the Cal3D animation export process is where you verify the actual time values of the animation. Check that the start and end frame numbers match what you intended to export (they usually do), and make sure the frames per second is set to 30 (it usually is). Click finish. You just exported an animation file!
Exporting an Avatar Action
If you are creating an animation that specifically moves the Avatar, either within a Furniture or Room product, or as an Avatar Pose or Action (as in dancing, etc.) then the Export process is slightly different
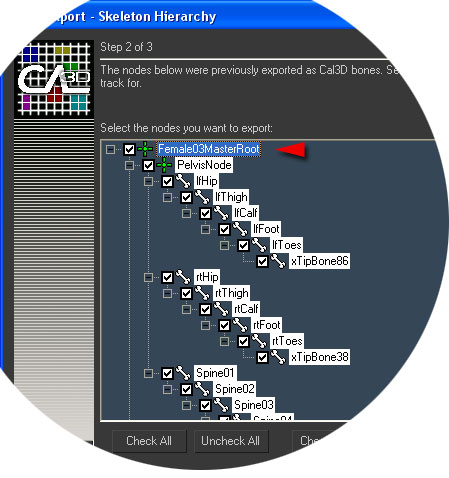
In order to Export your Avatar Animation file, select the Master Root Node (this is the highest bone in the skeletal hierarchy) and choose Export in the file menu. Scroll to the .xaf file format, name your file (remembering to manually type in the .xaf at the end of the name) and click Save. In the Cal3D window that appears, you will be prompted to supply a skeleton/.xsf file. Browse to the skeleton file you want your animation to work on. This must be the skeleton of the avatar you are animating in MAX.
If you want, you can export only portions of the skeleton. For example, if you want to have the avatar do a wave animation, you only have to export the bones affected in the wave. For example -the arm, clavicle and, maybe, Spine04. This approach frees the rest of the skeleton up to be driven by the avatar Idle animations (like changing posture while standing) and looks very natural. There are several ways to choose a subset of the bones in the skeleton when exporting.
- You can simply check the boxes next to the bones you actually want to export. This means actually unchecking everything else in the list. To do so, you can click the Uncheck All button and then go in and check the bones you want to export.
- You can select the bones you want to export in MAX, then choose to export an .xaf file, and then click the Choose Selected button in the skeleton hierarchy section of the exporter.
- The third step of the Cal3D animation export process is where you verify the actual time values of the animation. Check that the start and end frame numbers match what you intended to export, and make sure the frames per second is set to 30. Click finish.