Exporting for Create Mode
Once your Mesh is textured, weighted, and has all the necessary Nodes linked properly, it is time to start Exporting your assets for the Create Mode Editor . It is important to always export your Skeleton file first, since so many other exported files depend on your Skeleton file for their export to work properly. The Skeleton exports to a .XSF file suffix, which you will need to type in manually.
Exporting Furniture and Rooms
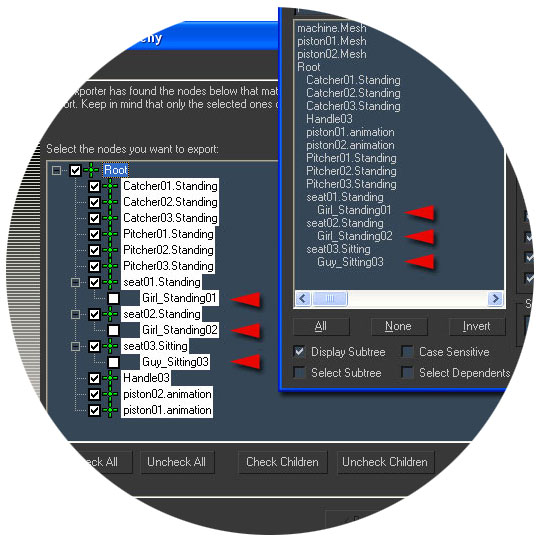
To start, select the Root or Skeleton Node in your model, making sure that no other elements are selected. In the case of Furniture or Room products, your export will look something like this. Meshes will appear outside the Skeleton hierarchy so you normally don’t need to worry about them, with the exception of Placeholder Avatar meshes, which is important that you UNCHECK before exporting.

In this example you will see Placeholder Avatar meshes that are linked to the Seat Nodes have been unchecked before the .XSF file is exported.
 Exporting Avatar Accessories
When creating Avatar Accessories, sometimes your weighting modifier will actually move the vertices of your mesh!! In order to avoid this, simply turn off your weighting modifier. Do not delete it but turn it off using the light bulb icon in the stack.
Steps to Export
- Select AttachmentRoot. Choose Export in the file menu. Scroll down to the .xsf file format, name your skeleton, click save and hit next/finish until there are no more Cal3D windows visible.
- Now select your mesh and choose Export, scroll to the .XMF file format, name your mesh file, click save, choose the skeleton file you just exported and click next/finish until there are no Cal3D windows visible.
- NOW select nothing, choose Export, scroll to the .xrf file format, name your material file, choose the material you named earlier (example: Glasses [0]) and click next/finish until there are no Cal3D windows visible. You need to repeat step 3 for every material in your Multi-Sub. This means that for every material you want to actually have show up in IMVU, you need a corresponding .xrf, or material, file.
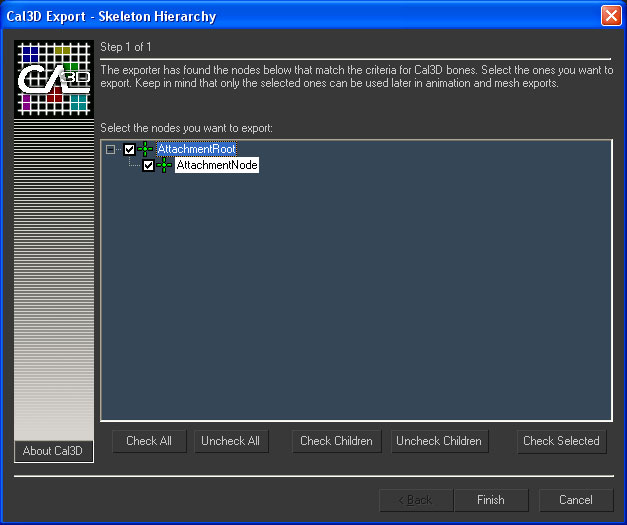
Select AttachmentRoot Choose Export in the file menu. Scroll down to the .xsf file format, name your skeleton and remember to manually type the .xsf at the end of the name, and click next. The Cal3D skeleton export window appears. Within this window, you will see every asset in your scene that lives within the hierarchy of the master skeleton node sitting beside a checkbox and an icon. The icons are more or less meaningless to this process but the checkboxes are relevant. Anything that has an actual checked box beside it is exported within the skeleton file. Click Finish to complete the export process. Woohoo! You have just exported a skeleton file for your Accessory.
