Introduction
It is not enough to just build a cool Furniture product if the avatar doesn’t know how to interact with it, and you can’t move it around in the 3D space. This is were Nodes come in. Nodes are the means by which your product tells the avatar how to stand, sit, and even move in and around your furniture item. In the case of something as simple as an end table, you might only need a Root Node in your model, but for something like a party hot tub, you may end up with dozens of Nodes to tell all your friends where they can sit.
Here is a little video to help describe Nodes and how they work:
Nodes Come in Several Flavors:

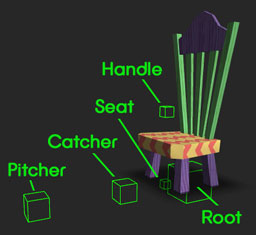
ROOT Node – This is the root of your product and should always be placed at the base of your furniture model, with the Root Node’s center intersecting with the floor. The Root Node is also where the “move” handle will appear when you are moving or editing your Furniture in the IMVU 3D window.
SEAT Node – This tells the Avatar where to stand or sit
CATCHER & PITCHER Nodes – These Nodes are always placed at the exact same distance apart from each other, and are the points at which two avatars start to perform a cooperative animation, like a hug or high five.
HANDLE Node – For a seated avatar, the Handle Node tells the IMVU Client where the “Click Here to Sit” button will appear
Root Node Placement
Names Are Important
Equally important as Node locations are how the Nodes are named. It is not enough to just have the Nodes there if they don’t know how to interact with each other. If you have only one avatar interacting with your Furniture item, then your Nodes will be named accordingly:
Root
Catcher01.Standing
Pitcher01.Standing
seat01.Sitting
Handle01
If you have more than one avatar interacting with your Furniture item, it will look something like this:
Root
Catcher01.Standing
Pitcher01.Standing
seat01.Sitting
Handle01
Catcher02.Standing
Pitcher02.Standing
seat02.Sitting
Handle02
Node Hierarchy is Important
Before you can export the various parts of your Furniture product, you have to make sure that everything is relating correctly with each other. All products in IMVU are built like the skeleton of a human body. There is a head, and all the bones are then linked and relate to that head. Furniture Products are no different. Think of the Root Node as the head of your Furniture skeleton. You will need to link all other Nodes to that Root Node for your model to export correctly.

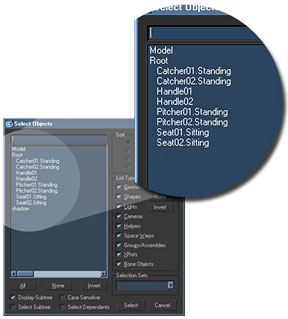
In the above image you can see how the Root Node is at the top, with all of the other Nodes indented below it. Furniture products have relatively simple hierarchies, these get more complicated as you start working on different kinds of models. You will also notice that the 3D Mesh is not included in this hierarchy. This is because the Mesh will later be Weighted to the Root Node, rather than Linked to it.
Here is a video tutorial that walks you through the process of creating, linking, skinning, and exporting Nodes in a typical furniture item.

Knowing What’s UP
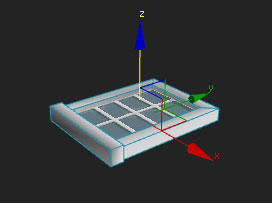
3D Rooms in IMVU have Nodes built into their floors, walls, and ceilings that are ready to accept your Furniture products. Because this is how it works, certain Furniture Products need to be built with this in mind. As a rule, the “Z” axis of any Furniture item needs to point UP, IN, or DOWN, depending on the orientation of that object. For a chair, the Z axis should point UP, for picture frames and windows IN, and for ceiling product DOWN. As a rule of thumb, I always make sure my pictures and windows lay on their backs on the floor, and my ceiling fixture are upside down. All will orient themselves just fine once imported into the Create Mode Editor
