Production Process
When it comes to any process, there are steps to follow. More complex projects include more steps, and some projects insist that certain steps be followed in a specific order for the end result to work. Building a product for IMVU is very much like this, and most of the Help requests we get involve a small step missed in the middle of a process to take a design from conception to the catalog.
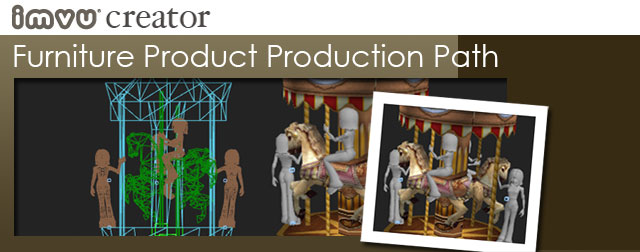
Below is a diary style description of the production steps taken in the creation of a Furniture Product. Your experience may be different as the addition of multiple animations, or many Meshes will mean additional steps will be added. We create this as a place to revisit while you are building your products and hope it helps as a refresher for even seasoned IMVU Developers:
Building a Furniture Product Step by Step
- After having conceived of my Furniture product I begin to build my Mesh in 3D Studio Max. I make sure to be economical with my polygons because I know the fewer polys in my finished product the faster it will load in the IMVU Client. For more see the Intro to Mesh Building tutorial.
- I name my Mesh name.Mesh. If my product is going to include multiple Meshes, I make sure to name them all with the suffix “.Mesh”
- I create a Multi-Sub Material in the Material Editor. This will allow me to apply multiple textures to my Mesh while having all of them exist within the same Multi-Sub Object Parameter. For more see the Mapping Materials – Power of Two tutorial.
- I import the 2D Texture I have created and make sure to name them properly. I begin with the importing of the first texture and end the imported name with a bracketed zero, [0].
- Each imported texture name after that is also bracketed, [1], [2], [3], etc. (i.e. Darkwood [5] )
- I use the Vertex Paint tool to add shadows and depth to my Mesh by filling it with a darker color and erasing away the highlighted areas. For more see the Vertex Paint tutorial.
- I create a Root Node and place it at the base of my Furniture Mesh, making sure that the Root Node axis (center) is at the floor level. For more see the Furniture Nodes tutorial.
- I merge an Avatar placeholder mesh and its accompanying Seat, Catcher, Pitcher, and Handle Nodes. I scale my Mesh to best fit the proportions of the Avatar, rather than altering the scale of the Avatar placeholder Mesh.
- If I am going to include multiple Avatar Seats in my product, I either Merge additional Avatar placeholders and Nodes, or I Clone the one already in my model.
- Each Node needs its own unique name, so I make sure all of my Avatar placeholders and Nodes are named appropriately.
- I make sure to Link all of the Avatar Nodes to the Root Node.
- If I am going to create a Mesh Animation, I build a separate Mesh that will later be animated. I create a new Node I label name.Animation. If my product is going to include multiple Mesh animations I make sure to name them also with the suffix “.Animation”
- I Link the Animation Node to the Root Node. For more see the Animating Nodes tutorial.
- I Weight the Mesh that will be animated to the Animation Node. For more see the Weighting a Mesh tutorial.
- I animate the Animation Node only. Moving the Node will effect only the Mesh that is specifically Weighted to it.
- If my Furniture product will include a section that I wish to disappear when the camera moves behind it (to allow visual access), I name them that same as I name my other Meshes. For more see the See-Through Nodes tutorial.
- I create See-Through Nodes and name them SeeThrough01, SeeThrough02, etc.
- I Link the See-Through Nodes to the Root Node.
- I Weight these Meshes to each of the See-Through Nodes.
- I make sure that the Hierarchy of all my Linked Nodes is correct using the Select Objects window in 3D Max.
- I Export my Root/Skeleton as .XSF file. If my placeholder Avatar Meshes are Linked to the Seat Node, I make sure to Un-check them during the export process. For more see the Export Skeleton .XSF tutorial.
- I Weight the remaining Meshes to the Root Node. If there are more than one Mesh, I Weight each separately.
- I Export each of the Meshes as a .XMF file. For more see the Export Mesh .XMF tutorial.
- I Export the Animation as a .XAF file. When the list of Nodes appears as part of the export process, I make sure to un-check everything but those Nodes that are specifically being animated. For more see the Export Animations .XAF tutorial.
- If my product includes a Morph Animation, I Export it as a .XPF file. For more see the Export Morph .XPF tutorial.
- When I Export my files I make sure to double check that all of my Textures are named and numbered properly within the Sub-Materials list. Often, problems with a finished 3D product in the Create Mode Editor can be traced back to a simple mistake in the naming and numbering of a single Sub-Material texture (trust me, huge clumps of my hair have been pulled out over this specific issue). For more see the Exporting Materials .XRF tutorial.
- In the Create Mode Editor I choose a pre-existing product that I wish to Derive from. For more see the Intro to Create Mode tutorial.
- I start by Importing my .XSF file in the Config TAB.
- Next I Import all of my Mesh .XMF files in the Mesh TAB.
- Within the Mesh TAB I start the process of importing all of my individual texture files, making sure that I include any Opacity Maps that accompany textures that include transparencies (in the past individual XRF file needed to be imported as part of this process, thankfully that when then, now we only have to make sure we import the correct texture files to each of the Materials listed in the window to the left).
- If my Mesh includes Vertex Paint I make sure that the Vertex Color check box is selected.
- If all or part of my Mesh does not include Vertex Paint, then I un-check the Vertex Color box. If I do not the surface will appear black.
- I animate those textures that need Scrolling or Cycling effects.
- I Import any Animation files, .XAF & .XPF in the Actions TAB. I make sure to import the file, but I also make sure that I am naming the Trigger name correctly (i.e. stance.Idle, etc.)
- I Save As, and give my new .CHKN Project file a unique name, which by default will save to the IMVU Projects directory in the My Documents folder. For more see the Editor Assets Tab tutorial.
- I Submit my product to the Catalog. For more detail see the Upload a 3D Object tutorial.
- In the Product Submissions window I upload a catalog snapshot that I have taken within the Create Mode Editor, using the Camera Tool. I can also take larger Ad images that I can use to better promote my new creation, or grab video to edit into a music video to post on YouTube and my Product Description page. For more see the Creating Videos With IMVU tutorial.