Introduction
Animations and sounds add life to all environments including IMVU and Actions are the tool IMVU Creators use to piece those animations and sounds together in an IMVU product.
This tutorial covers how to use the Actions tab in the Create Mode Editor. However, it does not cover how to build animation assets. If you want to learn how to build animations, please go to the Skeletal Animations Tutorial, the Morph Animations Tutorial, the Rooms Introduction, the Accessories Introduction and the Furniture Introduction.
Also, please know that the Actions tab contains far more features and inter-connectivity than any of the other Editor tabs. Therefore, this tutorial is long. So, grab yourself a pot o’ tea and enjoy some nice, technical jargon.
The IMVU Action System
It is always good to know the following rules of how an IMVU Action works:
The Actions Tab
All Actions are found in the Action tab in the Editor. Third tab in. You can’t miss it.

Add Action: Empty Slate
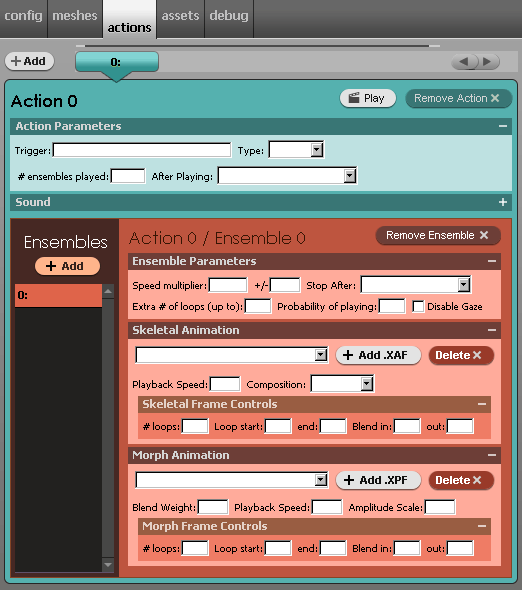
When you first enter an empty Action tab, you will see something like this:

Add Action
The first step towards creating an Action is to actually click the ‘Add’ button. This will create a new, blue panel entitled ‘Action 0’ and a new, red panel entitled ‘Ensemble 0’. Every time you create a new Action, one Ensemble will be automatically added to the Action. Each Action you add from now on will ascend in number and this number will be evident in the action name, ‘Action 1′, Action 2’, and so on.
The Action and Ensemble names begin at ‘0’ vs. ‘1’ because the Editor was made by engineering types and they’re a little silly that way.
Actions do not necessarily need Ensembles in order to work (like sound Actions). However, the vast majority of them do need an Ensemble so we figured we would save you a step and add it for you.
Action Panel Details: Action Parameters
Ah…that soothing blue….just shy of green…
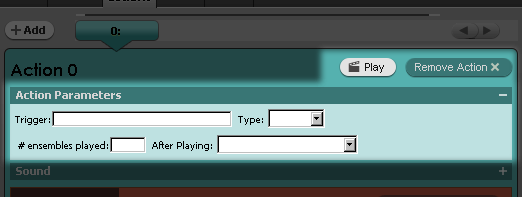
Now that you have created an Action, I bet I know what you’re thinking. “What the hell does all of that stuff do?!” Fear not, Action maker. Below are all the gory details of the Action Panel.
Play – At the top right of the panel is the Play button. Clicking this button after you click the Apply Changes button will cause your action to play. This allows you to test your Actions before submitting them to the IMVU catalog.
Remove Action – Clicking this will remove the Action you are currently viewing.
Action parameters
The first panel in the Actions tab is called ‘Action parameters’. Like all panels in the Editor, this can be collapsed or expanded and the Editor will remember your settings in between edit sessions. The parameters in this panel are the most used paramters in the Action panel.
Trigger: – This field is where you type in the word or words that will cause the Action to play. A trigger word can be anything you like. When that word is typed in the IMVU messenger, the Action will play. An Action that does not contain a Trigger word will not play. Trigger words can also be named after Idle or Stance animations.
You can have multiple words trigger one Action. To achieve this, you add a comma separated list of words such as, “ha, haha, heh, har, hardy, lol”.
Type: – The type field is where you tell the Action whether it ought to apply to an Avatar skeleton or, in the case of Rooms, Furniture or Accessories, the skeleton of the product you’re editing. The two options you have in this drop down menu are ‘Avatar’ or ‘Room’. The ‘Room’ choice is good for Rooms, Furniture and Accessories (Actually, either setting works for Accessories.) In order for your Action to work properly, you must choose a ‘Type’.
# of ensembles played: – This field tells the Action how many Ensembles it ought to play. If you want the Action to loop forever, you type ‘0’ in this field. If you want the Action to play once, just type in ‘1’.
After playing: – This drop down menu tells the Action what it ought to do after playing an Ensemble. You have three choices:
- Pick new Ensemble – This option tells the Action to randomly choose a new Ensemble to play next.
- Pick same Ensemble – This option tells the Action to play the same Ensemble repeatedly.
- Cycle through Ensembles – This option tells the Action to play the next Ensemble in the sequence. This option is used mostly to test that all of the Ensembles are actually working as designed.
Action Panel Details: Sound .ogg file
An Action can contain a sound as well as animation assets. In fact, an Action can contain ONLY a sound if you want it to. The sound is just triggered by a trigger word like any other Action. Currently, IMVU supports only sound files in the .OGG file format. Regardless of how long your .ogg file is, IMVU restricts the length of play to 20 seconds.

Add .OGG – This one is fairly obvious. Just click to find and add your OGG file.
Delete – CLick this if you want to remove an OGG file from an Action.
Loop – Clicking this checkbox allows your sound to play indefinitely. This is really handy for background sound effects in Room products.
Delay (secs) – Unless otherwise specified, an Action plays an embedded sound immediately. Specifying a time value in this field delays the start time of the sound by that many seconds. NOTE: fractions are possible (ie – “1.5” for one and one half seconds.) The delay is capped between 0 and 10 seconds. Any number lower than 0 or greater than 10 will be treated as if it were 10.
Multiple Actions
Click the ‘Add’ button a few times. Go ahead. I dare you. If you took me up on that dare then you would have seen that multiple Actions appear in the Actions list on the left side of the Actions tab.
That’s right! You guessed it! You can have multiple Actions in one product. What’s more, each individual Action in the CFL can have have the same Trigger name. This is especially handy for Idle actions.

Ensemble?
An Ensemble contains the animation details of your Action. The Ensemble is where your .xaf and .xpf files are loaded. Your Action can contain multiple Ensembles for some very fun variation.
Add Ensemble
As a reminder, your first Ensemble is added for you whenever you add an Action.
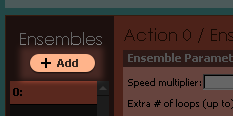
However, if you wish to add more, you can do so by clicking the ‘Add’ button in the Ensemble Section. Each Action can contain up to 99 ensembles.
Ensemble Details:
Sure, in nearly every example on the planet, red means stop. However, when it comes to IMVU Actions, red means go go go!
The Ensemble panel is where you actually upload animation assets into your Action. What’s more, the settings in this panel tell those animation assets how to behave.
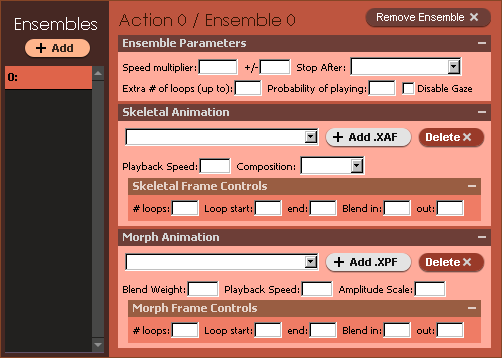
Remove Ensemble – If you want to get rid of an Ensemble, click this button. Remember, this button works on all Ensembles except the first one created in conjunction with the Action.
Ensemble Parameters Panel
Speed multiplier: – The Speed Multiplier settings allow you to speed up or slow down the playback speed of your animation when triggered. However, this box does not effect sound effects. Here are examples of what certain values do:
0.5 = half playback speed.
1 = same playback speed.
2 = double playback speed.
IMVU typically leaves these boxes empty.
Stop After: – In the “Stop After” box, you may choose to stop the Ensemble after the “Longer effect ends” or the “Shorter effect ends”. If you choose to stop the Ensemble after “Longer effect ends”, then the Ensemble will wait until the last frame of the last asset to stop.
If you choose to stop the Ensemble after “Shorter effect ends”, then the Ensemble will stop on the last frame of the first asset to end.
Extra # of loops (up to): – This box allows you to add a random multiplier to the amount of loops your Ensemble will play. This only adds, not subtracts, loops to the number used in the “#of Loops” box found in each animation’s Frame Controls. This allows you to have a random playback length every time your Action file is played which is very handy for idle animations and gives a lifelike quality to your Actions. If your initial “# of Loops” is zero, any change to “Extra # of Loops (up to)” will do nothing.
Probability of playing – When your Action contains multiple Ensembles, the number typed here will tell the Action how often it should choose to play this particular Ensemble. The number typed here ought to be 1.0 or a fraction of 1.0. For example, if you want this Ensemble to play roughly 30% of the time, you would type in .3. It is best, though not required, to have the total values of all of the ‘Probability of playing’ boxes across all of your Ensembles equal 1.0. IMVU typically leaves this box empty.
Disable Gaze – This check box allows you to control whether the Avatar will “look around” using IMVU’s procedural gaze settings. This is actually pretty fun so try it out.
Ensemble Details:
Skeletal Animation Panel
The Skeletal Animation Panel is where you browse for and edit settings for your skeletal animation – .xaf file. The Browse and Delete buttons are self-explanatory.

Add .XAF – This allows you to browse for .XAF, skeletal animation assets.
Delete – This removes the .XAF skeletal animation asset from the Action.
Playback Speed: – Not only can you control the overall playback speed of the entire Ensemble (using the Speed Multipler inputs) but you can also change the playback speed of individual assets within the Ensemble. By adding a value of, say, ‘2.0’ you can double the speed of the asset loaded. IMVU typically leaves this box empty.
Composition: – The “Composition” box allows you to effect whether an animation replaces or averages with other animations in the Action.
An engineer might say, “When you choose Replace, the Replace effect ramps up to 1.0, the other non-Replace effects and lower priority replace effects will be ramped down to zero.” Any sane person might instead say, “Replace overrules Average.”
Again with the engineer speak, “When you choose Average, the effects will compose with influence in proportion to their ramped relative weights. If there are two effects of equal relative weight, a fully ramped Average effect will have 50% influence, sharing the other 50% with an existing effect, instead of reducing the existing effect to 0% influence.” In layman’s terms? “Average defers to Replace.”
Ensemble Details:
Frame Controls Panels
Each type of animation panel contains its own Frame Controls panel. This is because the skeletal and morph animation assets can be of different lengths and, therefore, require their own loop settings.
![]()
The looping and blending tools in these two panels are the life blood of Actions within IMVU as understanding how they work influences the creation of the animation assets they, in turn, will influence. So, take your time with this one and experiment.
The Frame Controls allow you to set Blend In/Out frames, Loop Start/End frames, and the # of Loops for a given animation asset. The Blend In/Out boxes allow your animation to blend seamlessly from whatever was playing before your Action and then to whatever is meant to play after your Action. If you choose a Blend In/Out time of 0 frames, then your animation will snap. This does not look good so do choose something in the 5 to 10 range.
It is important to know up front that the ‘Composition’ setting greatly influences whether an Action can blend with another one. For example, if two back to back Actions are both set to Replace, then no amount of Blend tweaking will allow them to blend together. Rather, they will simply snap from one to the other.
It is possible to loop your animation for as long as you want and for as many frames within your asset as you want. This can effectively cut your .xaf down to only the necessary frames needed to export. Much can be accomplished by simply playing with the loop parameters. What follows is a more verbose description of just what looping means:
This parameter specifies where the loop section begins. The effect will begin on frame N, advancing to the end frame, then cycling back to the start frame for the remaining loop iterations. After all iterations have played, the effect will advance through the end frame to the remaining frames. The effect remains “on” during the release period.
If the start and end frame are both zero and the effect loads successfully, then the end frame will be adjusted to be the last frame. Thus if you want a simple looping effect you can set the start frame, end frame, and loopIterations all to zero. If you want a simple one shot effect, then set the start frame and end frame to zero, but set loopIterations to one.
If the start and adjusted end frame are the same, then the effect does not have a loop section, and the loopIterations parameter will be ignored.
Ensemble Details
Morph Animation Panel

The first difference between the Morph and Skeletal Animation panels is that the Morph panel is missing the “Composition” box. This is due to the fact that this functionality needs to take place in the actual morph target name within your 3D program.
The second difference is the addition of the “Amplitude Scale” box. By adding numerical values greater than 1.0 to the “Amplitude Scale” box, the .xpf will scale the active morph targets. For example, if you had set a morph to 75% upon export, and then set your Amplitude Scale to 2, the morph would play back at 150%. This can result in some fun varieties that you never would have thought of while setting key frames. Play around with it to see what I mean.
Multiple Ensembles
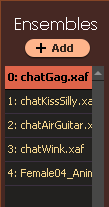
As has been hinted to earlier in this tutorial, each Action may contain numerous Ensembles. This functionality coupled with the ‘After playing’ and ‘Probability of playing’ settings allows you to create the compelling and wonderful illusion of life.
Fully Loaded Action
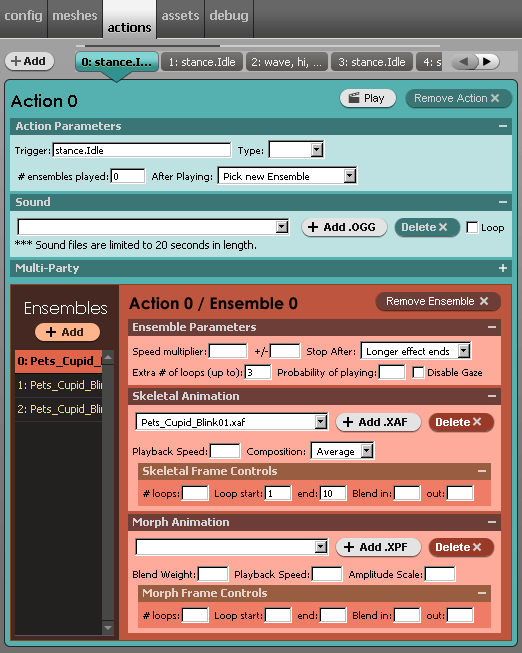
And…here is what a fully loaded Action panel can look like:
