This tutorial assumes that you are using 3D Studio MAX. It also assumes that you are using the files found in either the Male03 _Anime01 _WeightingPoseMASTER.max that is found in Female Weighting File or the Male03 _Anime01 _WeightingPoseMASTER.max that is found in Male Weighting File
This tutorial also assumes that you have already selected the male head mesh, applied the Physique modifier and Initialized it. This tutorial *also* assume that you have read the Introduction to Avatar Body Parts and the Mapping Materials Tutorial.
3D Materials
In 3D, a ‘Material’ is essentially just a collection of data. The particular data contained in a Material all revolve around a texture. What is the name of the material? What texture is contained? Are there multiple textures (in the case of an opacity map)? What material ID is that texture supposed to be applied to? Is any ambient lighting applied to the material? Is the material two sided (ie – can it be seen when viewing both sides of a polygon)? Several of the bits of Material data that are useful in 3DS MAX do not translate directly into the Previewer. Rather, you have to specifically choose things like ‘two-sided’ in the Material properties in the Previewer.
As mentioned above, each Material contains a texture. However, the Material does not dictate how that texture is applied to a mesh. That is handled with some sort of ‘Mapping’ tool.
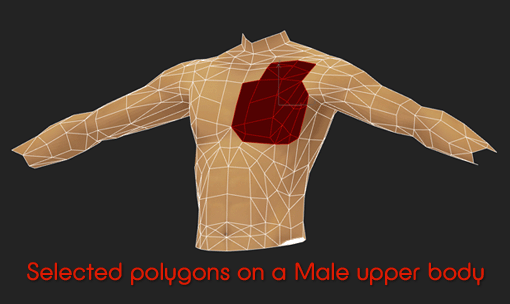
Select Faces
The original IMVU body parts come with a multi-sub material applied to them. If you are building a body part that is meant to work with the existing skin products in the catalog, please stick to the material IDs provided in the MAX file. That way, you won’t have to export new material (xrf) files for your new body part – all of the textures will just work!
If you are using the body parts provided in the Example files as a starting point for your new body part, you will need to remap the textures. This is easy. Once you’re happy with the geometry, select the faces of your body part whose texture mapping you want to change.
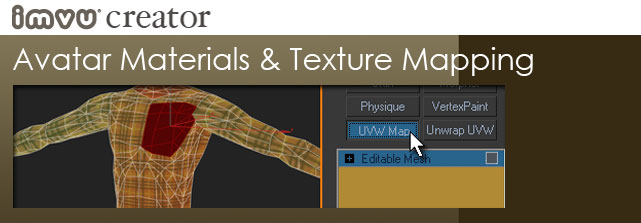
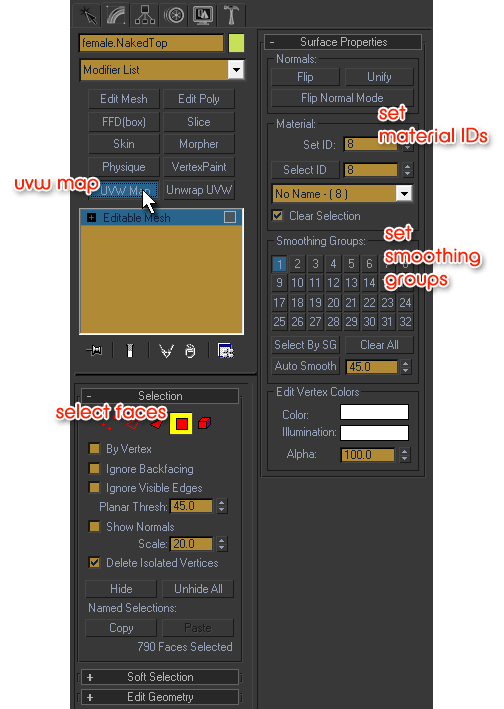
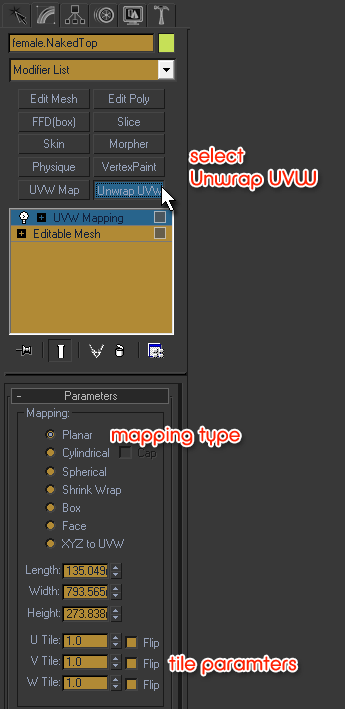
UVW Map
With your geometry selected, add a “UVW Map” modifier to it in the ‘Modify’ stack on the right hand side of the screen.
When you add the modifier, the list of options at your immediate disposal are centered around texture mapping. Click around on the Mapping Parameters like Planar, Cylindrical or Box to see how that effects the Mapping gizmo that is now displayed on your mesh. Also make sure to play with the X, Y, Z buttons and the Tiling and Flip boxes.
Use IMVU’s Skin Mapping
If you are building a body part that is meant to work seamlessly with the rest of products in the IMVU catalog, please remember to use the texture mapping already embedded in the meshes supplied in the master weighting files.
As mentioned above, IMVU users expect their skin texture products to work perfectly across all clothing meshes. When their skin texture products do not work perfectly, they get upset, leave bad reviews and spread the word that your products are unreliable. So, please err on the side of delighting your customers and use the texture mapping IMVU has already lovingly built for you.
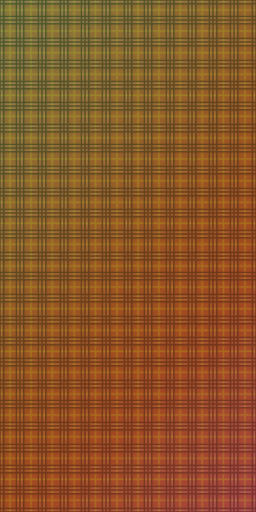
To the left is the 256×512 plaid texture we use to make sure that our mapping is near perfect. When this texture is applied to the avatar body in MAX, the horizontal and vertical lines are drawn as near straight as possible. This should allow you to more easily see how the skin on your new meshes is mapped and, more importantly, whether or not it matches what is on the master meshes.
Unwrap UVW
When you have arrived at the base Mapping modifications that you are happy with, it is time to dig into the details. Click the Unwrap UVWs button.
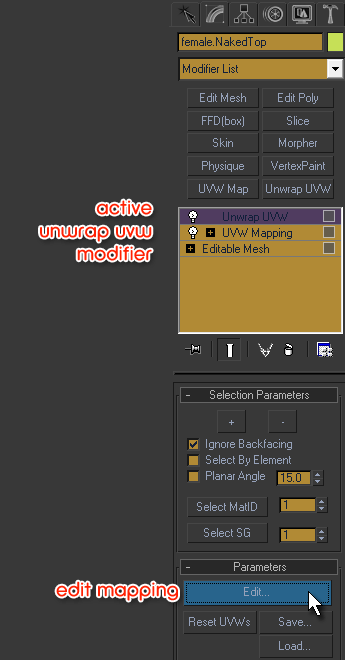
Unwrap UVW – Click Edit
When you Apply the IVW modifier, an ‘Edit’ button will appear under the ‘Parameters’ section. Click that button.
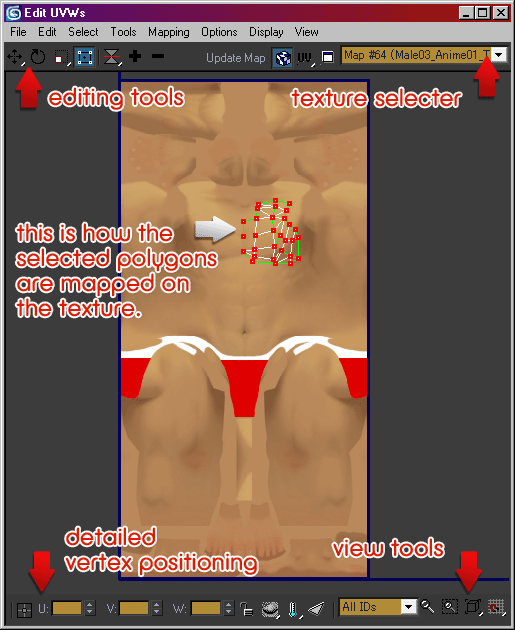
Edit UVWs
Click that ‘Edit’ button and the Edit UVWs screen will pop up. Just select points or groups of points and move them around as you like. You can zoom in as close as you like to make sure the textures line up right.
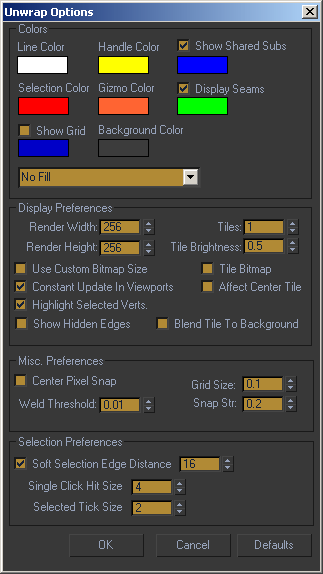
Unwrap Settings
I typically have the Edit UVWs window options customized to allow me to see the adjustments I make in real time on the mesh. SUPER handy. Below is a shot of all of my unwrap settings.
Mapping Your Materials
Please note, IMVU supplies you with a perfectly working sub-material to use with your body parts. This sub-material contains skin, eyes, and eyebrows already set up for you. Although you may create your own multi-subs for your head, IMVU recommends you use the embedded ones for your first pass at head building.
Texture mapping in any 3D program is an art all its own. However, there are a few IMVU specific things that you ought to know before you can export. First up, when you are ready to export, you are meant to have only one (1) material that is a multi-sub material. Within the multi-sub material, you may have as many material ids as you like.
One, Multi-Sub Material
If you are using MAX, you may only have one material on your model. This material can contain as many sub-materials as you like and can therefore be a “Multi-Sub” material. If you are using another 3D program, it is likely that you will have to have separate top level materials. This may result in your needing to have more meshes than described in this document.
Material Naming Convention
When creating your materials for IMVU products, you must follow a simple numerical naming convention in order for your textures to show up in the previewer. Each material name must contain a bracketed number at the end of the name. For example:
FrogTexture [2]
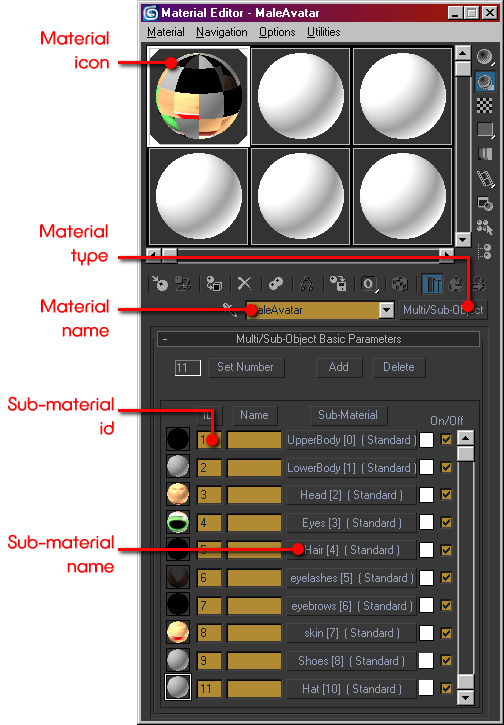
Avatar Material Assignments
The IMVU avatar comes with a preset number of Materials. Each Material has a unique ID as per the naming convention listed above. These IDs are used in the active IMVU avatar so please try to follow them when building your mesh. Here is the list:
Material 0 = UpperBody
Material 1 = LowerBody
Material 2 = Head (skin)
Material 3 = Eyes
Material 4 = Hair
Material 5 = Eyelashes
Material 6 = Eyebrows
Material 7 = Skin
Material 8 = Shoes
Material 9 = Gloves
Material 10 = Hat
Reminder: Texture Budgets
Although you should review the Mapping Materials Tutorial, I just want to remind you to keep the following list in mind when creating your textures for IMVU products:
In the IMVU rendering engine, it is far better to have many small textures rather than one big texture. This runs contrary to many other engines wherein puzzle-like texture collages are used to save rendering budget.
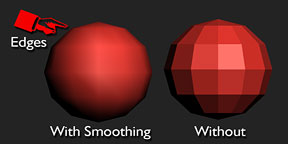
Smoothing Groups
To avoid geometrical looking meshes in IMVU, it is important to make sure that all of the smoothing groups for a given mesh are set up properly.
Morph Targets
You can build a morph target for any mesh in IMVU. However, morph targets are not necessary for creating body parts. To learn more, please go to the Morph Targets Tutorial.
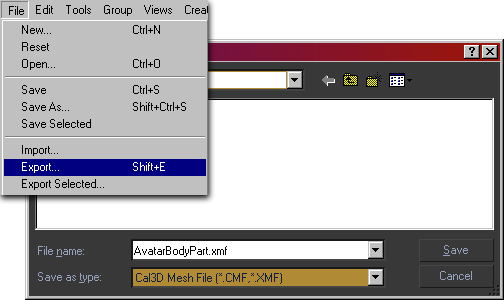
Export Mesh – .xmf
Once you have built your mesh, applied Material IDs, mapped your texture and weighted your mesh, it is time to export your mesh. When building any other type of mesh product, you would also export your materials. However, avatar products use the materials that have already been exported by IMVU. In fact, when you build your final product, it is highly likely that you will not be overriding the materials at all. Rather, it is highly likely that you will only change the mesh and textures.
Previewer
Once you have an exported .xmf file, it is time to hop into the Previewer. To learn more, please check out the Intro to Create Mode and the Edit Mesh Tab Tutorial.