Avatar Statue

This tutorial applies to both room and furniture products and assumes you are using 3DS MAX.

About ‘Avatar Statues’

In more complex products, you may have multiple avatar animations. To more easily keep tabs on all of the poses in your product, you need to be able to see posed avatars in the exact right location. However, keeping multiple versions of the animatable avatar in one MAX file makes your file unworkable – the file size becomes too large. In these situations, you ought to turn your avatar into a more easily managed ‘statue’ that you will add to your furniture or room MAX file.

For the purposes of this tutorial, we assume your intent is to embed a statue into a furniture product. However, the same process is used for embedding a statue into a room product.

Since you are building an animation for use in a furniture file, we assume that you have already imported the furniture items and root node into the avatar animation file.

This avatar statue is not at all necessary for your final furniture item to work properly. However, it is one of the best ways to verify placement of the seat node and, to be perfectly honest, I find it very useful to know which animation is supposed to show up where.
In order to make an avatar statue that is useful, you need to have already built an avatar animation and a room or furniture file. To learn how to do these things, please go to the Avatar Skeletal Animation Tutorial, the Room Introduction tutorial and the Furniture Introduction tutorial.

Start with Avatar Animation

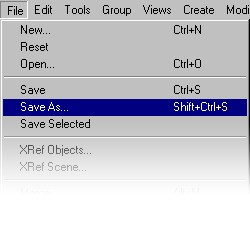
With your final avatar animation open, the first thing to do is Save As another file. You need to save a new file so you don’t override all your wonderful animation by mistake. I typically save these avatar statue files as something I know to throw away like “AAA.max”

Collapse the Meshes

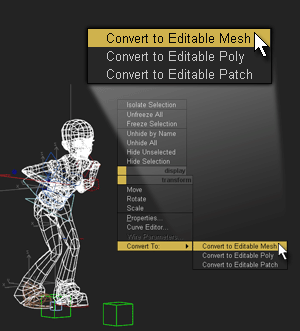
Select all of the avatar meshes; Right-click and collapse all of the meshes into an ‘Editable Mesh’

I rarely include the hands in my avatar statue as they tend to make the final furniture file needlessly large. I only include them if hand registration is important to the final seat location.
 

Selecting, Hiding and Unhiding
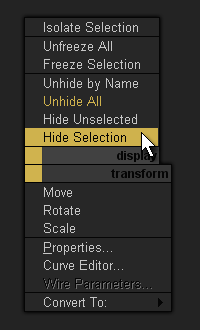
With the avatar meshes still selected, select the avatar root node, the furniture mesh and the furniture root node.

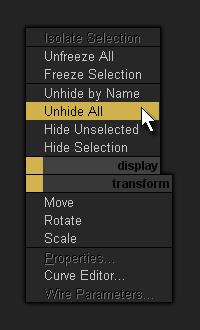
Then, right-click and choose to Unhide all. This will show all of the hidden skeletal structure for the avatar. This extraneous stuff is what you are about to delete.

With the avatar meshes, avatar root node, furniture mesh and furniture root node still selected, right click and choose to Hide the selection. You will be left with only the extraneous stuff like the bones and controllers that drive skeletal animation.

NOTE:

You want to make sure that all of the avatar meshes, avatar root node, furniture mesh and root node are hidden.


Delete what’s left.

Select All (usually ctrl+A) so that all of those bones and controllers are selected. Then, delete all of the extraneous stuff. At this stage, you should see nothing in the active viewport.

After you have deleted all of the bones and controllers, choose to Unhide All (I typically right click and choose ‘Unhide All’.)


Now you see only your avatar meshes, avatar root node, furniture mesh and furniture root node.

Rename and Attach

Select the avatar head and rename it. I usually use a naming convention that allows me to easily find my collapsed avatars in the furniture file. For example, “Av_Bounce” or “Av_SteamEngine” or, in this case, “Av_ChickenDance”.

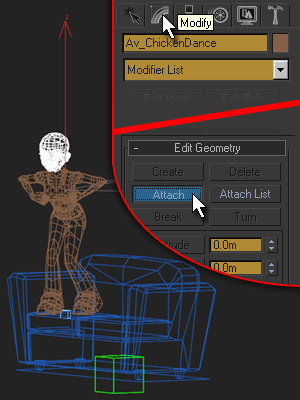
With the renamed head still selected, go to the Modify panel on the right and click the ‘Attach‘ button. Now, click on all of the other avatar meshes until they are all selected. You have just turned your avatar into a statue.

IMPORTANT

Make sure you un-check the ‘Attach‘ button so you don’t mistakenly attach the root nodes or the furniture mesh to your avatar.

Rename the Avatar Root Node

I always use the avatar root node as the seat node. This ensures that my avatar is in the *exact* right location in relation to the seat node. To do this, I rename the root node using the seat naming convention.

To learn more about seat naming, please go to the Seat Naming Convention tutorial.

In this case, I will rename the root node seat01.ChickenDance

Create a New Dummy Root

Create a new, large Dummy node and align it to the furniture root node. This new dummy node is going to allow you to position your avatar animation perfectly.

Name the new node DummyRootNode.

Now you want your statue to be linked to the seat node and the seat node to be linked to the dummy root node.

Link the avatar statue to the seat node. To do this, select your avatar statue and click on the ‘Select and Link‘ tool. Then drag from your avatar to the seat node. The seat node should blink to let you know the parenting has taken place. Follow the same process to link the seat node to the dummy root node.

Now, uncheck the link tool. To verify that your parenting has taken place, click the ‘Select by Name‘ button and make sure that you see your avatar statue indented underneath the seat node. Also verify that you see the seat node indented underneath the root node.

Remember to SAVE this file.

Merge into Room/Furniture File

Now you have a correctly parented avatar statue. The next set of steps define how to get that seat node to be in perfect position in your room/furniture file.

Open your room/furniture file and choose to merge in the contents of your avatar statue file. You should only merge in the dummy root node, the seat node and the avatar statue. If you hit material errors, just choose to use the scene material and hit OK.

Align Dummy Root

Select the dummy root node and then click on the ‘Align‘ tool. With the Align tool active, click on the furniture root node. This will launch the Align Settings dialog box. Choose to align the X,Y,Z for both the position and rotation and click OK.

The dummy root node should now be in *exactly* the same position as the furniture root node.

Now that the dummy root node is in place, the avatar seat and statue are in the *exact* location they need to be. Thus, the dummy root node has served its purpose. Delete it.

Select the seat node and click on the ‘Select and Link‘ tool again. This time, link the seat node to the furniture root node. You should see the furniture root node blink to let you know the linking has taken place. To verify this, click on the ‘Select by Name‘ tool to view the hierarchy. You should see the seat node indented underneath the furniture root node.

WOOHOO! You just created an Avatar statue and merged it into your furniture max file!

Select the Avatar statue and click the ‘Unlink Selection‘ button. The Statue is now in place simply to let you know what animation is meant to go with the seat node. It also helps you see exactly how that animation interacts with other avatars and pieces of the furniture item.

Updated on July 21, 2023

Was this article helpful?

Related Articles

Discuss this!
Ask questions and get answers in our Creator Discussions.
BROWSE DISCUSSIONS