Adding Lights (Blender)

Adding Lights

Lights can make or break products, rooms in particular can be made to be more atmospheric and relatable through the appropriate placement of sources of illumination, a simple box for example becomes a dungeon or creepy basement. There are generally two types of lighting, object, which includes an omni-directional and directional light object, and ambient. For Blender users there are a number of idiosyncrasies to keep in mind when being including lights that when followed, make their addition relatively straightforward.

Download the Room example file.

Add Omni-directional Lights

For Blender users two different types of light objects can be created; an omni-directional light called Omni, and a directional light called Spot. For both objects to work they need to be linked to the rooms skeleton which must include skeleton.Room and node.Room, node.Room being the child or parented to skeleton.Room – this is important because lights parent to node.Room.

skeleton.Room
» node.Room
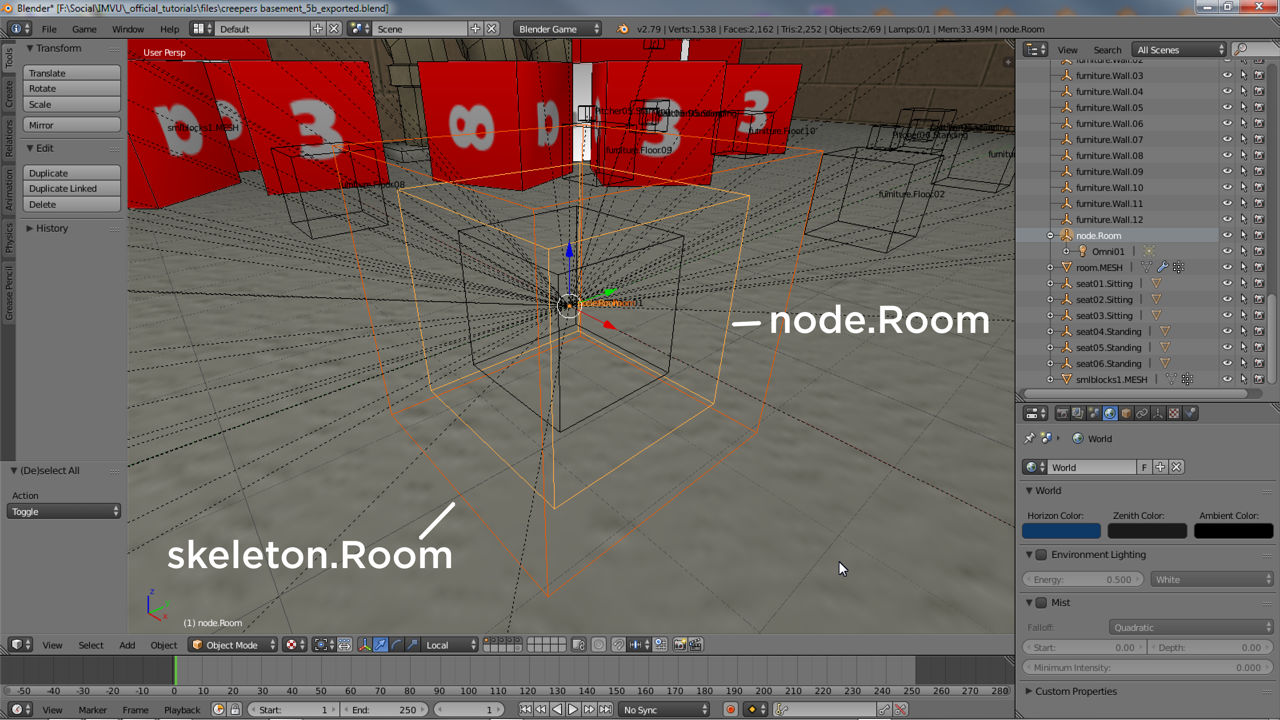
The two master nodes for a room, skeleton.Room and node.Room

All different types of light are linked to node.Room which is itself linked to skeleton.Room (node.Room is shown slightly smaller for clarity, as a node they are simply points in space).

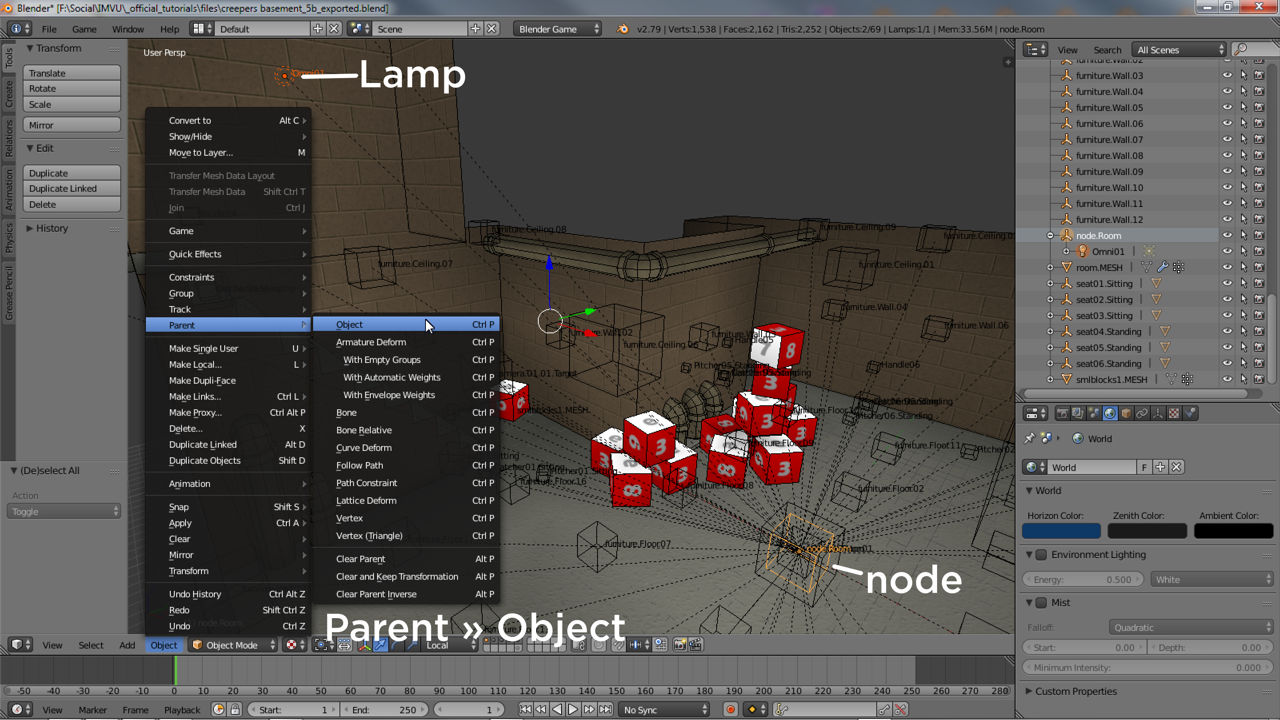
To add an omni-directional light, with the room open in Blender click the Add menu below the 3D View and from the options mouse over Lamp. In the fly-out menu click PointAdd » Lamp » Point. An object will appear at the 3D Cursor that can now be moved into position (left-click drag the widget handles). Once in place select the Lamp then Shift+ right-click select node.Room – selection order is important – and from the Object menu select Parent » Object (Object » Parent » Object), then Object (Keep Transform) in the pop-up that appears (Object » Parent » Object » Object (Keep Transform)), parenting the two items together.

The orientation of Lamp objects in Blender, where the widget axes point, do not matter as they emit light uniformly in all directions.

skeleton.Room
» node.Room
» » Omni01

Using an Armature and Bone based skeleton instead of nodes, the light will generally need to be a bone and not a Lamp object as described above; simply add an extra bone and parent it to node.Room bone.

Lights need to be parented to node.Room

Once a Lamp has been placed and positioned in the room where it needs to be it should be parented to node.Room – select the Lamp then node.Room last (selection order is important) then Parent, Object » Parent » Object, Object (Keep Transform)).

Once done select the Lamp and in Object Properties in the text input field at the top of the panel type and rename Point, the name assigned by default, to Omni[n], i.e. Omni01.

[n] is an incremental numerical value relating to the number of lights in the scene up to a recommended maximum of 3 – any more than this an IMVU’s performance can be negatively affected.

General lights are called 'Omni[n]' and emit a uniform brightness of light

Like all elements of a room skeleton, Lamps have a unique name that identifies the type of node, Omni, and should have a numerical append that highlights individual instances, [n], i.e. Omni01, Omni02 etc.

Add Spot Lights

As with omni-directional lights, spot or directional lights are part of the rooms overall skeleton and similarly parented to node.Room. To add a directional light, with the room open in Blender click the Add menu beneath the 3D View, from the options click Lamp and then Spot (Add » Lamp » Spot). The new object will appear at the 3D Cursor which can then be moved into position left-click dragging the widget handles.
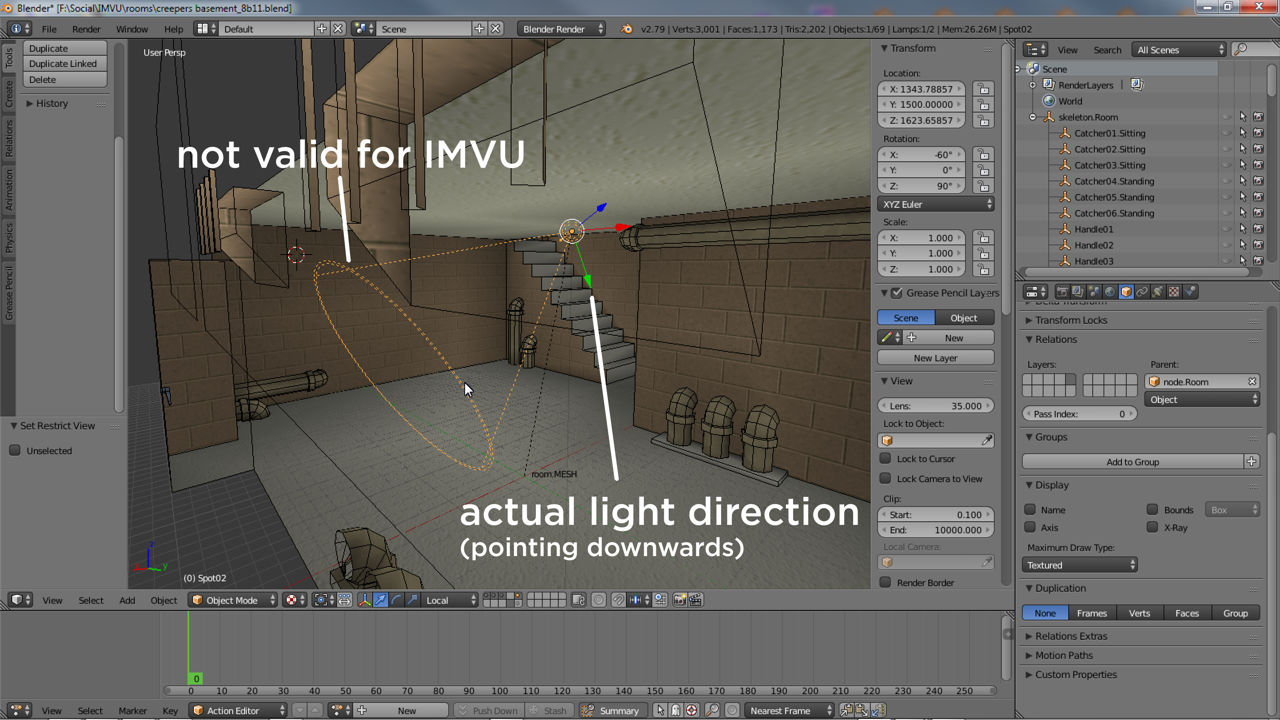
Using Local as the Transform Orientation instead of the default Global, the Spots Y axis (green arrow) points in the direction the light illuminates, not the cone displayed which may point at the ground – Y (green) = forward, Z (blue) = up.


Using an Armature and Bone based skeleton spot lights can still be created but they will need to be represented as individual bones.

Spot lights can be used but need to be set up correctly

Rooms made in Blender can include spot lights (Spot) but they need to be orientated along a different axis to work in IMVU because the light beam follows +Y axis (points in the same direction as the green widget arrow – Local orientation) not -Z (points away from the blue widget arrow – Local orientation).

Once placed select the Spot then Shift+ right-click select node.Room and parent the two together – Object » Parent Object » Object (Keep Transform). Once parented select the spot light(s) and in Object Properties click the text input field at the top of the panel and change the name to Spot[n], i.e. Spot01.
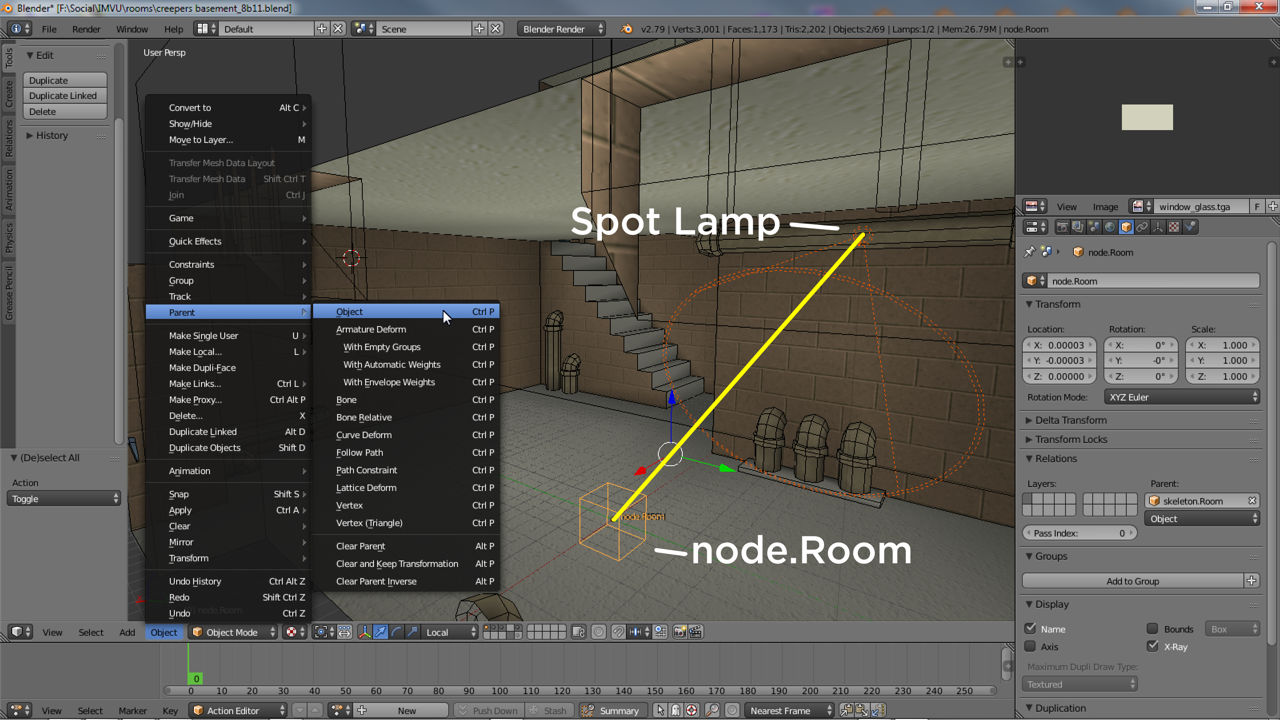
In relation to lights, [n] is an incremental numerical value representing the number of lights in the scene, up to a recommended maximum of 3 – any more than this and IMVU’s performance can be significantly negatively affected.

Spot lights also need to be parented to node.Room

Once Spot lights are positioned in the room they need to be linked to node.Room – select the Lamp first then node.Room (selection order is important) then Parent – Object » Parent » Object, Object (Keep Transform)).

Colouring Omni and Spot Lights

Both Omni and Spot lights can be colour-tinted in Blender. This generally serves two purposes; 1) tints the light a certain colour and 2) mediates the lights apparent brightness or intensity, this allows a simple basement to not only be dingy but with the addition of colour, post-apocalyptic.

The apparent brightness of lighting is mediated solely by colour not intensity or similar values (lights in IMVU do not have ‘falloff’, they don’t fade over distance). In Blender this means changes to Energy and Distance in Object Data Properties will have no effect on a given lights behaviour in IMVU.

To change a Lamps colour in Blender, right-click the object and in Object Data Properties click the Light colour sample lozenge in the Lamp subsection. The colour-picker/chooser will pop-up. Click in the colour wheel to set a Colour and/or the Value saturation slider to alter intensity. Press Enter or click away from the pop-up to confirm.
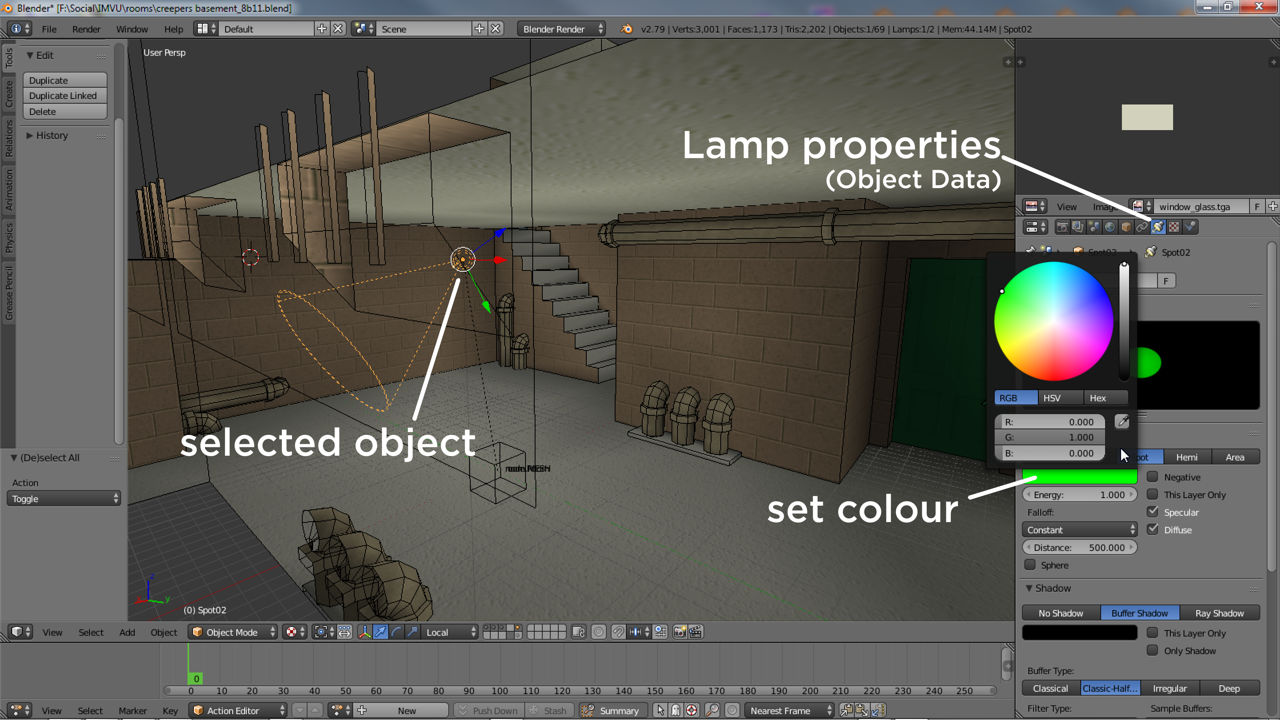
If spot lights are in close proximity to one another their colours may merge in IMVU creating a different tone/look than intended. This also affect light intensity, as colours are merged they may increase the resulting lights apparent brightness.

Lights can be colour tinted in Blender from Object Data properties

By defaults all lights are ‘white’ but can be colour tinted in Blender – select the Lamp then in Object Data properties set the light colour using the colour picker. Colour is also used to temper light intensity, darker colours reduce a light apparent brightness or strength.

Add Ambient Light

For Blender creators Ambient Light is added to the scene, or is modified, in Create Mode. To do this, once a scene has been exported from Blender to FBX, imported into an Editor and assembled (click here or here for more details), click the config tab to access the panel and its options. If not visible click the Room Fog and Lighting Parameters heading to reveal the Ambient Light properties. To set or modify the scenes ambient lighting simply click-drag either/or/all of the colour sliders shown, R = Red, G = Green and B = Blue. Once set click the Apply Changes button to see the results
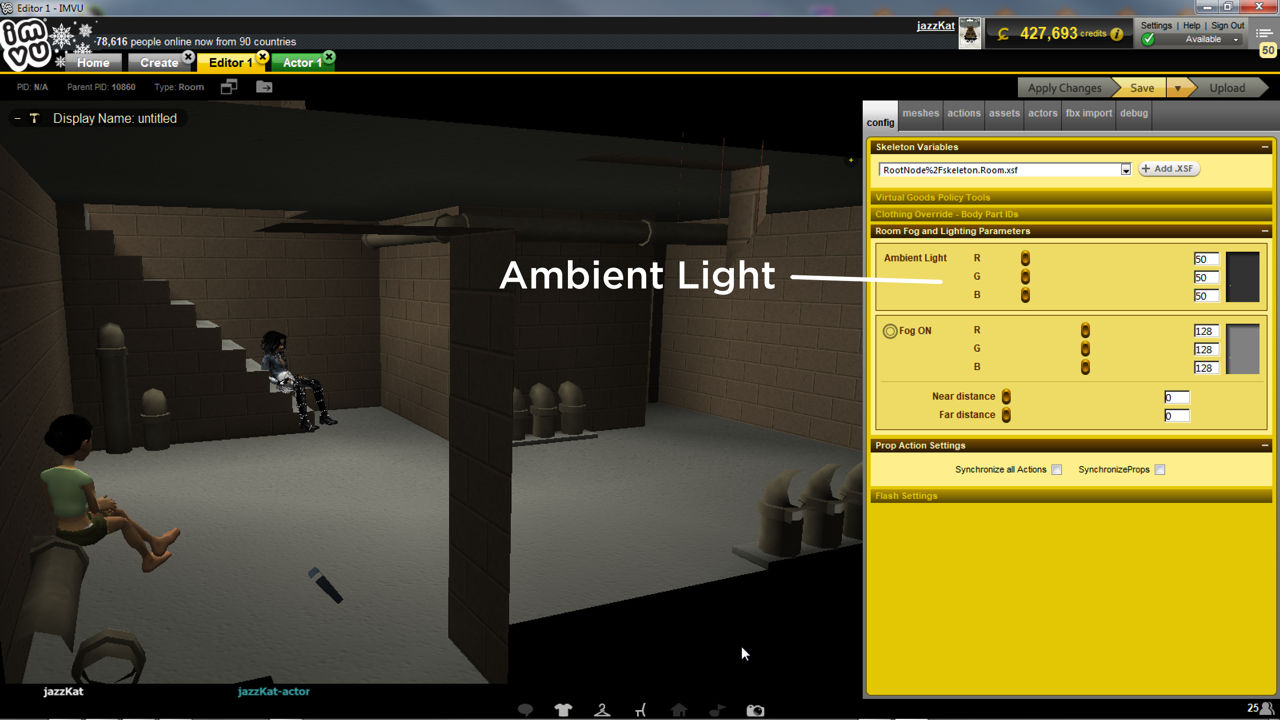
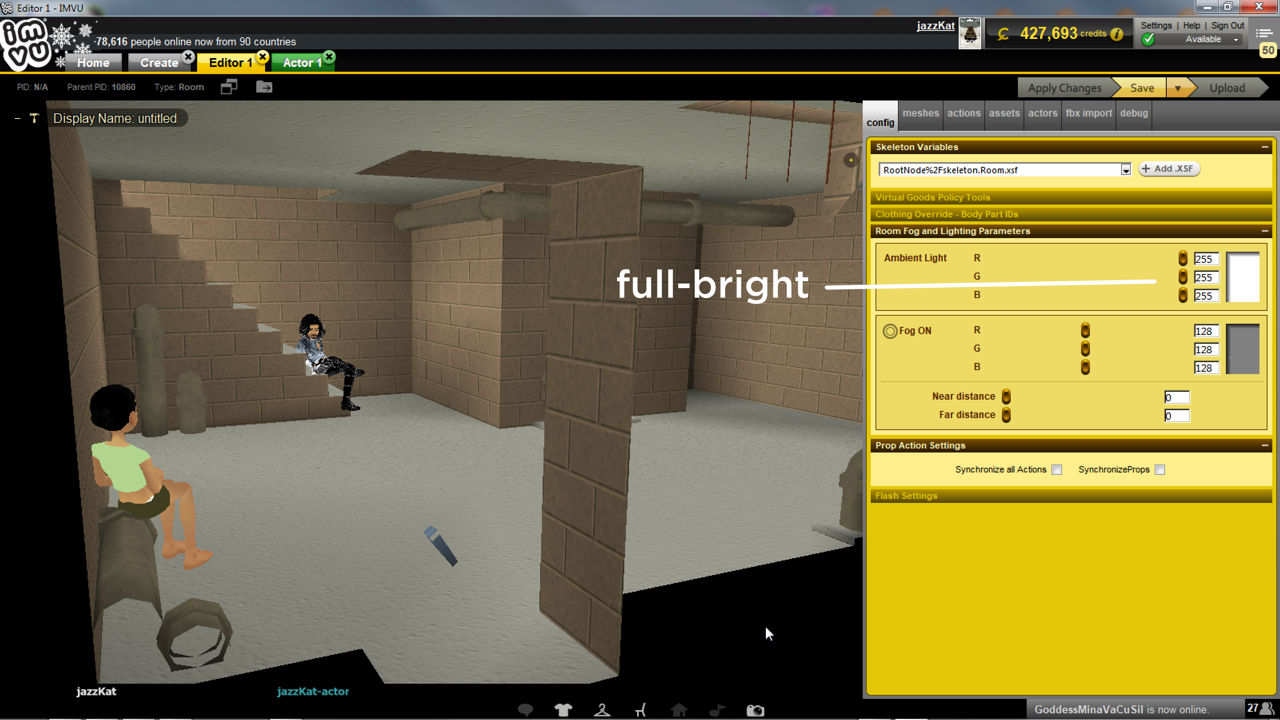
Colour is not changed in the main view in real time, Apply Changes needs to be click after each modification to the settings so may need to be clicked several times as adjustments are made. Ambient Light is based on saturation or colour intensity, not brightness – an R/G/B value of 0 means no colour, whereas 255 equals full colour (0% to 100% saturation). To keep the colour neutral use the same value for each R/G/B channel.

Rooms can also be changed making adjustments to ambient light in Create mode
Full ambient light makes the room look flat lit

Ambient Light approximates the way light naturally bounces around by applying a uniform colour to everything in the scene, the key being to find a balance between the shading given Omni and other skeletal sources, and ambient’s flat lighting (nullifies shading).

Animated Lights

For most purposes lights are static but they can be animated. To do this lights that are to be animated need to be associated with an animated control node. To do this a new node needs to be added, this can be a duplicate of any node already in the scene. Right-click the nearest node and duplicate it – Object » Duplicate Objects. In Object Properties rename the node to something appropriate, i.e. ‘lightControl‘ and then select it and Shift+ right-click select node.Room. Parent the two together – Object » Parent » Object » Object (Keep Transform). This creates a hierarchy similar to the following;

Download the example file.

skeleton.Room
» node.Room
» » lightControl

Once the control node is parented to node.Room the light(s) needs to be parented to the control, select the light first then Shift + right-click select ‘lightControl’ before parenting; Object » Parent » Object » Object (Keep Transform). This creates a hierarchy similar to the following;

skeleton.Room
» node.Room
» » lightControl
» » » Omni/Spot

With this set up, lightControl is then animated as normal (see here for more on animation), and as the parent of the Lamp, controls it’s behaviour, e.g. rotates across the sky like the sun or other celestial body.
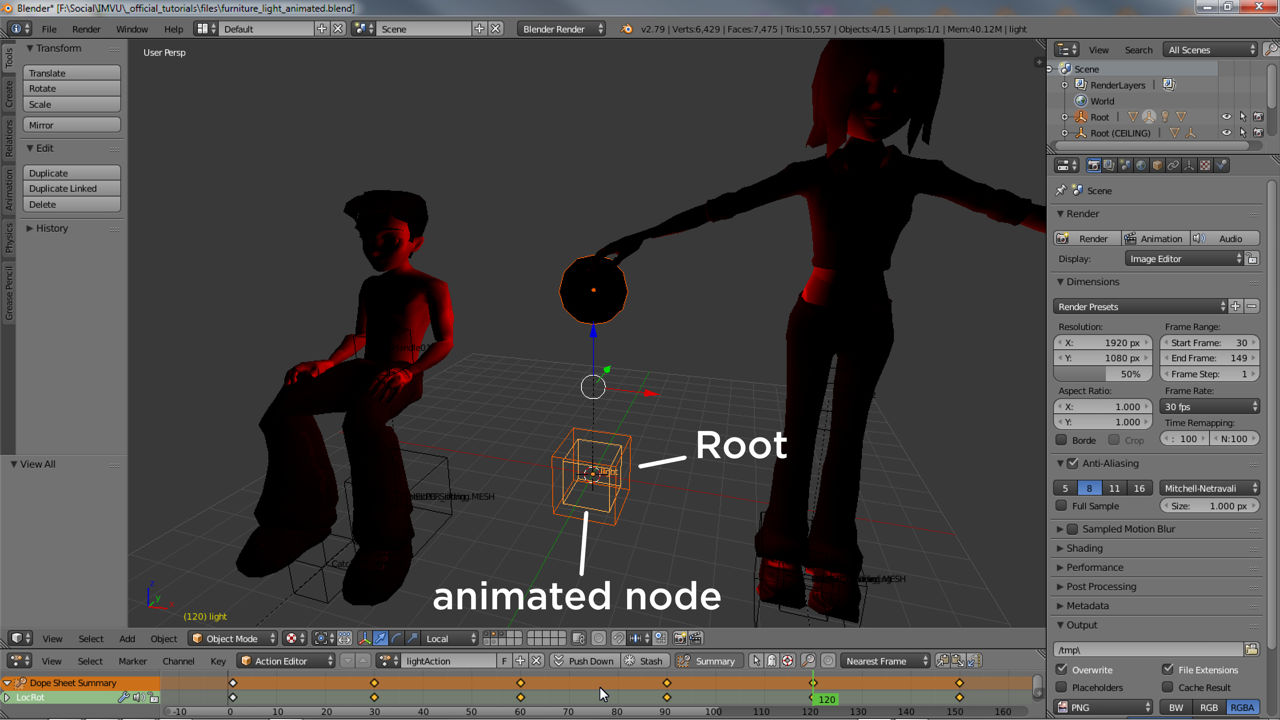
Generally speaking lights shouldn’t be animated directly but should be controlled by another bone or node.

Lights can also be animated providing they are set up correctly

Light can also be animated although indirectly by parenting (in Blender) to a ‘control’ node which is animated, itself then parented to the items master bone or node, e.g. Root for a furniture item.

Furniture & Accessory Lights

Lights can also be added to furniture and accessories depending the items set-up. To do this a compatible skeleton is needed that contains at least one bone or node, adding lights to mesh replacements won’t work. In similar fashion to adding lights to rooms, both furniture and accessory lights are parented to the origin bone for each product type, Root for furniture like so;

Download the accessory light and furniture light example files.

Root
» Omni[n]
Lights can also be added to furniture ans accessories

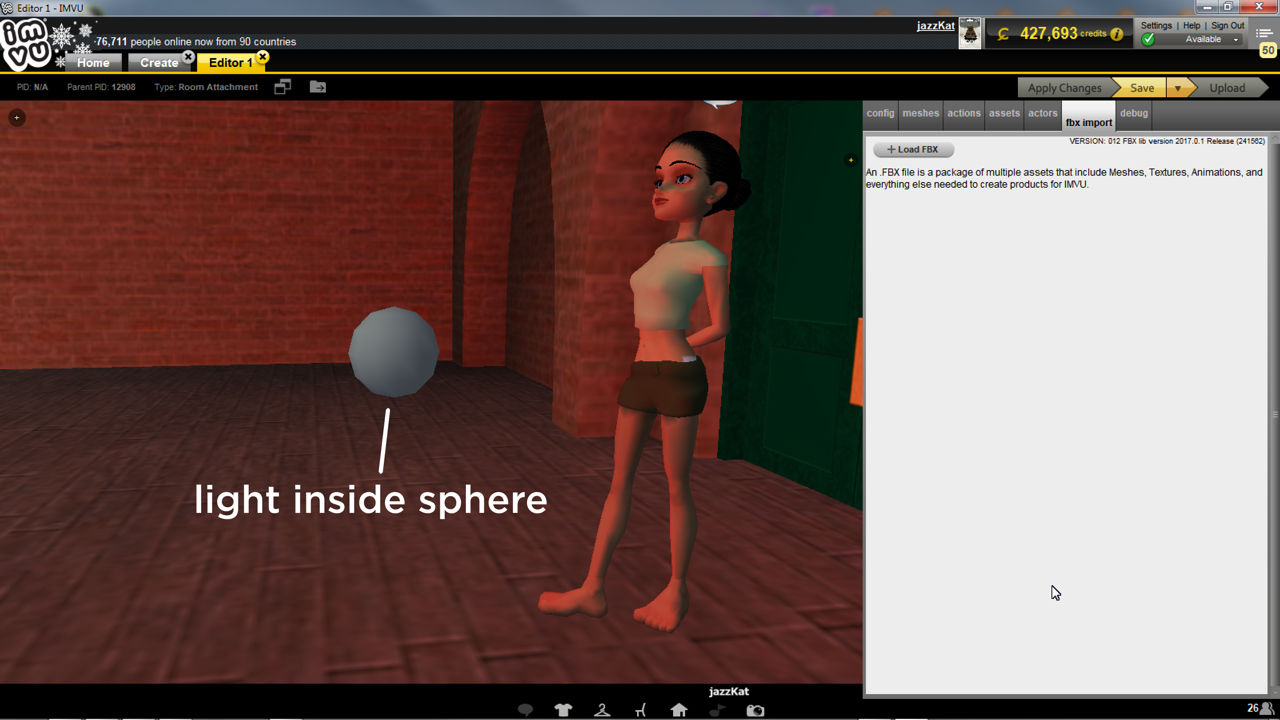
Lights can be added to furniture items by parenting a Lamp to Root. They can also be colour tinted and animated (mesh sphere indicates lights location, it does not emit any light itself).

And AttachmentRoot for accessories;

AttachmentRoot
» Omni[n]

To do this in Blender, add and position a Lamp object – Add » Lamp » Point/Spot. Select the Lamp and Shift+ right-click include the origin bone or node (selection order is important) then parent together – Object » Parent » Object » Object (Keep Transform). This will create the appropriate hierarchy ready for export.
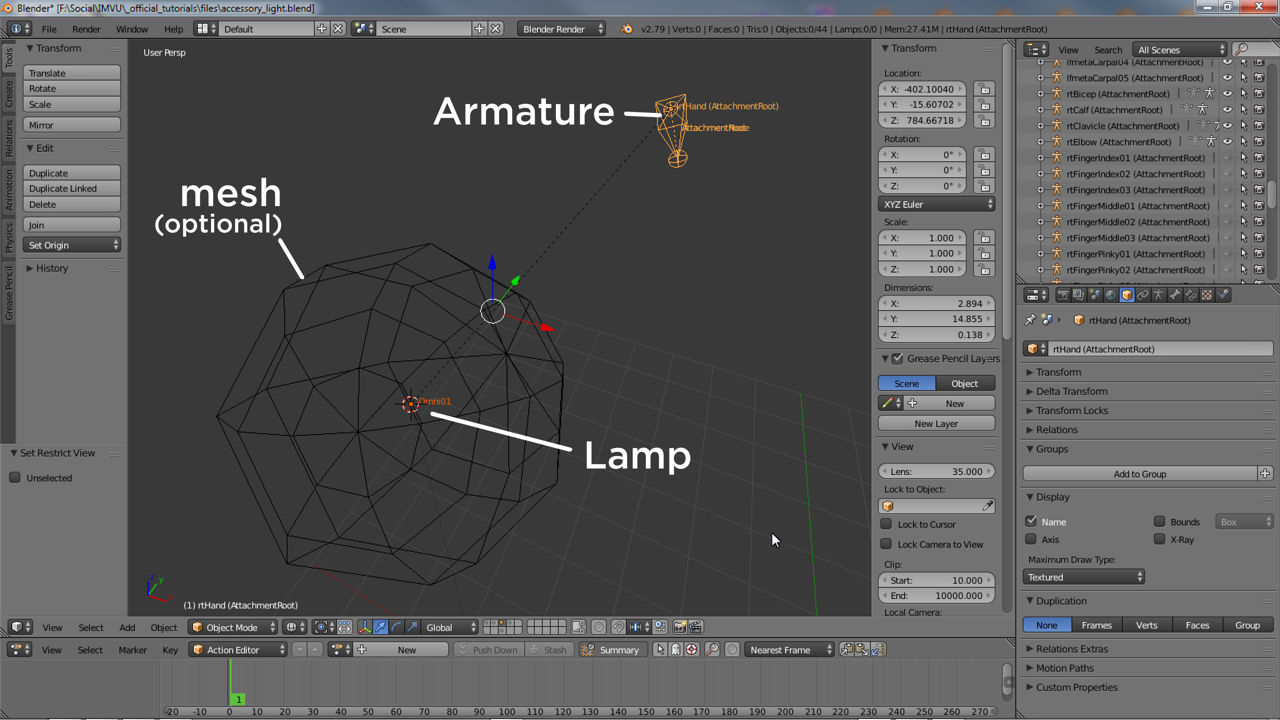
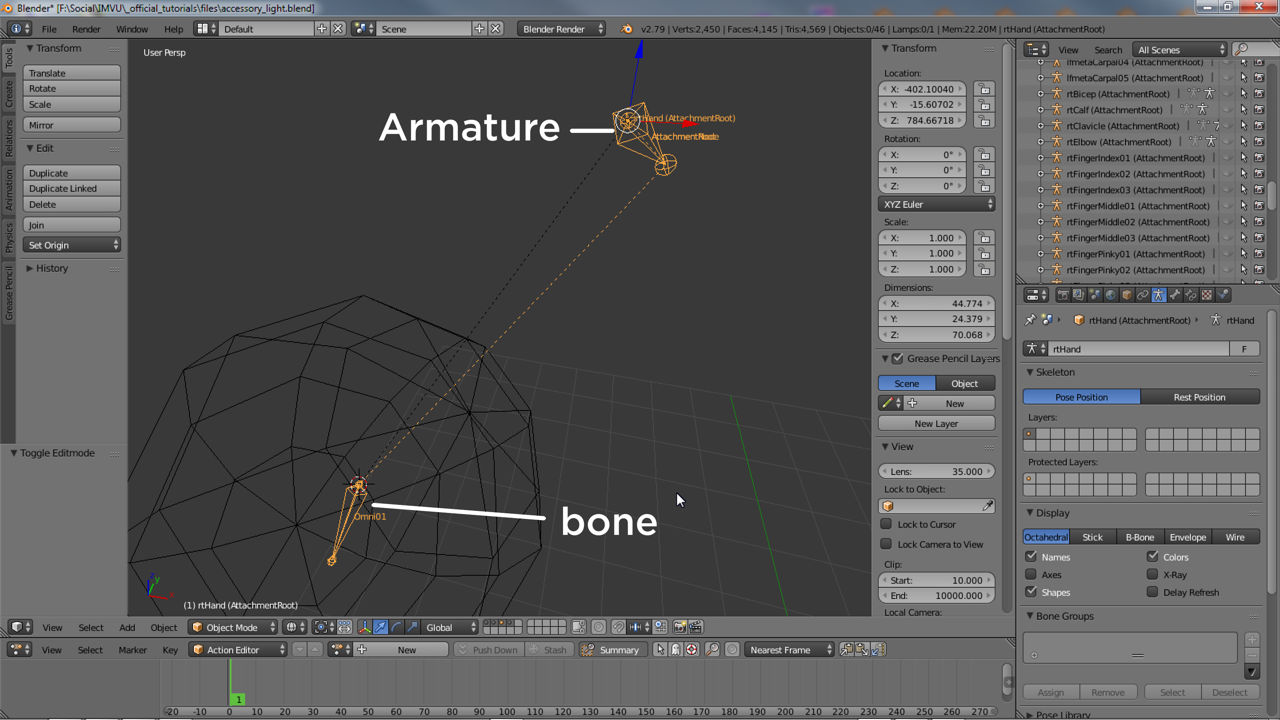
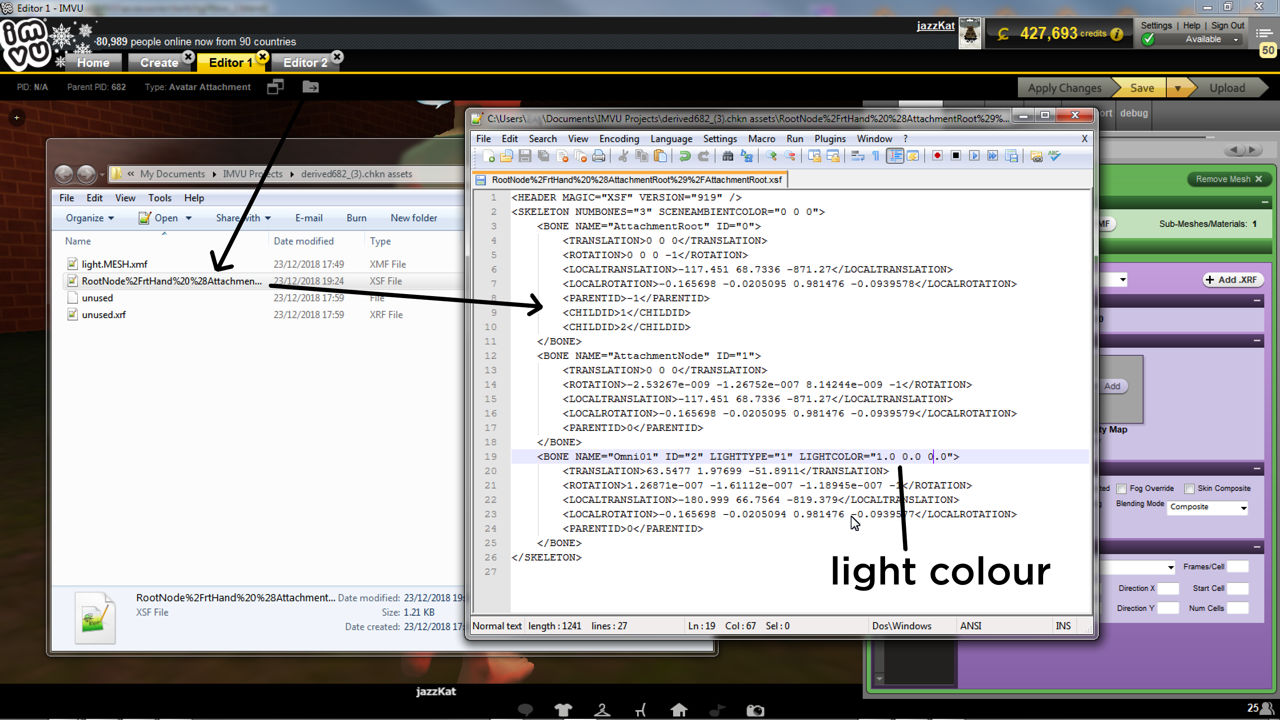
If using a Lamp object doesn’t work correctly an extra bone can be added to the accessory Armature to represent the light (duplicate an existing bone or add a new one). This should be parented to AttachmentNode or AttachmentRoot to ensure the resulting product functions correctly. The ‘light’ may then need further editing in IMVU if colour changes are required – click the Assets Folder icon and edit the XSF file in a text editor (see image below).

To work with accessories, lights need to be bones
Using bones means manually editing the XSF file to change colour
Using an Armature the ‘light’ bone, named ‘Omni01’, must be parented to AttachmentNode or AttachmentRoot. As this is a bone colour information needs to be manually included editing the XSF directly in a text editor.

Parenting a light to an accessory skeleton

Similar to furniture, accessories can also include lights linked to the accessory root bone or node. They too can also be animated (subject to suitably set up skeleton) and colour tinted.

Video Summary


Updated on July 21, 2023

Was this article helpful?

Related Articles

Discuss this!
Ask questions and get answers in our Creator Discussions.
BROWSE DISCUSSIONS