1. Home
  2. Classic Creator
  3. Legacy Docs
  4. Rooms & Furniture
  5. Furniture – Weight Painting (Blender)
  1. Home
  2. Classic Creator
  3. Legacy Docs
  4. Blender™
  5. Furniture – Weight Painting (Blender)

Furniture – Weight Painting (Blender)

For products to work in IMVU meshes need to be linked or connected to an underlying skeleton using Parent. This established a global relationship; which skeleton controls which mesh. Once set up the relationship needs to be augmented further through Weight Paint and Vertex Groups so IMVU knows which specific element of a skeleton controls which specific element of a mesh. If neither is done nothing appears in IMVU when the assets are imported and assembled.

See here for more information on furniture nodes, Catcher & Pitcher nodes, and Seat Handles/Nodes.

For more help adding seats to furniture see here.

For more information on weight painting generally see here.

IMPORTANT

Weight painting applies to node or bone based skeletons equally.

IMPORTANT

Limit skin weighting to 4 bones per vertex!

Products created with skin weighting of more than 4 bones per vertex may appear distorted in Next platforms (Desktop, Web, Mobile and Studio).

Without weight painting meshes won't appear in IMVU

[ht_message mstyle="info" title="" show_icon="true" id="" class="" style=""]Weight Painting. Without weight painting meshes won’t appear in IMVU when imported.

Weight Painting in Blender

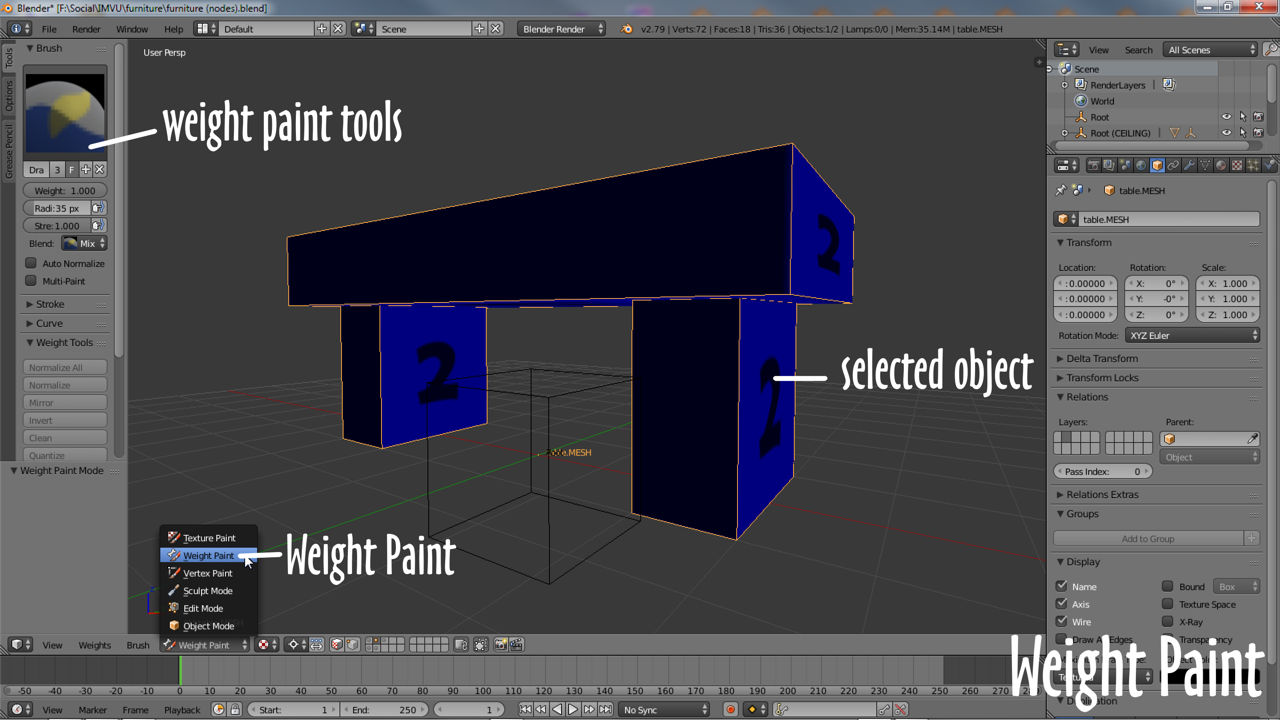
For a typical furniture item, meshes need to be weight painted to Root, the master node that controls where the furniture appears in a room. To do this first right-click select the mesh to be painted and switch to Weight Paint mode using the Object Interactive Mode selector. The Tool Shelf will change to show a new set of option, the cursor will display a wire loop and the mesh will turn blue indicating its ready to be painted. To paint, left-click a vertex or over a number of vertices to apply the weight value set in the available tools to the mesh (1.000 or 100% ‘weight’ by default).
IMPORTANT

The Furniture Starter file has a basic mesh object already set up and correctly weight painted to the Root node so painting only needs to be done to additional meshes or mesh elements.


Switching to Weight Paint mode in Blender with object selected

Weight Paint. When initially switching to Weight Paint mode using the mode selector the Tools Shelf updates with a new set of tools and the mesh turns blue (not weighted yet).

Weight Painting and Vertex Groups

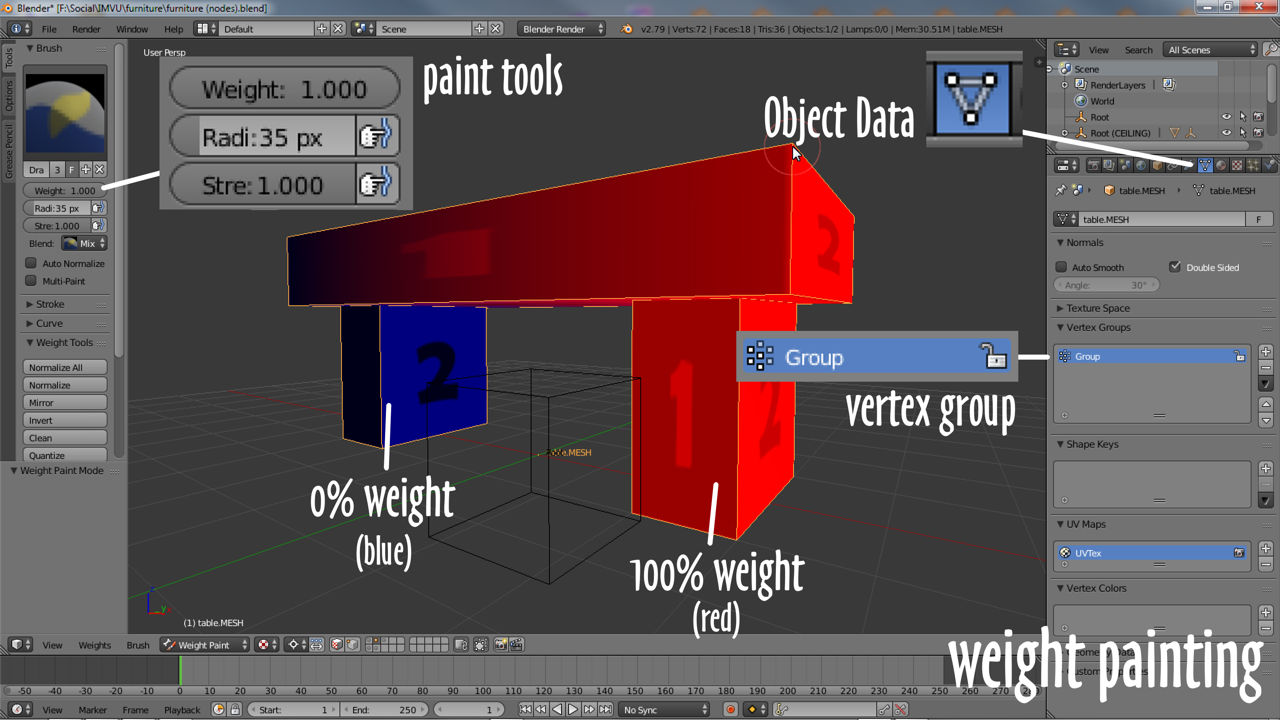
If the mesh is not yet associated (Parented) to a skeleton (node or bone), as soon as a weight of any value is painted to the mesh Blender automatically generates a vertex group, called Group by default, that collates all the painted vertices and values into the same instance, hence their being called vertex groups – blue being 0.000 or 0% influence, red 1.000 or 100% influence, for normal furniture items meshes need to be painted red entirely.
IMPORTANT

For most furniture items the default paint settings are more than adequate, Weight: 1.000 (100%) and Strength: 1.000 (100%) – Radius can be changed, increasing brush size to accommodate larger meshes.


Painting weights automatically generates a vertex group

Weight Painting. Weight Painting is done in a special mode tailored to the task, which can be accessed once a mesh is selected, using the Interactive Mode selector in the 3D View Header.

Rename Default Group

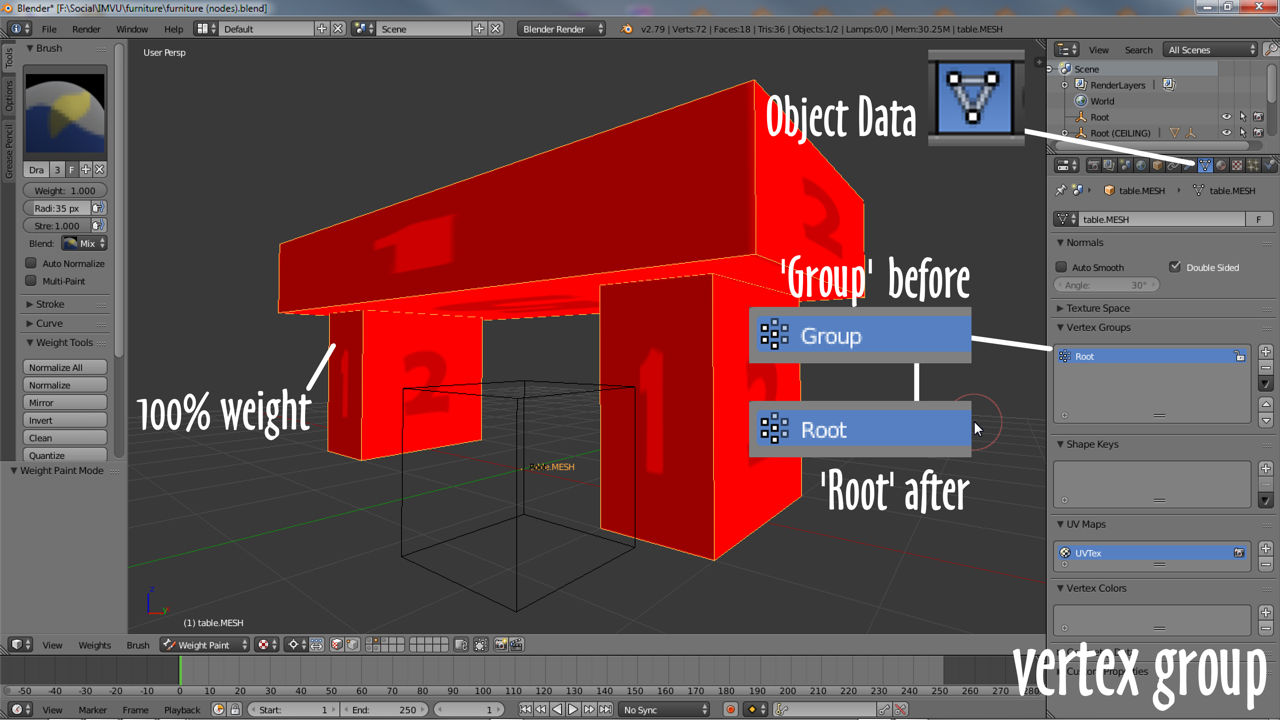
If Blender is creating default groups they will need to be renamed to match the skeletal node or bone that’s to control them for IMVU. For a typical furniture item meshes will generally only need a single vertex group assigned to the entire mesh (in vertex paint mode everything will appear tinted red – see below), which by default will be called Group. This needs to be renamed to match what IMVU is expecting, naming ‘Root’. To rename, in Object Data Properties double left-click the ‘Group‘ entry in the Vertex Groups aperture to activate for editing and type ‘Root‘ to rename. This now means once mesh and skeleton are Parented, the Root node or bone will control the mesh which also ensure it appears in IMVU once imported.
IMPORTANT

Vertex group names are cAsE SEnsItive, “root” is not the same as “Root”.


Renaming the default vertex group

Vertex Group. When weight painting Blender will generate a Vertex Group that needs to be renamed to match the node or bone its to be associated with, Root in this instance for a simple furniture item.

Weighting Node vs Bones

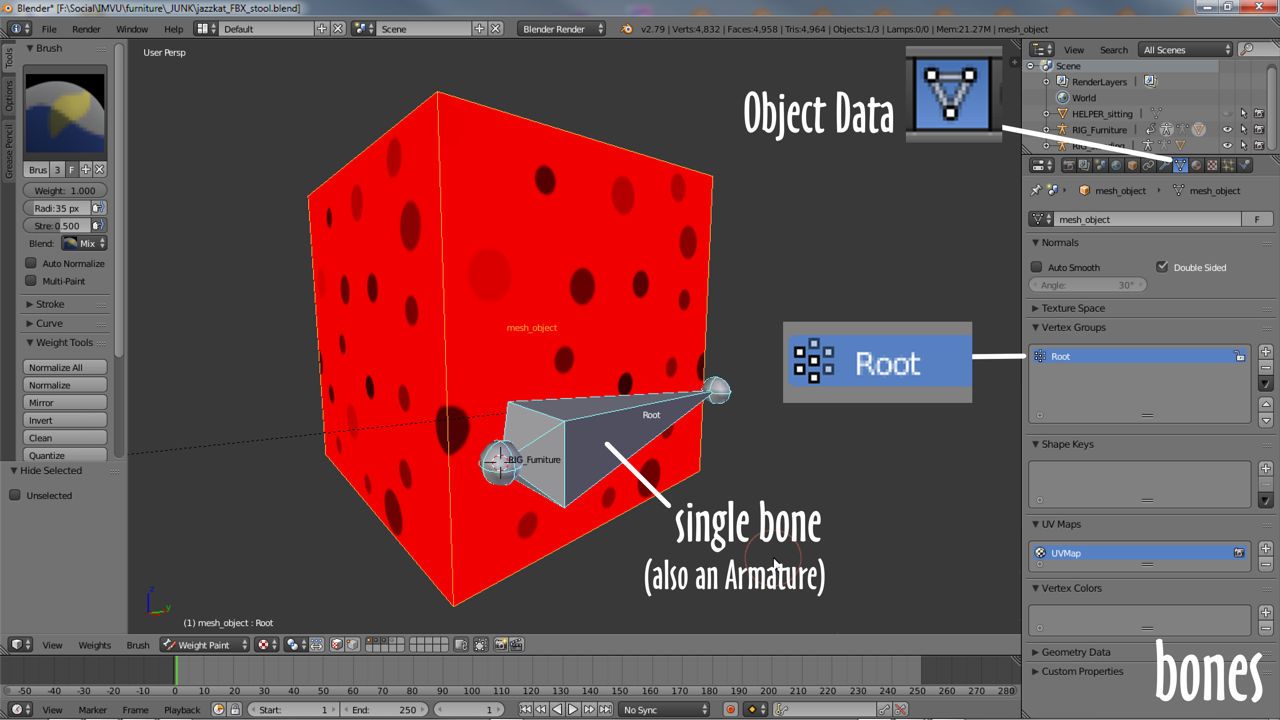
Being able to export content to FBX means furniture can be made using nodes, bones, or a combination of the two. In terms of weight painting neither changes the way this is done, colours are painted to a mesh the same way using the same tools, vertex groups also then being generated and having to be renamed similarly (as above).
IMPORTANT

When weight painting using Armatures and Bones, selecting different bone and then painting the mesh will automatically generate different vertex groups and associated weight paint ‘maps’ per selection (bone).


Weight Painting to a Bone (and Armature)

Bones. Weight Painting to bones when using an Armature as a furniture skeleton is exactly the same as it is for nodes – bone/Armature shown in Pose Mode to facilitate bone-selection based weight painting of the mesh.

Updated on July 21, 2023

Was this article helpful?

Related Articles

Discuss this!
Ask questions and get answers in our Creator Discussions.
BROWSE DISCUSSIONS