Introduction
Once you have built an animation in a 3D program like 3DS MAX, you must export it as a different file type. This exported file will be what you add to the Previewer so that you can create a product.
IMVU uses Cal3D file formats. This means that you must use a 3D program that has Cal3d exporters written for it. The Cal3D file format that the IMVU Previewer recognizes for skeletal animations is “.xaf”. The Cal3D file format that the IMVU Previewer recognizes for morph animations is “.xpf”.
Once you have your 3D program set up to export Cal3D assets, it is actually really easy to export.
The first section of this tutorial will focus on skeletal animation export. The second section will focus on morph animation export.
Skeletal – Select the Root Node
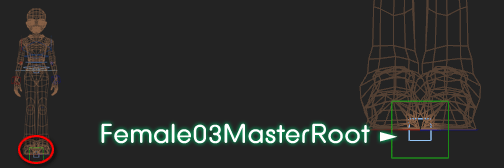
In order to export any skeletal animation for IMVU, you must select the root node of the skeleton. This is the highest bone in the skeletal hierarchy.
The root node for the IMVU avatar skeleton is called Female03MasterRoot.
Skeletal – Select Export
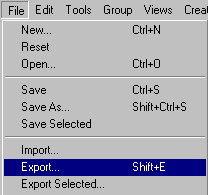
With the root node selected, go to File/Export.
Skeletal – Choose *.XAF Format
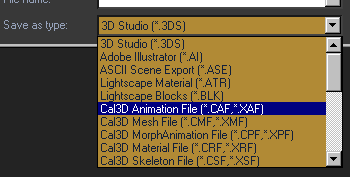
When the export screen opens, choose the “Cal3D Animation File (*.CAF, *.XAF)” option.
 Skeletal – Name File
Name your file however you like. However, please remember to manually type in the .xaf suffix at the end of your asset name. If you do not manually add this, the file will be exported as an unusable .caf file.
Then, click Save.
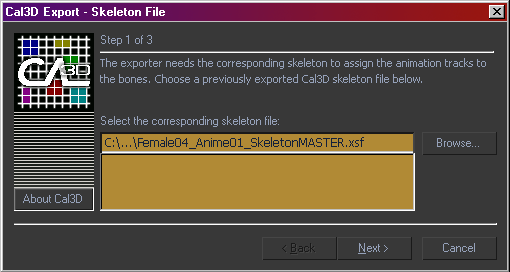
Skeletal – Export Step 01: Choose Skeleton
In the Cal3D window that appears, you will be prompted to supply a skeleton/.xsf file. Browse to the skeleton file you want your animation to work on. In the case of animations built on the IMVU-created avatar, that file is always the same regardless of whether you are creating a female or male animation.It is called Female04_Anime01_SkeletonMASTER.xsf and comes with avatar ZIP files found on the Avatar Animation Files Tutorial.
Skeletal – Export Step 02: Choose Bones
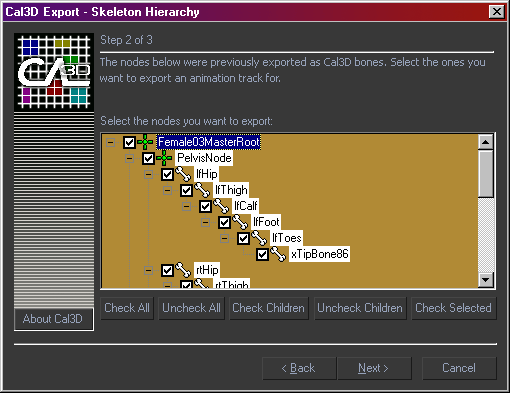
If you want, you can export only portions of the skeleton.
For example, if you want to have the avatar do a wave animation, you only have to export the bones affected in the wave. IE – the arm and clavicle. This approach frees the rest of the skeleton up to be driven by the avatar Idle animations (like changing posture while standing) and looks very natural.
There are several ways to choose a subset of the bones in the skeleton when exporting:
- You can simply check the boxes next to the bones you actually want to export. This means actually unchecking everything else in the list. To do so, you can click the uncheck all button and then go in and check the bones you want to export.
- You can select the bones you want to export in MAX, then choose to export an .xaf file, and then click the Choose Selected button in the skeleton hierarchy section of the exporter.
Skeletal – Export Step 03: Verify Timing
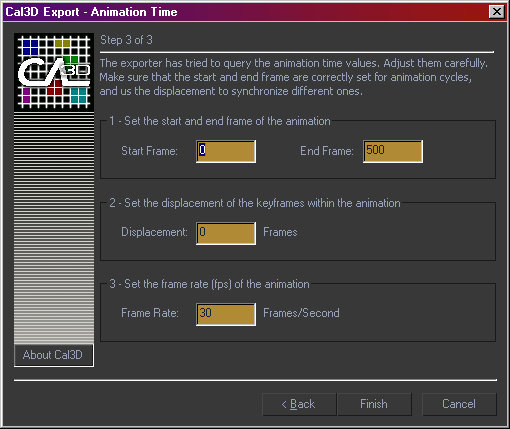
In the third step, you are asked to review that the basic timing inputs are correct. They almost always are so you will normally be able to simply hit Finish without a second thought. However, if you want to know how things are supposed to look, here are some tips:
Start Frame – This is normally zero but you can make it any number you want. The frames before the number you type in are not exported.
End Frame – This is normally the end frame of your animation file. You can make it any number you want. The frames after the number you in are not exported.
Displacement – just leave this at zero.
Frame Rate – IMVU animations should always be exported at 30 frames per second.
Skeletal – Click Finish
Once you’ve clicked finish, you have created an .xaf file that can be used in the Previewer.
Morph Animations
Now let’s move on to how to export a morph animation.
As you may know, there is a big difference between skeletal and morph animation. Skeletal animation tells the bones of the skeleton how far to move/rotate over time. While I can make the avatar head bone nod yes or shake no I can not change her expression with a skeletal animation.
Morph animations control the shape of a mesh over time. In the case of the IMVU avatars, morph animations are used for facial expression.
Morph – Select the Mesh
Once you have created your morph animation in a 3D program like 3DS MAX, select the mesh you wish to have morph. In the case of avatar facial morphs, this is typically the parent head mesh. This should be the only head mesh in the file that does not follow the morph naming convention.
Morph – Select Export
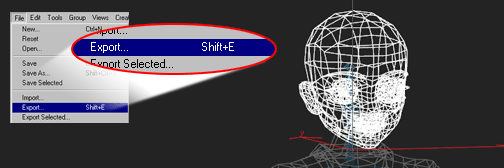
With the parent mesh selected, go to File/Export.
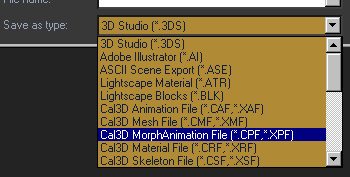
Morph – Choose *.XPF Format
When the export screen opens, choose the “Cal3D MorphAnimation File (*.CPF, *.XPF)” option.
Morph – Name File
Name your file however you like. However, please remember to manually type in the .xpf suffix at the end of your asset name. If you do not manually add this, the file will be exported as an unusable .cpf file.
Then, click Save.

Morph – Export: Verify Timing
Exporting morph animations only contains one step. In this step, you are asked to review that the basic timing inputs are correct. They almost always are so you will normally be able to simply hit Finish without a second thought. However, if you want to know how things are supposed to look, here are some tips:
Start Frame – This is normally zero but you can make it any number you want. The frames before the number you type in are not exported.
End Frame – This is normally the end frame of your animation file. You can make it any number you want. The frames after the number you in are not exported.
Displacement – just leave this at zero.
Frame Rate – IMVU animations should always be exported at 30 frames per second.

Morph – Click Finish
Once you’ve clicked finish, you have created an .xaf file that can be used in the Previewer.
