In this tutorial you’ll learn about how avatar materials are used within IMVU creation. While this tutorial specifically references Blender, many of these steps will apply in other 3D software applications. [Download Blender FREE here.]
Avatar Materials
Certain features in IMVU are activated based on material assignments, for example rely on specific sections of the mesh being assigned an appropriate identifier (“ID”) which then triggers the effect for those surfaces. For IMVU this identifier is not specifically the name or label given to a material assignment. The descriptive word that might be used, for example “head“, “hand” etc., but a special appended number like so; “[0]“, “[3]“, “[10]” etc. that makes the material look like this, “head [2]“, “hand [7]” and so on. Without doing this meshes can appear white or un-textured in IMVU.
Avatar Materials in IMVU
For the basic avatar mesh each number associated with a material corresponds to a particular mesh segment of the avatar as follows;
Head [2]

Eyes [3]

Hair [4]

Eyelashes [5]

Skin [7]

Eyebrows [8]
In some instances materials can be associated with multiple mesh sections like so;
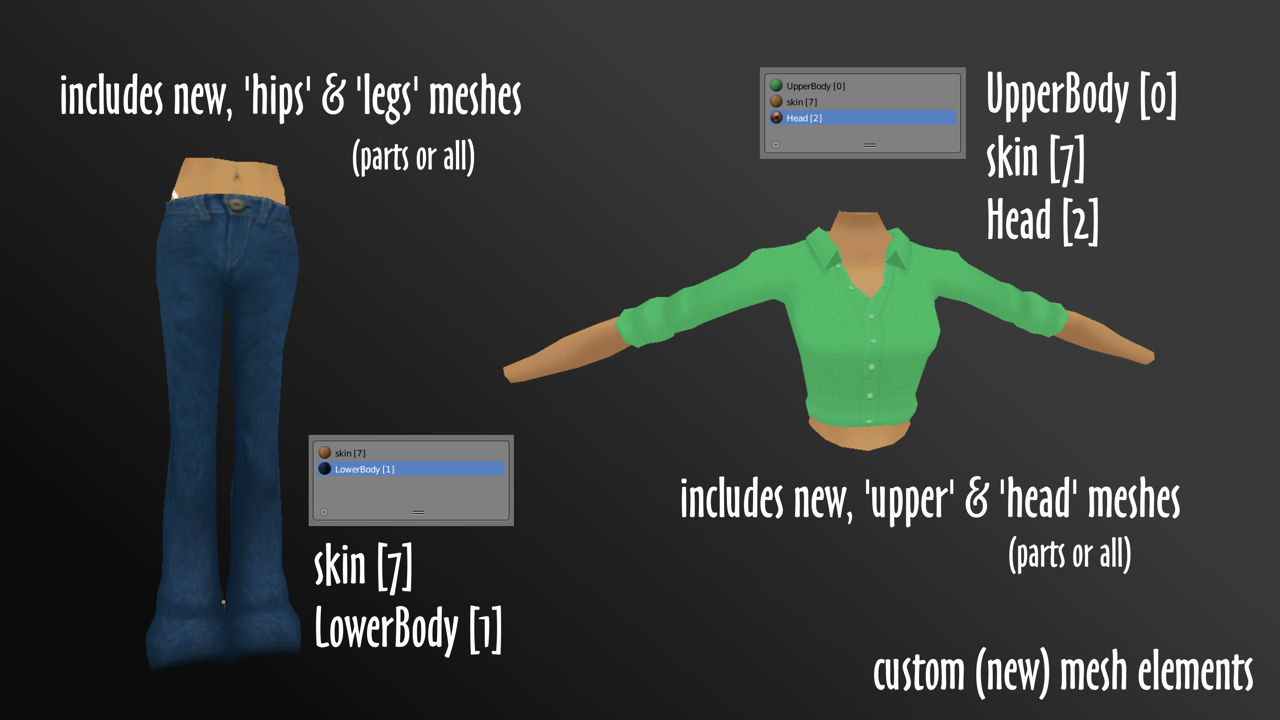
Skin [7]

    Upperbody - female.NakedTop

    Hips - female.NakePelvis

    Right hand - female01.anime01.RightHand

    Right leg - female.RightLeg

    Right foot - female.RightFoot

    Left hand - female01.anime01.leftHand

    Left leg - female.LeftLeg

    Left foot - female.LeftFoot
Or a single mesh can have multiple material assignments like so;
Head - female04.Anime01.Head

    Head [2]

    Eyes [3]

    Eyelashes [5]

    Eyebrows [8]
There are also a number of other avatar relates ID’s which include;
Upperbody [0] - female01.anime01.Torso055

Lowerbody [1] - female01.anime01.Pelvis04

Shoes [6] - female01.anime01.RightFoot03 and female01.anime01.LeftFoot03

Gloves [9]

Hat [10]
This latter collection of material ID’s don’t normally appear on the default avatar because they’re more often associated with a different set of products that, using ‘body parts’, still need a related ID to allow for example low cut tops or short-shorts that expose the underlying skin of the avatar to varying degrees as part of the product .
Avatar Materials in Blender
In Blender, IMVU’s material names need to be duplicated to the extend that body parts (meshes) must be assigned the same material names or labels in full, in Blender the head mesh for example would be Head [2], the eyes sub-mesh Eyes [3] just as they are in IMVU. This holds true for all avatar meshes and material names/assignments.
Additional Avatar Materials
Making custom content in Blender that’s to be used by, or replace, some part of the avatar means making sure the new parts are set up for and assigned the right materials per mesh section;
Hair

    Hair [4]

    Head [2] (optional - generally not used)

Head

    Head [2]

    Eyes [3]

    Eyelashes [5]

    Eyebrows [8]

    Hat [10]

Torso

    Upperbody [0]

    Skin [7]

Hips

    Lowerbody [1]

    Skin [7]

    Hand R/L

    Gloves [6]

    Skin [7]

    Leg R/L

    Skin [7]

Foot R/L

    Shoes [6]

    Skin [7]
This then ensures that, for example making a head that replaces the default whilst using same default texture works the way it should, the head appears and the skin changes based on the Users product assignments.