What is Morph Animation?
IMVU supports two kinds of mesh animation systems: skeletal animation, where the mesh or meshes are controlled by one or more bones, and morph animation where a mesh is blended to match one or more altered copies of the of the original mesh.
Like skeletal animation it is important to have your mesh finalized! This means all of your edits to the geometry, vertex colors, UV mapping, materials, etc. are finished and ready to export.
Now for some details
There are two key components to morph animations:
- The Parent mesh, which is your mesh in its original state
- The Morph Target mesh(es), which are copies of the parent mesh which have been altered to match a desired look. Think of these as “key frames” like in traditional animation.
Morph target animation is stored as a series of vertex positions. In each keyframe of the animation, the vertices are moved to a different position.
There are advantages to using morph target animation over skeletal animation. The artist has more control over the movements because he or she can define the individual positions of the vertices within a keyframe, rather than being constrained by skeletons. This can be useful for animating cloth, skin, and facial expressions because it can be difficult to conform those things to the bones that are required for skeletal animation.”
This is definitely the case in IMVU. It is nearly impossible to get a believable squash and stretch in a mesh using skeletal animation. I say “nearly” because, sure, it *can* be done but you’d have to be insane to want to do it that way. Morphs make your squash and stretch achievable fairly easily.
A final note about the importance of finalizing your Parent mesh before creating your Morph Targets. Meshes created for IMVU are a collection of vertices and each vertex in a mesh is assigned a number. These vertex numbers must remain consistent between the Parent mesh and all Morph Targets. If you edit your Parent mesh by adding or removing vertices after you have made your Morph Targets, the vertex number sequence in the Parent mesh will no longer match vertex number sequence in the Morph Targets. You should also NEVER add or remove vertices from your Morph Targets.
Morph Animation Setup
Morph Target naming
Morph targets in IMVU use a naming convention that dictates what type of morph they are. This naming convention must be used or your morphs will not play back in IMVU. An example of a properly named morph target is leftBlink.Clamped where the .Clamped suffix is the morph type and leftBlink is the prefix . The prefix of the name can be anything you like. Here is a breakdown of what the four morph types are and what they mean:
3ds Max
In 3ds Max there are just a few required steps:
- Add a Morpher modifier to your finalized Parent mesh.
- Parent (link) the Morph Targets to your Parent mesh. This is to keep the Morph Targets aligned with the parent mesh if your morph mesh is going to be attached to a skeleton such as for avatar Clothing or Attachment products. Yes! You can combine skeleton and morph animations!
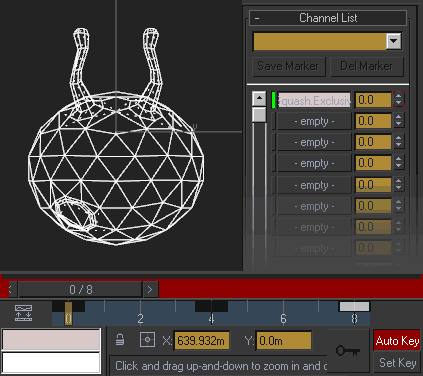
- Assign Morph Targets into the Channel List of the Morpher modifier in your Parent mesh. This can be done in two ways:
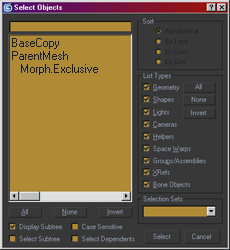
- Right click over an empty channel and choose ‘Pick from Scene’. Then click on the Morph Target you want to load. Only objects that have the exact same vertex count may be added to this list.
- Click ‘Load Multiple Targets’. This will bring up a dialog box that lists all meshes in the scene with the same vertex count as your Parent Mesh. Select the Targets in the list (or click ‘All’ if you want them all) and then hit OK.

- Animate your morphs by changing percentage amount of the morph target channel in the Morpher modifier in your Parent mesh and setting a keyframe for the value. It is easiest to do this with ‘Auto Key’ turned on.
- If you are using the IMVU Studio Toolkit (highly recommended) make sure to place the Parent mesh in the ‘EXPORT’ layer for the product you are making, e.g.: ‘CLOTHING_EXPORT’
Blender
In Blender there are also just a few steps:
- Select your Morph Target mesh and then Shift-Select your Parent mesh then select ‘Object Data Properties’
- In the ‘Shape Keys‘ section click the ‘+’ button to add a ‘Basis’ shape key then click the down arrow below the ‘+’ and ‘-‘ buttons and select ‘Join as Shapes‘. This will create a new shape key entry from the Morph Target.

- Animate your morphs by changing percentage amount of the morph target Shape Key.
- One final step to get the morph animation to export is to create a new ‘Action‘ and add at least two keys.
- We suggest animating a property that is not supported in IMVU, such as object scale, so that you don’t get unpredictable results.

- We suggest animating a property that is not supported in IMVU, such as object scale, so that you don’t get unpredictable results.
- If you are using the IMVU Studio Toolkit (highly recommended) make sure to place the Parent mesh in the ‘EXPORT’ layer for the product you are making, e.g.: ‘FURNITURE_EXPORT’
