![]()
This file is so easy to manipulate it makes creating beautiful animations a snap. Each of the controllers that make up this avatar rig have their own little tricks so we’ll cover them each in detail.
Also, the Rigged Avatar file does contain facial morphs now. So, you can use the Rigged Avatar file to create both skeletal and morph animations. The controllers and custom attributes described in this tutorial increase the efficiency of creating SKELETAL animations (ie – animations that make the body move).
Inverse Kinematics
One of the best features about this rig is that all of the inverse kinematics have been worked out in advance. This means that when you move the foot controller around, the rest of the leg follows…and bends in much the same way a human leg would bend. This is true for the arms, spine and neck as well.
When you first open the file, you will notice that only the controllers and mesh are visible. The bones in the avatar skeleton have been hidden on purpose so that it is easier to see what the controllers are doing to the avatar. The controllers essentially tell the avatar bones how to behave so you only need to see the controllers in this file to make a great animation. If you want to see the avatar skeleton bones, just choose to unhide all.
The controllers themselves can be moved and rotated over time just like any other bone in MAX. This means that if you want to build an animation, you simply move the controllers over time.
Global Controller
The global controller allows you to position the entire animation rig within the scene. This is helpful for things like making a specific pose for a piece of furniture or a scene.
99.9999999999999% of the time, however, you will not need to change the position or orientation of the global controller.
Foot controllers
There are two foot controllers – one for each foot. haha. These can be moved and rotated just like any bone in MAX. Think of the foot controllers as the source of gravity for the feet. If the body is close enough to the foot controllers, the feet will look like they are on solid ground.
Foot Controllers 2
However, if the Pelvis bone is lifted off the ground, the feet will raise off the ground also but, as you can see, they will point towards those foot controllers.
In this manner, it is pretty easy to create a floating effect. Just raise the pelvis off the ground!
Foot Controllers Custom Attributes
With any controller selected, you can click into the ‘Modify’ tab on the right and gain access to the ‘Custom Attributes’ on the bottom of the tab. Some controllers do not have custom attributes but, for those that do, you will always find them here.
![]()
Foot Controllers Custom Attributes
Also, by adjusting the Roll slider, you can raise the foot off of the controller either by pivoting on the heel or pivoting on the ball of the foot. This is handy for toe tapping and heel stomping, respectively.
Knees
The Knee controllers effect the lateral movement of the knees. Need to squeeze that horse in the saddle a little more? Just move those knee controllers in a bit.
While lateral movement of the knees is great and all, sometimes, it results in some wacky ankle rotation. This is because the foot bones want to move when you move the knee controller but they are locked to the foot controller.
The fix for this ankle rotation is the attribute called rollFoot. Moving the rollFoot slider effects the yaw of the foot.
![]() Pelvis
Pelvis
The Pelvis is the only controller that is actually a bone in the avatar skeleton. It influences all of the other upper body controllers. ie – when you move the Pelvis, then the spine, shoulders, arms and head move too.
As discussed in the Foot controller section, the Pelvis moves independant of the foot controllers. This is very handy for when you have your feet in the perfect position but you just want to lower the body a little bit.
CTRL_HIPS
This controller effects the hip bones of the avatar. It can swivel the hips independat of the Pelvis. This means it can swivel the hips without affecting the upper body.
This controller was also built in a handy arrow shape. So, you can see exactly which direction your pelvic area is pointing.
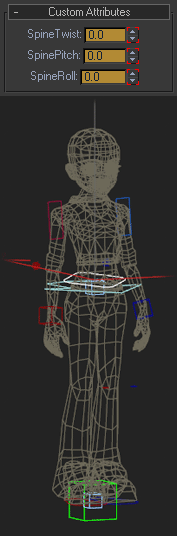 The Spine Controllers
CTRL_SPINE01 is the base contoller for the avatar’s spine. All of the adjustable spinal movements have been added to thecustom attributes of this controller. These custom attributes allow you to affect the Twist, Pitch and Roll of the spine independently.
IF you find that you can not get the exact spinal position you need, you can ‘unhide all’ and get access to the other spine controllers (CTRL_SPINE02, CTRL_SPINE03, CTRL_SPINE04) These other spine controllers are different from the base controller in that they only effect their respective spine bones.
The other spine controllers
CTRL_SPINE02, CTRL_SPINE03, CTRL_SPINE04 effect spine bones 2, 3 and 4.
![]() Shoulders
Shoulders
CTRL_shoulderL and CTRL_shoulderR move the shoulder in the socket (like a clavicle/scapula movement).
Attribute shoulderTwist rotates the shoulder bone in place without effecting the bicep or clavicle rotation. This is very handy when doing raised arm animations as it makes the mesh around the shoulders behave more like a real shoulder.
Wrists
CTRL_LWrist and CTRL_RWrist control the overall position of the arms as well as the rotation of the wrists.
Attributes include both cupHand and WristTwist. cupHand is useful for opening up the hand to show emergency or to fold the hand in for making a tight fist. cupHand’s default is set to 3.0.
WristTwist is really useful as you will undoubtedly warp the forearm mesh when moving the wrist controllers around. Just slide WristTwist up or down to rotate the forearm bone and get the forearm mesh to retain its mass.
We have found that when the forearm does not collapse, the believability of the animation is retained and the customer has a positive experience.
![]() Elbows
Elbows
S_LElbow and S_ElbowR control the direction of the elbows. Its fun to just move these around and see how it influences your animation.
D_Head
D_Head’s only function is its custom attribute. By sliding localToWorld up, D_Head has more and more control over the head bone of the avatar. This allows you to move the body around in all kinds of crazy ways but keep the head looking forward. Kind of like the movements of an expert skiier.
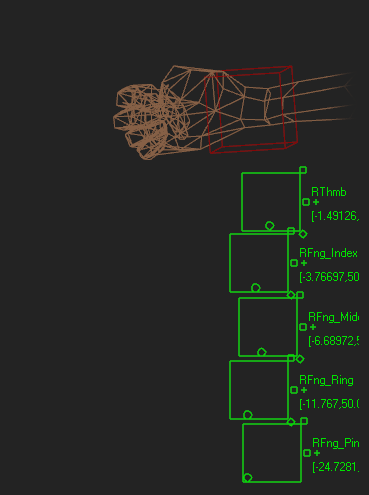 Joystick Controllers
Remember to turn on the ‘Select and Manipulate’ tool in order to activate all joystick controls. The joystick controls have no custom attributes but are very powerful tools.
The groups of five controllers found on the bottom left and bottom right of the screen control the fingers of the avatar. The amount of control is impressive as is the emotional impact to your animations.
NeckTwist and NeckBend
These joystick controls effect the rotation of the head bone. NeckTwist allows the neck to influence the direction of the head.
NeckBend effects the pivot of the head in every direction. These two controllers are great for having an avatar look around or shake their head no or nod yes or….anything.