Let’s face it, morph animation is not easy. However, they add a wonderful sense of life to your products and aide in product sales.
Teched and Ready
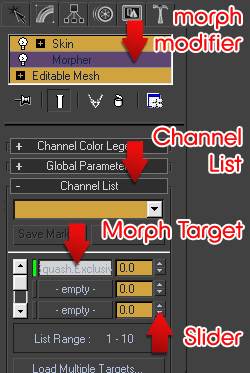
In order to create a morph animation, you need to start with a file that is properly set to allow you to animate it. This means that the parent mesh has a morpher modifier applied to it and that morph target channels live within that modifier. To see if your file is properly teched for morph animation, click on the mesh and look for the morpher modifier underneath the weighting modifier. If you don’t see it – the file is not prepared for morph animation.
If you do see the morpher modifier as well as morph targets in the Channel List, then you’re ready to go.
Basic Animation
I always make a quick animation to verify that the mesh and morphs animate nicely together. If they do, then I can go ahead with my animation. If they don’t, then there is no doubt a glitch in MAX. So, I restart and try again. This usually resolves the issue.
To make a quick morph animation, follow these steps:
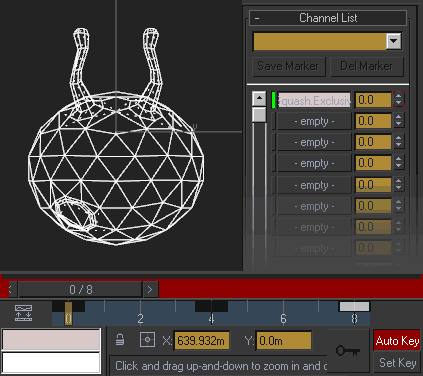
Auto Key is IMPORTANT
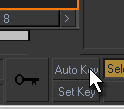
Please remember to only make changes to your morph channel percentages while in Animation Mode. If you are not in Auto Key mode and you make a change, that change will not be recorded at a point along the time slider. Rather, your change will be applied to the entire animation.
While this can be useful for making Vogues (referred to below), it is easy to forget whether you are in Animation Mode or not. Don’t worry, though. You’ll learn either way. hahahaha.
Action Types
There are three types of avatar Actions:
Knowing how an animation is going to be used in IMVU *before* you build it helps you build the right kind of animation and helps reduce iteration time.
Morph Naming Convention
The morph targets have a naming convention that dictates what kind of morph they are. This naming convention must be used or your morphs will not play back in IMVU. An example of a properly named morph target is leftBlink.Clamped where the .Clamped suffix is the morph type. The prefix of the name can be anything you like. Here is a breakdown of what the four morph types are and what they mean:
Blend In / Blend Out
Although this section focuses on a feature found in the Previewer, it is important to keep in mind while building your animation.
As discussed below, the frame controls in the Previewer allow you to loop your animations. However, they also allow you to blend whatever animation is playing into your animation. This is very handy for morph animations as a non-blended jump from one morph animation to another can leave unpleasant artifacts for a few frames.
Vogue Animations
Vogues are single frame or low frame animations that have very small file sizes. These animations rely on the blend in/out functionality of the Previewer to work properly in IMVU. Now, by no means are Vogues required to be simple expressions – but, regardless of the expression you are making, it is still just an expression. Think of it as a snapshot of an avatar statue’s face….or an avatar stuck in an icy, frozen tundra surrounded by once fresh dreams that are only now beginning to thaw.
By exporting this simple morph animation, you pretty much guarantee that your animation file size will be quite small. Small file size is really, really good. You should want your file sizes to be as small as possible. Once you’ve gotten your animation exported, simply play with the blend in/out and loop duration functionalities in the Previewer to get your Action product just right.
You can loop a 2 frame animation for 30 frames and (at 30 frames per second) end up with a 2 second animation of your avatar’s facial animation. Very cool and very cheap to download. Cheap download = wonderful customer experience.
The only drawback to using Vogues is the aesthetically unappealing look of linear translation. However, this is more of a skeletal animation issue. Using Vogues for Morph animations is always OK.
File Size Budget
The win for doing vogues is keeping your overall animation size down. Please keep in mind that the more morph targets you animate and longer the duration of your animation, the larger your Action product is going to be.
The larger your file, the longer it is going to take to load during a conversation. Please be as discerning as you can about where you spend your animation budget. We want you to be successful and it will be hard to be successful if your products take too long to download.
Catalog Snapshot
Export
Once you have built your animation, you must export it as an .XPF file. .XPF is a Cal3D file format that is installed in MAX when you install the Previewer. .XPF files are what the IMVU Previewer recognizes as morph animation files.
In order to export your Morph Animation file, select the Parent head mesh. In the case of the Female04_Anime01_IdleStandingPoseMASTER.max, the head mesh is called ‘female01.Anime01.Head’.
In the case of Male03_Anime01_IdleStandingPoseMASTER.max, the head mesh is called ‘AnimeHead.Male01’. With the head mesh selected, choose Export in the file menu. Scroll to the .xpf file format, name your file (remembering to manually type in the .xpf at the end of the name) and click Save.
In the Cal3D window that appears, verify the actual time values of the animation. Although they are almost always exactly the numbers they need to be, you should still check that the start and end frame numbers match what you intended to export, and make sure the frames per second is set to 30. Click finish.
Animation file: EXPORTED!
What’s Next?