The Config TAB is a collection of tools that are not specific to any one function in the IMVU Client. In this area you can import your Skeleton .xsf file, change the Ambient Light and Fog Density, and in the case of Avatar Clothing & Accessories, assign an Attachment Node.
The availability of features in the Config tab depends on what type of product you’re editing. Read on to learn what panels are available with what products.
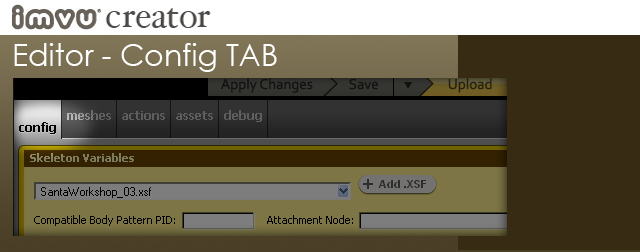
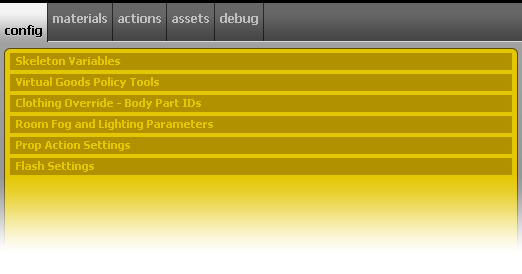
Skeleton Variables

This panel is available for Avatars, Furniture, Accessories, Rooms and Clothing.
Add .XSF: This is where you add the skeleton .XSF file. If you’re making a new Room, Furniture or Accessory product from scratch, you will need to add a new .XSF file. To learn more about Cal3D asset types, please read the Intro to Exporting tutorial and the Export Skeleton .XSF tutorial.
Compatible Body Pattern ID: This field is not used for Rooms. For clothing and Accessories, you may want to choose which avatar product number you wish your new product to work with. In this case, you would type 80 for the female avatar or 191 for the male avatar. In the case of Accessories, you can type 80, 191 so that it works for both.
Attachment Node: This filed is not used for Rooms. This is for Accessories or Furniture. In the case of Accessories, you must choose a bone name from the avatar skeleton. In the case of Furniture, you must choose one of three base furniture node names:
Virtual Goods Policy Tools

This panel is for Avatar Clothing.
The Virtual Goods Policy (or “VGP”)is what IMVU uses to define what is appropriate for sale and use in IMVU. There is a TON of useful information in the VGP so please familiarize yourself with it. The VGP requires that a bare minimum of skin be covered when making clothing that is intended for use by the General Audience.
The VGP provides a skin texture that has a white and red bikini painted onto it. This is the default skin the avatar is loaded with whenever you enter the Editor. When it comes to this skin texture, there is a simple rule to follow that will help you avoid having your product re-rated by IMVU Customer Service: RED pixels = NOT General Audience. ie – if you can see the red pixels of the Minimum Coverage Guideline Skin, then you should not choose to rate your product as General Audience when you upload it.
Apply Minimum Coverage Guideline Skin: While the default avatar skin the Editor loads is the MCG skin, you have access to your inventory in the Editor and so may find yourself in a situation where you’d like to get the MCG skin back on. Just click this button and your avatar skin will change to the MCG skin.
Apply Minimum Coverage Guideline Pose: Clicking this button will put your avatar into a looping animation that allows you to see whether red pixels are visible on your new clothing product. To get the avatar out of this looping pose, click the Apply Changes button.
Clothing Override – Body Part IDs

This panel is available to Avatars, Clothing and Furniture.
Clicking the check box below one of these numbers and then Applying Changes makes your product override that Body Part ID. You can uncheck the number to revert the change. If a parent product specifies a Body Part ID, its check boxed is grayed out and you can not uncheck it.
To learn more about Body Parts, please read the Avatar Body Parts tutorial.
Fog & Lighting Parameters 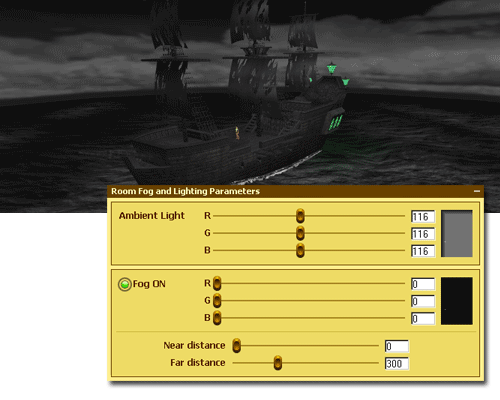
This panel is available for Rooms
Ambient Light: The skeleton .XSF file defines the initial ambient light color for a room. You can change this color by moving the RGB sliders and clicking the Apply Changes button.
Fog can also be added to a Room to help add mood and mystery. Be sure to play around with these settings. Its a lot of fun. Remember: If fog or lighting isn’t affecting a portion of the room, review the Materials for that room to make sure that they don’t have fog override or self illuminated checked.
If you don’t want Fog in your room, just click the green button next to the words Fog ON. From here, you can toggle fog on and off to your heart’s content.
Prop Action Settings

This panel is available for Furniture and Rooms
A Prop Action is a type of Action that is triggered when an avatar joins a seat node in a Furniture or Room product. Sometimes one product can contain multiple Prop Actions and, sometimes, the avatar and Furniture/Room Actions can get out of sync. To make sure this doesn’t happen, check both of these boxes.
If you would like to learn more, please read the Actions Tab tutorial.
Flash Settings

This panel is available for Furniture.
Flash SWF: Click the Add .SWF if you’d like to include Flash functionality with your product.
Trigger type: This field allows you to choose from two options. Choosing None means that your Flash file will always be visible. Choosing Seat means that the Flash file will only be available when an avatar joins a seat node built into this Furniture product.
Flash Parameters: Parameters can be passed from the Config Panel of Product Edit Mode to your flash script.
Remove Flash Widget: Click this button to make your product not show flash. For those of you who are deriving from a product that has Flash, that parent product’s flash will show up in your derived product unless you click this button.
Empty?
This panel is available for Furniture.
Avatar Skin, Eye and Eyebrow products have no Config Tab functionality available so don’t be frightened if you see a screen like the above.