Here are some basic rules to creating a quality 3D product for use in IMVU. Some of these may not be as obvious as others, but all are worth keeping in mind as you design your unique products for the IMVU Catalog. In the end we hope these tips will not only make your products look and run better, but help them sell more successfully as well.
Be Frugal with Your Polys
One of the realities of building 3D products for use in a virtual world is that the more polygons visible to the camera, the more work your computer needs to do to render that world for your customers. If you create a new hairstyle that is made up of 20,000 polygons, it may look realistic, but it is bound to slow down any party just as soon as you appear in their Public Room. The trick is to find ways to do more with less, which is a challenge facing many game designers today.
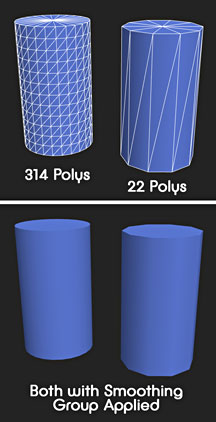
When you are building your 3D Mesh, the poly count can add up very quickly if you are not forever vigilant. Two places that are especially susceptible to lots of polys are curved surfaces, like those found in cylinders and spheres. 3D applications offer lots of primitive shapes, and these are sometimes built with many more polygons than you actually need. Your secret weapon for making your low poly models look smooth are Smoothing Groups.
Create Quality Textures
Creating textures for your 3D products can be the most time consuming of all the steps in the building of your 3D product. Since so much depends on the quality of your textures, it is good to spend a little extra time to get it right.
There are several pitfalls to avoid while texturing your products, so here are some hints to help you make sure that your products look their very best.
Avoid Using Photographic Textures
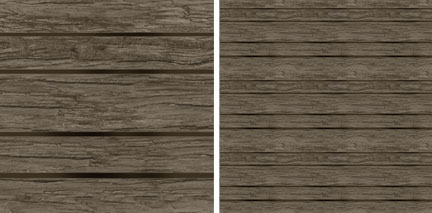
Trust me, I know how tempting it is to do a Google search for some cool texture and slap it onto my 3D Mesh, but I have learned over time that the quick solution is seldom the best. Finding a photograph of a material you wish to add to your model can come with artifacts that will make your product look amateurish.
Photos tend to have higher contrast and shadows that can contradict the illusion you are trying to achieve. In this example you can see that the stones appear to be casting shadows in several different directions.
Minimize Contrast
This doesn’t mean that I don’t use photographs periodically. If I do find something I like, I will usually do a lot of work on it to reduce or illuminate harsh shadows, and strong contrasts. Creating convincing 3D models depends on a balance between suggested dimensionality and the actual 3D details already built into your model.
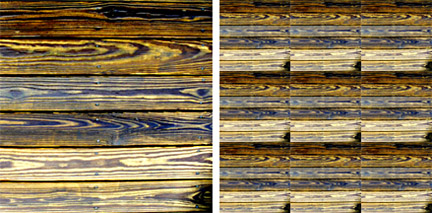
Tiling Textures
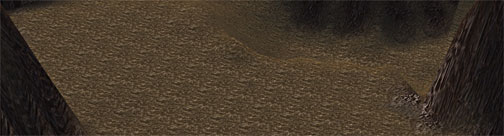
Creating tiled textures is an art form unto itself, and a poorly tiled texture can really draw attention to itself. This is another danger of using unedited photographs for your textures. In the above examples you can see how obvious the tiling appears in the unedited photograph reference (top), compared to the texture created completely in Photoshop (below).
This noticeable tiling effect is especially obvious when used to represent things like water and terrain. No matter how careful you are there is always the danger that with enough distance you will start to see a pattern appear, like a floral print pattern on fabric, so be careful as you work to avoid too many contrasting elements on each texture tile, or they will become all the more obvious when your texture is repeated.
Keep Textures Small
If you want more detail in your textures you just make them really big… right?
Actually, that is not necessarily true. Although applying large textures to your models will add some more detail, like adding a ton of polygons it can greatly slow down how your product is rendered in the IMVU Client window. To remedy this IMVU force compresses large files as part of the product Submissions process.
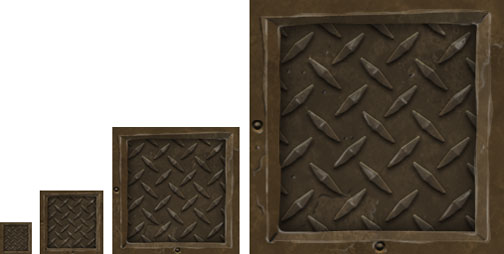
This means that although your product might look great in the Create Mode Editor, you have no control over the quality of the compression of your oversize textures once you Submit it. We recommend you avoid making textures any larger than 512 x 512 pixels, and think selectively about how you are going to use your textures. It would be silly to use a 512 x 512 texture on a bracelet, but it might be perfectly appropriate if it is going to represent a giant door in your castle room.
Also, keep in mind the distance the 3D camera will be from your textured object. If you are creating a chandelier to hang from the ceiling, the camera will always be far away enough that a very highly detailed texture will not be necessary.

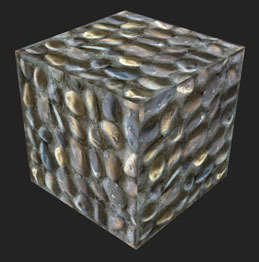
Get More Out of Fewer Textures
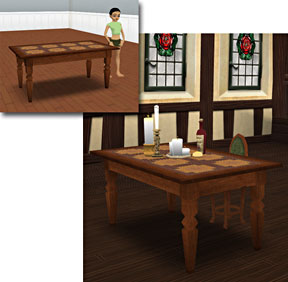
The fewer textures you use will also greatly speed up how your product is rendered in IMVU. When possible try to create textures that have multiple uses. In the above example I have used elements from the same texture all over these models. By ganging up reuseable bits within one texture you can get away with more complexity without slowing down the process to render it. 
Advertising Your Wares
Taking Good Screenshots
The Catalog is filled with product shots taken inside the empty Create Mode Editor default room. If you really wish to sell your 3D creations, try to find a good environment to photograph them in. Look at the way catalogs for real world products present their wares and see if you can us some of these same techniques in the virtual world.
Remember that you aren’t just selling an object or outfit, you are selling the Story that goes along with it. Where would this look best? What does this item say about the purchaser?
Model Your Outfits
Your Avatar outfits and accessories will always look better when placed in a dynamic setting that compliments your designs in both color and mood. Finding complementary Poses and exciting backdrops, either 2D graphics or 3D environments, will greatly enhance your products. Searching through real world fashion magazines can also inspire you with their use of color and environment to set off the products they are selling.

Avoid Jagged Edges
Depending on your video card settings or IMVU rendering options, you may be seeing Aliased (or jagged) edges on your screenshots of avatars and objects in IMVU. To create smooth edges, and greatly enhance the appearance of your screenshots, be sure that your 3D card is set to Anti-Alias, and your IMVU settings to Accelerated Graphics, for OpenGL or Direct3D.
Jagged Aliased edges are an artifact of older computer games and can make your work look dated. Whenever possible take advantage of what your computer can do to make your products look their best.
These are just a few of the many ways you can enhance the quality of your product designs and how you promote them. Each of these topics could warrant their own tutorials, and many already have.
